If one needs a new command to be run in the WorkItem Command Line, what needs to be done? Lets explore this with the background from the post The WorkItem Command Line Explained.
As always, keep in mind, this is not production code, under development and not designed to win a beauty pageant. Testing has not been very thorough, so using this code is at your own risk.
Latest Version
See A RTC WorkItem Command Line Version 3.0 for the latest version.
The New Command
The new command is supposed to help with migrating Multi Select Enumeration attributes available until RTC 3.x to Enumeration List attributes available in RTC 4.x and later.
As explained in Workaround: Migrate from Rational Team Concert 3.X string attribute used as multi-select lists to RTC 4.X enumeration lists, in RTC 3.x these multi select lists where implemented as a string attribute, that stored the enumeration literal ID’s separated by comma. A special presentation handled input and output. Downside of this approach was, that it was hard to query these attributes and create dashboards and reports. The new way is a special list type for each enumeration.
The workaround explains how to use CSV export and import to migrate the data. This solution uses the API to do so. What this solution does not attempt so far is having a mapping that changes the data.
Related posts
License
The post contains published code, so our lawyers reminded me to state that the code in this post is derived from examples from Jazz.net as well as the RTC SDK. The usage of code from that example source code is governed by this license. Therefore this code is governed by this license. I found a section relevant to source code at the and of the license.
Please also remember, as stated in the disclaimer, that this code comes with the usual lack of promise or guarantee.
On the other hand, you have the code and are able to add your own code to it. It would be nice to know what you did and how, if you do so.
Just Starting With Extending RTC?
If you just get started with extending Rational Team Concert, or create API based automation, start with the post Learning To Fly: Getting Started with the RTC Java API’s and follow the linked resources.
You should be able to use the code attached to this post in the development environment you set up in the Rational Team Concert Extensions Workshop and get your own extensions or automation working there as well.
Download
Download the latest version that includes the code from this post.
Requirements
The command is supposed to work on work items of a specific type in a project area.
- For a source attribute (of type string), read the value, split it into enumeration literal ID’s
- Find the enumeration literals and build a list from them
- Store the list of enumeration literals in a target attribute
- Perform this for one work item of the type (e.g. for testing)
- Perform this for all work items of the type
- Be able to tolerate errors and run nonetheless
The image below shows the source attribute as shown in RTC 4.x with a regular string presentation and the new EnumerationList attribute. The values from the source attribute have been migrated over to the target attribute.

- Source and target attribute
Creating the new Command
The first step is to create a new command class. As explained in The WorkItem Command Line Explained there are some abstract classes available to be used. The AbstractWorkItemModificationCommand seems to be it, but looking closer, it is very specialized in creating or modifying a work item with a list of provided attributes and values in a parameter list. So the choice here is the AbstractTeamRepositoryCommand instead.
So the first step is to create the class MigrateWorkItemAttributeCommand in the package com.ibm.js.team.workitem.commandline. Create a public constructor as required from the abstract class and override the abstract methods. In the method getCommandName() return the name of the command. Also override the method setRequiredParameters() but make sure to add a call to super() to get the parameters it requires added. The initial step would look similar to this:
public class MigrateWorkItemAttributeCommand extends
		AbstractTeamRepositoryCommand {

	public MigrateWorkItemAttributeCommand(ParameterManager parametermanager) {
		super(parametermanager);
	}

	/***
	 * Add required parameters
	 *
	 * (non-Javadoc)
	 *
	 * @see com.ibm.js.team.workitem.commandline.framework.AbstractTeamRepositoryCommand#setRequiredParameters()
	 */
	@Override
	public void setRequiredParameters() {
		super.setRequiredParameters();
	}

	/***
	 * Return the command
	 *
	 * (non-Javadoc)
	 *
	 * @see com.ibm.js.team.workitem.commandline.framework.IWorkItemCommand#getCommandName()
	 */
	@Override
	public String getCommandName() {
		return "migrateattribute";
	}

	/***
	 * Perform the command
	 *
	 * (non-Javadoc)
	 *
	 * @see com.ibm.js.team.workitem.commandline.framework.AbstractCommand#process()
	 */
	@Override
	public OperationResult process() throws TeamRepositoryException {
		return getResult();
	}
}
In addition to the repository URL, the user name and the password, the command needs to know the project area, and the the work item type. It also needs the parameter for the source attribute ID and the target attribute ID. Some flags like ignoreErrors might come in handy as well.
Most of this can be harvested from existing commands like the CreateWorkItemCommand. A few new need to be added. Introducing some constants is a good idea for later. The code added to setRequiredParameters() would finally look like below. The call to super() makes sure the basic parameters for the login process are required as well.
public static final String COMMAND_MIGRATE_ENUMERATION_LIST_ATTRIBUTE = "migrateattribute";
public static final String PARAMETER_SOURCE_ATTRIBUTE_ID = "sourceAttributeID";
public static final String PARAMETER_SOURCE_ATTRIBUTE_ID_EXAMPLE = "com.acme.custom.enum.multiselect";
public static final String PARAMETER_TARGET_ATTRIBUTE_ID = "targetAttributeID";
public static final String PARAMETER_TARGET_ATTRIBUTE_ID_EXAMPLE = "com.acme.custom.enum.list";


/***
 * Add required parameters
 *
 * (non-Javadoc)
 *
 * @see com.ibm.js.team.workitem.commandline.framework.AbstractTeamRepositoryCommand#setRequiredParameters()
 */
@Override
public void setRequiredParameters() {
	super.setRequiredParameters();
	// Copied from CreateWorkItemCommand
	getParameterManager()
			.syntaxAddRequiredParameter(
					IWorkItemCommandLineConstants.PARAMETER_PROJECT_AREA_NAME_PROPERTY,
					IWorkItemCommandLineConstants.PARAMETER_PROJECT_AREA_NAME_PROPERTY_EXAMPLE);
	getParameterManager()
			.syntaxAddRequiredParameter(
					IWorkItemCommandLineConstants.PARAMETER_WORKITEM_TYPE_PROPERTY,
					IWorkItemCommandLineConstants.PARAMETER_WORKITEM_TYPE_PROPERTY_EXAMPLE);
	getParameterManager().syntaxAddSwitch(
			IWorkItemCommandLineConstants.SWITCH_IGNOREERRORS);
	getParameterManager().syntaxAddRequiredParameter(
			PARAMETER_SOURCE_ATTRIBUTE_ID,
			PARAMETER_SOURCE_ATTRIBUTE_ID_EXAMPLE);
	getParameterManager().syntaxAddRequiredParameter(
			PARAMETER_TARGET_ATTRIBUTE_ID,
			PARAMETER_TARGET_ATTRIBUTE_ID_EXAMPLE);
}
The method getCommandName() would look like this now, with the string extracted into a constant:
	/***
	 * Return the command
	 *
	 * (non-Javadoc)
	 *
	 * @see com.ibm.js.team.workitem.commandline.framework.IWorkItemCommand#getCommandName()
	 */
	@Override
	public String getCommandName() {
		return COMMAND_MIGRATE_ENUMERATION_LIST_ATTRIBUTE;
	}
Add The New Command to the Main Class
The new command needs to be added to the WorkItem Command Line. In the class WorkitemCommandLine add it to the method method addSupportedCommands() like shown below.
/**
 * Add the supported commands. If introducing a new command, add it here.
 *
 * @param parameterManager
 */
private void addSupportedCommands(ParameterManager parameterManager) {
	addSupportedCommand(new PrintTypeAttributesCommand(
			new ParameterManager(parameterManager.getArguments())));
	addSupportedCommand(new CreateWorkItemCommand(new ParameterManager(
			parameterManager.getArguments())));
	addSupportedCommand(new UpdateWorkItemCommand(new ParameterManager(
			parameterManager.getArguments())));
	addSupportedCommand(new MigrateWorkItemAttributeCommand(new ParameterManager(
			parameterManager.getArguments())));
}
Now it can be used like shown below. It is also possible to start debugging it using Launches.
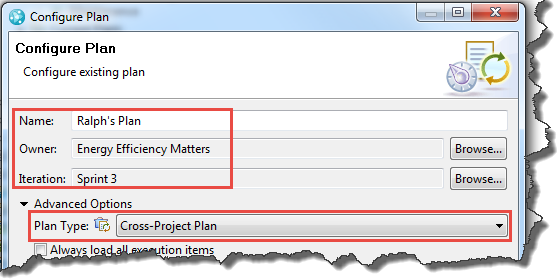
wcl -migrateattribute /ignoreErrors repository="https://clm.example.com:9443/ccm" user=ralph password=ralph projectArea="JKE Banking (Change Management)" workItemType=task sourceAttributeID=custom.medium.string targetAttributeID=custom.enumeration.list
or this
wcl -migrateattribute /ignoreErrors repository="https://clm.example.com:9443/ccm" user=ralph password=ralph projectArea="JKE Banking (Change Management)" workItemType=task id=275 sourceAttributeID=custom.medium.string targetAttributeID=custom.enumeration.list
Implementing the Command Logic
Now the method process() needs to be implemented. It orchestrates the work to be done. This obviously took some iterations. Here is the final result.
/***
 * Perform the command
 *
 * (non-Javadoc)
 *
 * @see com.ibm.js.team.workitem.commandline.framework.AbstractCommand#process()
 */
@Override
public OperationResult process() throws TeamRepositoryException {
	// From CreateWorkItemCommand
	// Get the parameters such as project area name and Attribute Type and
	// run the operation
	String projectAreaName = getParameterManager()
			.consumeParameter(
					IWorkItemCommandLineConstants.PARAMETER_PROJECT_AREA_NAME_PROPERTY)
			.trim();
	// Find the project area
	IProjectArea projectArea = ProcessAreaUtil.findProjectArea(
			projectAreaName, getProcessClientService(), getMonitor());
	if (projectArea == null) {
		throw new WorkItemCommandLineException("Project Area not found: "
				+ projectAreaName);
	}

	String workItemTypeID = getParameterManager().consumeParameter(
			IWorkItemCommandLineConstants.PARAMETER_WORKITEM_TYPE_PROPERTY)
			.trim();
	// Find the work item type
	IWorkItemType workItemType = WorkItemHelper.findWorkItemType(
			workItemTypeID, projectArea.getProjectArea(),
			getWorkItemCommon(), getMonitor());

	// Get the parameter values - The source attribute
	String sourceAttributeID = getParameterManager().consumeParameter(
			PARAMETER_SOURCE_ATTRIBUTE_ID).trim();
	// check if old attribute ID is string type
	IAttribute sourceIAttribute = getWorkItemCommon().findAttribute(
			projectArea, sourceAttributeID, getMonitor());
	if (sourceIAttribute == null) {
		throw new WorkItemCommandLineException(
				"Source Attribute not found: " + sourceAttributeID);
	}
	if (!AttributeTypes.STRING_TYPES.contains(sourceIAttribute
			.getAttributeType())) {
		throw new WorkItemCommandLineException(
				"Source Attribute is not a String type: "
						+ sourceAttributeID);
	}

	// Get the parameter values - The target attribute
	String targetAttributeID = getParameterManager().consumeParameter(
			PARAMETER_TARGET_ATTRIBUTE_ID).trim();
	// check if new attribute ID is EnumerationList
	IAttribute targetIAttribute = getWorkItemCommon().findAttribute(
			projectArea, targetAttributeID, getMonitor());
	if (targetIAttribute == null) {
		throw new WorkItemCommandLineException(
				"Target Attribute not found: " + targetAttributeID);
	}
	if (!AttributeTypes.isEnumerationListAttributeType(targetIAttribute
			.getAttributeType())) {
		throw new WorkItemCommandLineException(
				"Target Attribute is not an EnumerationList: "
						+ targetAttributeID);
	}
	if (getParameterManager().hasSwitch(
			IWorkItemCommandLineConstants.SWITCH_IGNOREERRORS)) {
		setIgnoreErrors();
	}
	String wiID = getParameterManager().consumeParameter(
			IWorkItemCommandLineConstants.PARAMETER_WORKITEM_ID_PROPERTY);
	if (wiID != null) {
		IWorkItem wi = WorkItemHelper.findWorkItemByID(wiID,
				IWorkItem.SMALL_PROFILE, getWorkItemCommon(), getMonitor());
		if (!wi.getWorkItemType().equals(workItemType.getIdentifier())) {
			throw new WorkItemCommandLineException(
					"Work item type mismatch: "
							+ workItemType.getIdentifier() + " specified "
							+ workItemType.getIdentifier());
		}
		migrateSingleWorkItem(wi, sourceIAttribute, targetIAttribute);
	} else {
		// Update all work items of this type.
		migrateAllWorkItems(projectArea, workItemType, sourceIAttribute,
				targetIAttribute);
	}
	// If we got here, we succeeded
	getResult().setSuccess();
	return getResult();
}
What it basically does is to get the parameters needed for this command and work with them. Keep in mind that the abstract class AbstractTeamRepositoryCommand does the login process already. So what needs to be done is to get the project area, the work item type, the source and the target attribute ID and the flags. Most of the code has been harvested in existing commands as well as in the WorkItemHelper class. The methods migrateSingleWorkItem() and migrateAllWorkItems() will be explained in a bit.
Some new fields and getters/setters where introduced in the process. We also need the separator for the literals in the original string later. The code looks as below:
public static final String SEPARATOR_ENUMERATION_LITERAL_ID_LIST = ",";

private boolean fIgnoreErrors = false;

private void setIgnoreErrors() {
	fIgnoreErrors = true;
}

private boolean isIgnoreErrors() {
	return fIgnoreErrors;
}

public MigrateWorkItemAttributeCommand(ParameterManager parametermanager) {
	super(parametermanager);
}
There was also a need to be able to access the ITeamRepository in the MigrateWorkItemAttributeCommand. I introduced a getter into the AbstractTeamRepositoryCommand class for convenience.
Note, it is always possible to get the ITeamRepository from an RTC object using the getOrigin() method and cast it to the ITeamRepository. However, it makes sense to add this to the framework, too.
Implementing the Work Item Modification
The final implementation steps are to implement the missing methods as well as add a inner class extending WorkItemOperation, to do the change to the work item. The code is shown below.
/**
 * Migrate one specific work item - for testing
 *
 * @param wi
 * @param sourceIAttribute
 * @param targetIAttribute
 * @throws TeamRepositoryException
 */
private void migrateSingleWorkItem(IWorkItem wi,
		IAttribute sourceIAttribute, IAttribute targetIAttribute)
		throws TeamRepositoryException {
	MigrateWorkItem operation = new MigrateWorkItem("Migrate",
			IWorkItem.FULL_PROFILE, sourceIAttribute, targetIAttribute);
	performMigration((IWorkItemHandle) wi.getItemHandle(), operation);
}

/**
 * Migrate all work items of a specific type in a project area
 *
 * @param projectArea
 * @param workItemType
 * @param sourceIAttribute
 * @param targetIAttribute
 * @throws TeamRepositoryException
 */
private void migrateAllWorkItems(IProjectArea projectArea,
		IWorkItemType workItemType, IAttribute sourceIAttribute,
		IAttribute targetIAttribute) throws TeamRepositoryException {
	// Find all work items of this type.
	// Create an Expression to find them
	IQueryableAttribute attribute = QueryableAttributes.getFactory(
			IWorkItem.ITEM_TYPE).findAttribute(projectArea,
			IWorkItem.PROJECT_AREA_PROPERTY, getAuditableCommon(),
			getMonitor());
	IQueryableAttribute type = QueryableAttributes.getFactory(
			IWorkItem.ITEM_TYPE).findAttribute(projectArea,
			IWorkItem.TYPE_PROPERTY, getAuditableCommon(), getMonitor());
	Expression inProjectArea = new AttributeExpression(attribute,
			AttributeOperation.EQUALS, projectArea);
	Expression isType = new AttributeExpression(type,
			AttributeOperation.EQUALS, workItemType.getIdentifier());
	Term typeinProjectArea = new Term(Term.Operator.AND);
	typeinProjectArea.add(inProjectArea);
	typeinProjectArea.add(isType);

	// Run the Expression
	IQueryClient queryClient = getWorkItemClient().getQueryClient();
	IQueryResult results = queryClient.getExpressionResults(
			projectArea, typeinProjectArea);
	// Override the result set limit so that we get more than 1000 items if
	// there are more
	results.setLimit(Integer.MAX_VALUE);
	MigrateWorkItem operation = new MigrateWorkItem("Migrate",
			IWorkItem.FULL_PROFILE, sourceIAttribute, targetIAttribute);
	// Run the operation for each result
	while (results.hasNext(getMonitor())) {
		IResult result = (IResult) results.next(getMonitor());
		performMigration((IWorkItemHandle) result.getItem(), operation);
	}
}

/**
 * Perform the update and
 *
 * @param handle
 * @param operation
 * @throws WorkItemCommandLineException
 */
private void performMigration(IWorkItemHandle handle,
		MigrateWorkItem operation) throws WorkItemCommandLineException {
	String workItemID = "undefined";
	try {
		IWorkItem workItem = getAuditableCommon().resolveAuditable(
				(IWorkItemHandle) handle, IWorkItem.SMALL_PROFILE,
				getMonitor());
		workItemID = getWorkItemIDString(workItem);
		operation.run(handle, getMonitor());
		getResult().appendResultString(
				"Migrated work item " + workItemID + ".");
	} catch (TeamRepositoryException e) {
		throw new WorkItemCommandLineException(
				getResult().getResultString()
						+ "TeamRepositoryException: Work item "
						+ workItemID + " attribute not migrated. "
						+ e.getMessage(), e);
	} catch (WorkItemCommandLineException e) {
		String message = "WorkItemCommandLineException Work item " + workItemID
				+ " attribute not migrated. " + e.getMessage();
		if (!isIgnoreErrors()) {
			throw new WorkItemCommandLineException(getResult().getResultString() + message, e);
		} else {
			getResult().appendResultString(message);
		}
	}
}
The method migrateSingleWorkItem() basically runs the migration operation for a single work item. It creates the inner class MigrateWorkItem with the data it needs and then calls the method performMigration() to perform the migration. The method performMigration() calls the provided method and does all the error handling.
The method migrateAllWorkItems() basically creates an expression to get all work items of the specified type from the project area. The expression is run and performMigration() is performed on one result after the other.
Please note that the line
results.setLimit(Integer.MAX_VALUE);
makes sure that the built in query limit of the Eclipse client is overwritten to allow getting all possible results. To work it has to be exactly at the place it is.
The method performMigration() just performs the call and wraps everything up to be able to process exceptions. The information is provided in the result.
The methods above use some additional methods to get the client library IWorkItemClient to be able to perform the query expression.
/**
 * We need this client libraries to run queries
 *
 * @return
 */
private IWorkItemClient getWorkItemClient() {
	return (IWorkItemClient) getTeamRepository().getClientLibrary(
			IWorkItemClient.class);
}

/**
 * Get the work item ID as string
 *
 * @param workItem
 * @return
 */
private String getWorkItemIDString(IWorkItem workItem) {
	return new Integer(workItem.getId()).toString();
}
The WorkItemOperation Implementation
Finally lets look at the inner class MigrateWorkItem which extends WorkItemOperation. I use this approach in all the work item manipulation client API usage, because it conveniently handles all possible mishaps.
private class MigrateWorkItem extends WorkItemOperation {

	IAttribute fsourceAttribute = null;
	IAttribute fTargetAttribute = null;

	/**
	 * Constructor
	 *
	 * @param The
	 *            title message for the operation
	 * @param message
	 * @param profile
	 * @param sourceAttribute
	 * @param targetAttribute
	 */
	public MigrateWorkItem(String message, ItemProfile profile,
			IAttribute sourceAttribute, IAttribute targetAttribute) {
		super(message, profile);
		fsourceAttribute = sourceAttribute;
		fTargetAttribute = targetAttribute;
	}

	/***
	 * This gets called if run() is called
	 *
	 * @see com.ibm.team.workitem.client.WorkItemOperation#execute(com.ibm.team
	 *      .workitem.client.WorkItemWorkingCopy,
	 *      org.eclipse.core.runtime.IProgressMonitor)
	 */
	@Override
	protected void execute(WorkItemWorkingCopy workingCopy,
			IProgressMonitor monitor) throws TeamRepositoryException,
			RuntimeException {

		IWorkItem workItem = workingCopy.getWorkItem();
		String thisItemID = getWorkItemIDString(workItem);
		if (!workItem.hasAttribute(fsourceAttribute)) {
			throw new WorkItemCommandLineException(
					"Work Item "
							+ thisItemID
							+ " Source Attribute not available - Synchronize Attributes: "
							+ fsourceAttribute.getIdentifier());
		}
		if (!workItem.hasAttribute(fTargetAttribute)) {
			throw new WorkItemCommandLineException(
					"Work Item "
							+ thisItemID
							+ " Target Attribute not available - Synchronize Attributes: "
							+ fTargetAttribute.getIdentifier());
		}
		// get the old value - a string with literals separated by a comma
		Object ovalue = workItem.getValue(fsourceAttribute);
		// compute the result values
		String sourceValues = "";
		if (null != ovalue && ovalue instanceof String) {
			sourceValues = (String) ovalue;
		}
		if (!sourceValues.equals("")) {
			String[] values = sourceValues
					.split(SEPARATOR_ENUMERATION_LITERAL_ID_LIST);
			IEnumeration enumeration = getWorkItemCommon()
					.resolveEnumeration(fTargetAttribute, monitor);

			List results = new ArrayList();
			for (String literalID : values) {
				if (literalID == "") {
					// Nothing to do
					continue;
				}
				Identifier literal = getLiteralEqualsIDString(
						enumeration, literalID);
				if (null == literal) {
					throw new WorkItemCommandLineException("Work Item "
							+ thisItemID
							+ " Target literal ID not available: "
							+ literalID + " Attribute "
							+ fTargetAttribute.getIdentifier());
				}
				results.add(literal);
			}
			// Set the value
			workItem.setValue(fTargetAttribute, results);
		}
		getResult().appendResultString("Migrated work item " + thisItemID);
	}

	/**
	 * Gets an enumeration literal for an attribute that has the specific
	 * literal ID.
	 *
	 * @param enumeration
	 *            - the enumeration to look for
	 * @param literalIDString
	 *            - the literal ID name to look for
	 * @return the literal or null
	 * @throws TeamRepositoryException
	 */
	private Identifier getLiteralEqualsIDString(
			final IEnumeration enumeration,
			String literalIDString) throws TeamRepositoryException {
		List literals = enumeration
				.getEnumerationLiterals();
		for (Iterator iterator = literals.iterator(); iterator
				.hasNext();) {
			ILiteral iLiteral = (ILiteral) iterator.next();
			if (iLiteral.getIdentifier2().getStringIdentifier()
					.equals(literalIDString.trim())) {
				return iLiteral.getIdentifier2();
			}
		}
		return null;
	}
}
The interesting method here is execute(). It basically checks if the work item has the source attribute and the target attribute. If one of the attributes is missing, it can not run. You have to synchronize attributes first.
As last step the method gets the string value and splits the string into its values. The list of enumeration literal ID’s is then used to look up the enumeration literals. In case a literal can not be found, this is an error. If the literals are retrieved, they are put into a list and finally set as the value for the new attribute.
The method getLiteralEqualsIDString() is actually mostly harvested from the WorkItemHelper class, where it is used with the literal display name.
Additional Changes to the Framework
Since this command works very different than the others, it became apparent that it would be nice to see progress directly, if we are not working in RMI server mode. this also helps the other commands and potential future commands. To provide a better user experience
-
- In WorkitemCommandLine the method isServer() has been made public so that it can be read from the framework classes
- In OperationResult the method appendResultString() was changed to output the information rather than storing it in a result string, if the WorkItemCommandLine does not run in server mode
This change makes the result output much more immediate, especially for long running commands in normal mode. In RMI mode, the data is provided as is, after the call finishes. Some Observations The Parameter handling does not handle optional parameters well. It should be possible to add an optional parameter like the work item ID in this case. However, this is just a minor problem here. In addition at some point it can get so complicated that the automation for printing the command syntax won’t be easily manageable any more. Summary This post explains how to extend the WorkItem Command Line with your own commands. As always, I hope that helps someone out there.