Status History Presentation for RTC

Rational Team Concert (RTC) has a built-in feature to view the history of a work item. But especially for work items with many changes, it is hard to follow the Status of a work item over time. That’s why Lukas created the amazing Status History Presentation for RTC and published it in the DACH Jazz Community project. It shows all Status changes since the creation of the work item in form of a timeline in the RTC work item Web UI.

Follow the instructions in the Status History Presentation for RTC project to download and install the editor presentation server extension. The Open Source project also serves as a great example for how to write a custom editor presentation.

After installing this extension plug-in into your RTC instance (server side), you will be able to add a “Status History” presentation on your work item editors (WEB only). You can add this  presentation to a work item editor section for example the Quick Info section. Once the presentation is available it will

  • Show all state changes in a timeline
  • Show who did the state change
  • Show the number of days a work item was or is in a state
  • A Rich Hover shows additional information about the changes made together with the state change

Many thanks to the DACH Jazz Community for sharing their amazing work.

A Custom Condition to Make Attributes Required or Read-Only by Role Version 2

A new requirement came up. Prioritize mandatory over read only. Can that be done? It can, lets see how.

As described in A Custom Condition to Make Attributes Required or Read-Only by Role it is possible to create custom behavior for making attributes read-only and required. The solution above has a catch however. If you configure a user with roles that make an attribute mandatory and roles that make the same attribute read-only, the user can not modify the mandatory attribute and can not save the work item. This situation can also arise with the other built in advisors.

So the new requirement was: modify the condition in a way that it checks if an attribute is required for the user and not make it read only in that case, even if the user has roles that specify the attribute read only. This could also be done the other way around, really, or there could be other requirements.

Is this really doable? I had my doubts. It took me a while to find that it can actually be done. It can be done, but there are several tricks that have to be used to do so.

Solution Outline

The solution described here provides a refined version of the condition for role and state provider as outlined below. The code has been extended to be able to:

  1. Detect that a condition is for a read-only attribute
  2. Detect which attribute it is responsible for
  3. Recursively call the operational behavior that determines if an attribute is required and to determine based on the information retrieved if the attribute is required and the condition needs to return false without further checks to prevent to make a required attribute read-only

The solution will be explained in detail below, but first.

A warning that should be carefully considered

The code that comes with this solution is experimental. All content is provided “as is” and without warranties. I am not responsible for any harm or damage caused by this material to you, your computer, your software, or anything else. 8)

The code does not write to the data, so data corruption is not a concern.

However, the code uses a recursive approach to check if an attribute is required to decide if it can be made read only. This can have performance implications (as every extension can). Since the code has to go multiple times through all the information, the user experience could be impacted by slow loading of work item presentations.

The code has to be called every time the work item is

  • opened in an editor
  • saved anywhere

so this runs in the users UI context and could be noticed if its execution time is long. This obvioulsy depends on the number of attributes, work item types and roles. For A attributes and W work item types and R roles the maximum complexity is roughly 3*(A*W*R), for read only attributes because it has to go through two configurations for required attributes preconditions plus one run through the condition itself. So it is o(n) with n=A*W*R for read only attributes. It is A*W*R for required attributes also o(n) with n=A*W*R.

So complexity is linear, however, there is no free lunch and the code has to read potentially a lot of information and perform other operations, so there could be an impact on the user performance, especially if the server is under heavy load.

Since it is recursive, you also have to make sure the code terminates. In this case it is done by getting only the required attributes if the condition is for read only attributes. If you get this wrong in the configuration, the server will probably crash with an OOM error.

I did not see any performance problems when I tested it, but the test was only with a limited set of roles and configuration entries in a single user environment.

To be able to recursively call the operational behavior recursively, the code has to use internal API that can be changed without notice. My experience so far is that the API, also internal API is very stable, but this should be considered anyway.

The code has to make assumptions about the condition names for Read-Only conditions. This naming convention is necessary for the code to get the information it needs to work properly. If the naming convention is not followed carefully the code will not work as expected.

License and Download

The post contains published code, so our lawyers reminded me to state that the code in this post is derived from examples from Jazz.net as well as the RTC SDK. The usage of code from that example source code is governed by this license. Therefore this code is governed by this license. I found a section relevant to source code at the and of the license. Please also remember, as stated in the disclaimer, that this code comes with the usual lack of promise or guarantee. Enjoy!

Download the Code

The code can be downloaded from DropBox here. Please note, there might be restrictions to access DropBox and the code in your company or download location.

Just Starting With Extending RTC?

If you just get started with extending Rational Team Concert, or create API based automation, start with the post Learning To Fly: Getting Started with the RTC Java API’s and follow the linked resources.

You should be able to use the code attached to this post in the development environment you set up in the Rational Team Concert Extensions Workshop and get your own extensions working there as well.

In this context, please also consider to at least read through the Process Enactment Workshop for the Rational solution for Collaborative Lifecycle Management lab 4 and lab 5 to understand how attribute customization works.

Solution Constraints

There are several constraints that will impact any possible solution. This is a list of the constraints I have experienced.

User UI Notification

The RTC UI uses a red asterisks to be able to provide the user a visible indication that a work item attribute is required.  The RTC UI also makes read-only attributes not changeable by removing the border or graying out the attribute value selection box. In this state the user can’t accidentally enter data. The image below shows the web UI with required and read only attributes. Severity is read only and can not be changed, a number of other attributes are required and show an asterisk.

UI required and read only attributes

RTC provides out of the box pre-conditions also called advisors for defining work item attributes read-only and required. It is important to know that advisors only run once the save button is pressed.

Running at save and showing information in the UI prior to the save is a contradiction. It should not be possible to show indications in the UI for a work item save advisor.

The way this is implemented in RTC is that the UI knows the built in advisors for Required Attributes for Type and State and for Condition and the Read-only Attributes for Type and State and for Condition. The UI calls these advisors to retrieve the information for the attributes before the advisors will actually run.

Note: This is hard coded into the UI and can not be extended. In fact it is not possible to show these UI indications for a custom work item save advisor.

We will use the same mechanism the UI uses in our solution below.

Conclusion on User UI Notification

It is possible to write a work item save advisor that prevents from saving a work item if attributes are not set or if they are changed, but these advisors would not be able to provide the user with any information in the UI up front. For this reason I believe the only feasible approach to implement behavior for read-only and mandatory attributes is to use custom conditions and using the advisors that make attributes required and read only based on condition values to provide visual feedback in the UI.

Otherwise the RTC developers would have to create an extension point, where custom advisors could provide the information which attributes are read only or required.

Conditions – Limitations

The condition is called with some data that allows it to run. This data contains

  1. The selected work flow action of the work item if available
  2. The label or name the condition has

There is no information available

  1. About the advisor in which context the condition is called: Required Attributes for Condition or Read-Only Requirement for Condition or a custom advisor, so the condition does not know if it is for read only or required.
  2. About the attribute or attributes the condition is responsible for in the context of the advisor

To summarize this: the condition can not decide with the given data

  1. If it is responsible for making an attribute read-only or mandatory
  2. Which work item attributes the condition acts upon

It is necessary to know in the condition, if it is for making a work item read only and it is necessary to know which attribute this condition is responsible for. This data is needed in the condition to perform the subsequent checks if the attribute is required. This means it is necessary to pass some information to the condition that allows it to get this data. The only possible way I am aware of at this time is the name/label of the condition.

This is the main reason for the design below, where the condition needs to be specified for one attribute only, has to have the mode of working and the attribute ID in the name and has to be configured individually with roles and workflows.

The initial attempt was to have only one condition with a central configuration. This approach was not feasible with the information available in the condition.

Solution Code

To achieve the requested functionality the condition code in the AbstractUserRoleTypeAndStateConditionProvider was enhanced in the following ways.

  1. A new method was added to test if the condition should exit with false based on the attribute being required
  2. The call is wrapped to enable and disable this recursive behavior using the constant ENABLE_RECURSIVE_REQUIRED_ATTRIBUTES . By default this is set to false. In this case the old behavior is maintained. To change this, the value must be set to true and the code must be rebuilt and deployed
  3. Additional supporting methods and data has been added to map attribute ID’s

It would be possible and simple to enhance the code of the condition to get the information if it should do the check from its configuration similar to how it gets the other configuration data.I decided to not spend the time for that. So the line below is responsible and needs to be changed to enable the new capability. Change the value to “true” to enable the recursive feature. Then built and deploy the extension.

Enable check for required

The check if a work item attribute is required and can therefor not be read only is the first check that the new behavior does. the rest of the code is absolutely identical to the old one. Only the methods necessary for this check has been added. The image below shows the code to call the new behavior.

Calling the Check

The new method looks like this:

/**
 * This method tries to extract the attribute name from a naming convention
 * 
 * The name of the condition has to match Readonly_the.id.of.the.attribute
 * 
 * If the naming convention holds, it converts the attribute ID for built-in
 * attributes into an internal form that is used by the UI and tries to
 * retrieve the required attributes for Type and State or by condition
 * 
 * It checks if the attribute it is responsible for is in the list If it is,
 * the attribute is considered to be required.
 * 
 * @param workItem
 * @param configuration
 * @param workItemCommon
 * @param monitor
 * @return returns true if the attribute could be identified as required
 *         false otherwise.
 * 
 * @throws TeamRepositoryException
 */
boolean isRequiredRecursive(IWorkItem workItem,
		IConfiguration configuration, IWorkItemCommon workItemCommon,
		IProgressMonitor monitor) throws TeamRepositoryException {
	/*
	 * Please note, there is no information available about the attribute ID
	 * this condition works for. It is necessary to provide it somehow.
	 * There is also no information available what mode this condition is
	 * used for i.e. is it for required attributes or for read-only
	 * attributes.
	 * 
	 * The code below assumes that the mode and the attribute ID is coded
	 * into the Label of the condition. The assumption is that the name of
	 * the condition follows this pattern:
	 * 
	 * Readonly_the.attribute.id
	 * 
	 * The label is split in the first part which is used to detect the
	 * condition is used for. Basically if the mode is for detecting
	 * read_only or required attributes The second part is used to identify
	 * the attribute ID the condition is used for.
	 * 
	 * If the condition is used to make an attribute read only, it tests if
	 * the attribute is really required due to any other rule.
	 * 
	 * If it is required it can't be set to read only and the code returns
	 * true.
	 */
	String label = configuration.getLabel();
	String[] attrib_Info = label.split("_");
	String operation = null;
	String attributeID = null;
	if (attrib_Info.length > 1) {
		operation = attrib_Info[0].trim().toLowerCase();
		attributeID = attrib_Info[1].trim();
		// get the internal representation of the attribute, if there is one
		attributeID = getInternalID(attributeID);
	}

	// Can we check?
	if (!(operation != null && attributeID != null && operation
			.equals("readonly"))) {
		return false;
	}
	/*
	 * There is enough data to check if there is a required attribute. In
	 * order to do this, call the existing configured operational behaviour.
	 */
	Set requiredAttributes = new HashSet();
	IAuditableCommon auditableCommon = workItemCommon.getAuditableCommon();
	IProcessAreaHandle processArea = workItemCommon.findProcessArea(
			workItem, monitor);
	IAuditableCommonProcess process = auditableCommon.getProcess(
			processArea, monitor);

	// Get the workflow action
	String actionId = configuration.getProviderContext()
			.getWorkflowAction();

	/*
	 * Call the RequiredAttributesByConditionAdvisor advisors recursively to
	 * get the list of attributes that are required for this context by
	 * condition
	 * 
	 * @see com.ibm.team.workitem.common.internal.
	 * RequiredAttributesByTypeAndStateAdvisor
	 * 
	 * Note, there seems to be an issue when running this on the Eclipse
	 * client in debug mode.
	 */
	List advisorDeclarations1 = process
			.findAdvisorDeclarations(processArea,
					WorkItemCommon.WORK_ITEM_SAVE_OPERATION_ID,
					RequiredAttributesByConditionAdvisor.ADVISOR_ID,
					monitor);
	for (IAdvisorDeclaration advisorDeclaration1 : advisorDeclarations1) {
		requiredAttributes.addAll(RequiredAttributesByConditionAdvisor
				.getRequiredAttributes(workItem, workItemCommon, actionId,
						advisorDeclaration1.getConfigurationElement(),
						false, monitor));
	}
	/*
	 * Call the RequiredAttributesByConditionAdvisor advisors recursively to
	 * get the list of attributes that are required for this context by type
	 * and state.
	 * 
	 * @see com.ibm.team.workitem.common.internal.
	 * RequiredAttributesByTypeAndStateAdvisor
	 * 
	 * Note, there seems to be an issue when running this on the Eclipse
	 * client in debug mode.
	 */
	List advisorDeclarations2 = process
			.findAdvisorDeclarations(processArea,
					WorkItemCommon.WORK_ITEM_SAVE_OPERATION_ID,
					RequiredAttributesByTypeAndStateAdvisor.ADVISOR_ID,
					monitor);
	for (IAdvisorDeclaration advisorDeclaration2 : advisorDeclarations2) {
		requiredAttributes.addAll(AbstractAttributesByTypeAndStateAdvisor
				.getConfiguredAttributes(workItemCommon, workItem,
						actionId,
						advisorDeclaration2.getConfigurationElement(),
						monitor));
	}
	// Is the attribute in the list of required attributes?
	if (!requiredAttributes.isEmpty()) {
		if (requiredAttributes.contains(attributeID)) {
			// If the attribute is in the list, don't make it read only.
			return true;
		}
	}
	return false;
}

What it does is essentially as follows.

The first section is used to decode information from the label or name of the condition. The subsequent code needs to know if this condition is to make an attribute read only. If this is the case it needs to know the name of the attribute it is responsible for.

The first block checks if the label of the condition follows the naming conventions. If it does, the label looks like i.e. Readonly_com.ibm.team.workitem.attribute.description. The condition uses this information to determine if the condition is for making an attribute read only and what the id of the attribute is. To do that, it splits the label of the condition using the underscore character ‘_’. If the split has at least two parts, it uses the first part as the indicator for what the condition is used for. The second part is expected to contain the attribute ID for the attribute the condition is responsible for.

The attribute ID, if one was found, is passed through the method getInternalID(). This method converts the ID’s for built in attributes into the internal representation that is available later in the process. If there is no internal ID found for an attribute, the original ID is returned. This mapping is necessary, because many of the built in attributes have an ID that is shown externally in the process configuration editor and an internal id that is used in a lot of the internal processing.

As an example, in the process configuration the attribute Description shows up as com.ibm.team.workitem.attribute.description but the internal representation is description. See the image below.

Internal and external ID for built in attributes

The method and the mapping is explained later in the document.

The next part of the code checks if there is enough data to decide if the current condition is a read-only condition and there is an attribute that can be checked. If the condition label is not matching the conventions there is not enough data available to decide and the method returns false.

In the next steps a HashSet for attribute ID’s is created and the code gets the required API classes that are required for the final steps.

The code then gets the process configurations for the RequiredAttributesByConditionAdvisor advisor and retrieves the list of required attributes from them. This is basically the code that the RTC UI uses itself to determine the read only and the required attributes from the built in advisors.

The code does the same for the RequiredAttributesByTypeAndStateAdvisor configurations.

Once all required attributes are available in the HashMap, the code tests if the attribute that this condition is supposed to check for being read only is in the list. If that is the case the code returns true, false otherwise.

If this method returns false, the normal behavior described in A Custom Condition to Make Attributes Required or Read-Only by Role is executed to determine if the condition should return true (to make the attribute read only or required). If the method returns true, the condition detected it was responsible to make the attribute read-only and the attribute is required and therefore must not be set to read only. In this case the whole condition can return false and does not have to check anything else.

The method getInternalID is very simple and looks like this.

/**
 * Try to get the internal representation for an attribute ID If there is an
 * internal representation, return it, otherwise return the original
 * 
 * @param attributeID
 * @return
 */
private String getInternalID(String attributeID) {
	String newVal = iDMap.get(attributeID);
	if (null != newVal)
		return newVal;
	return attributeID;
}

The method createMap to create the map to look up the internal Id looks like below.

/**
 * Create the built-in attribute mapping of external ID's to the internal
 * representation that can safely be used to compare the required
 * attributes.
 * 
 * @return the map
 */
private static HashMap<String, String> createMap() {
	HashMap<String, String> map = new HashMap<String, String>(40);
	map.put("com.ibm.team.workitem.attribute.severity",
			IWorkItem.SEVERITY_PROPERTY);
	map.put("com.ibm.team.workitem.attribute.priority",
			IWorkItem.PRIORITY_PROPERTY);
	map.put("com.ibm.team.workitem.attribute.version",
			IWorkItem.FOUND_IN_PROPERTY);
	map.put("com.ibm.team.workitem.attribute.id", IWorkItem.ID_PROPERTY);
	map.put("com.ibm.team.workitem.attribute.workitemtype",
			IWorkItem.TYPE_PROPERTY);
	map.put("com.ibm.team.workitem.attribute.projectarea",
			IWorkItem.PROJECT_AREA_PROPERTY);
	map.put("com.ibm.team.workitem.attribute.summary",
			IWorkItem.SUMMARY_PROPERTY);
	map.put("com.ibm.team.workitem.attribute.state",
			IWorkItem.STATE_PROPERTY);
	map.put("com.ibm.team.workitem.attribute.creator",
			IWorkItem.CREATOR_PROPERTY);
	map.put("com.ibm.team.workitem.attribute.owner",
			IWorkItem.OWNER_PROPERTY);
	map.put("com.ibm.team.workitem.attribute.description",
			IWorkItem.DESCRIPTION_PROPERTY);
	map.put("com.ibm.team.workitem.attribute.creationdate",
			IWorkItem.CREATION_DATE_PROPERTY);
	map.put("com.ibm.team.workitem.attribute.resolutiondate",
			IWorkItem.RESOLUTION_PROPERTY);
	map.put("com.ibm.team.workitem.attribute.duedate",
			IWorkItem.DUE_DATE_PROPERTY);
	map.put("com.ibm.team.workitem.attribute.duration",
			IWorkItem.DURATION_PROPERTY);
	map.put("com.ibm.team.workitem.attribute.correctedestimate",
			"correctedEstimate");
	map.put("com.ibm.team.workitem.attribute.timespent", "timeSpent");
	map.put("com.ibm.team.workitem.attribute.category",
			IWorkItem.CATEGORY_PROPERTY);
	map.put("com.ibm.team.workitem.attribute.target",
			IWorkItem.TARGET_PROPERTY);
	map.put("com.ibm.team.workitem.attribute.resolver",
			IWorkItem.RESOLVER_PROPERTY);
	map.put("com.ibm.team.workitem.attribute.resolutiondate",
			IWorkItem.RESOLUTION_DATE_PROPERTY);
	map.put("com.ibm.team.workitem.attribute.tags", IWorkItem.TAGS_PROPERTY);
	map.put("com.ibm.team.workitem.attribute.modified",
			IWorkItem.MODIFIED_PROPERTY);
	map.put("com.ibm.team.workitem.attribute.modifiedby",
			IWorkItem.MODIFIED_BY_PROPERTY);
	return map;
}

It is called when the class is instantiated.

/**
 * A map that is used to translate the external representation of a built-in
 * attribute into the one that is used internally
 */
HashMap<String, String> iDMap = createMap();

It is possible to add custom mappings here.

The following mapping table shows the values of the attribute Name, the internal ID of the attribute and the external ID used in the process configuration.

Attribute ID mapping built in attributes 1

The following attributes are also available but should be considered carefully. Most of these attributes are pseudo attributes like “Subscribed By” or automatically set by the process. Carefully consider if these attributes should be made required or read-only.

Attribute ID mapping built in attributes 2

Do not use this condition to make the Status attribute internalState read only. Only use the built in permissions to define which role can perform which workflow action.

Please note that the Status of the work item is especially critical. The condition evaluates the status of the work item based on the current state and the action selected. If there is an action selected, the state of the work item is calculated as the target state of that action. In case the attribute is now read only and not required, it is basically impossible to save the work item – as designed. However, there is a built in permission for work flow ations per role that should be used.

Configuring the Conditions

The configuration of the conditions works as described in A Custom Condition to Make Attributes Required or Read-Only by Role, except for some details for conditions responsible for read-only attributes.

If you create the condition to make an attribute read-only

  1. The label has to follow the naming condition Readonly_ where is the internal or external attribute ID
  2. The attribute ID has to be correct and is case sensitive; any typo renders the condition not functional
  3. Each condition can only be configured for one attribute and not for a group of attributes

In the example below, the label for required attributes can be chosen arbitrarily I.e. Required_Filed_Against. The Conditions for read only attributes have to follow the naming condition using an external ID i.e.

  1. Readonly_com.ibm.team.workitem.attribute.description
  2. Readonly_com.ibm.team.workitem.attribute.category
  3. Readonly_internalTags.

The 3rd example uses an internal ID instead of the external ID.

Create conditions for attributes

The names of the conditions are reflected in the configuration of the operational behavior.

Configure the Read Only For condition advisor

The result should look like below.

Configure the Read Only For condition advisor - result

The following table shows an example configuration for the specific user roles of a user in the new state for the work item type defect. Several attributes are configured as read-only and required in the available advisors using a condition or using the built in advisors.

Example configuration

The following screen shot shows the resulting display in the web UI if the new condition is used.

Result of the configuration in the UI

Please note that only the severity is read only, because all other attributes that happen to be configured as read only using this condition are changeable, because they are required.

Please note, the built in advisors don’t follow this pattern. If you configure an attribute required and read only for a user, the behavior is like using the condition version with the recursive behavior switched off.

Configuring and Deploying the Condition

Please follow the post A Custom Condition to Make Attributes Required or Read-Only by Role for more details. This version is only a small extension to the original condition and the description there applies to this condition as well.

Summary

Using a custom condition and the out of the box operational behavior for Required Attributes For Condition and Read-Only Attributes For Condition, allows to achieve the required behavior.

Keep in mind this is by no means production code. You might want to do more testing.

As always I hope this helps someone out there to get their job done more efficient.

A Custom Condition to Make Attributes Required or Read-Only by Role

Recently, a customer wanted to make attributes required and read only in a way the built in operational behavior does not support. So I tried to find out if there would be a way to achieve this by an extension. After struggling for some time, I finally found a way and want to share this with the community.

Update: see A Custom Condition to Make Attributes Required or Read-Only by Role Version 2 for some more tricks and information.

The Requirement

The requirement was,

  1. A user can have multiple roles
  2. Attributes are required or read only for a role in a certain state
  3. For a user all roles shall be evaluated and the attribute be required or read only if any of the roles the user has, specifies so

So the intended behavior was more like permissions work in RTC, accumulate over all roles.

The built in RTC mechanisms for required and read only attributes are based on operational behavior. Built in advisors can be configured to provide the information and behavior.

RTC Operation BehaviorYou can configure operational behavior for each role, in this example it is for the default role Everyone. However, the operational behavior in RTC does only look for the first configured operational behavior for the operation that is configured for a role the user has, as described in Process behavior lookup in Rational Team Concert 2.0. This is which is still valid for later versions of RTC.

A user has one (every user has the Everyone role) or more roles configured if he is member of a project or team area. The roles have an order, from top to bottom. The first configured operational behavior for the first role in that order that is found in the context of an operation will be executed. Only that first found operational behavior will be executed.

The idea behind this concept is, that it is possible to overwrite the operational behavior by having specific roles in a specific order. It is, for example, possible to have configured that users with the role Everyone need to provide several required attributes to save a work item and several attributes can be read only. But the Team Lead may have a lot less required attributes and no read only attributes, because the operational behavior is specified in a different way for the Team Lead role.

This also means, if the check box “Preconditions and follow-up actions are configured for this operation” is checked for a role and no preconditions are configured, RTC will do nothing, if the user has that role, even if a lot of preconditions are configured for the role Everyone. RTC will find the specification for that role and as there is nothing configured assume there is no operation behavior needed for the role.

It also means, if operational behavior is specified for all roles, only the operation behavior of the primary role the user has in the context, is executed.

The customer wanted a behavior that was different. Assume role1 and role2 exist. A work item attribute is specified to be read only for role1 but not read only for role2. The attribute shall be read only for all users that have role2 assigned, regardless of the order of the roles.

This is, again, more like permissions as described in Process permissions lookup in Rational Team Concert 2.0 where if one role a user has, has the permission, the user has this permission.

How Does the RTC Code Work?

I looked at how this is implemented in RTC by looking into the SDK in the hope to find a way to extend it somehow. It is pretty easy to find the code of the advisors/preconditions shipped with RTC.  It took me a while to figure out what is going on in the code.

One thing that had bothered me for a while became understandable in the process: Operation behavior is run after the save button is pressed. How can operational behavior have any impact on the UI before the button is pressed? How can the UI show attributes as read-only or as required before the operation is performed?

Well, it turns out, that the built in advisors have a static part, that reads the configuration. The UI knows the built in advisors and calls this part to get the configuration data in order to require attributes or make them read only. Mystery solved.

This, of course means there is no way to create your own advisor/precondition to extend RTC to work with different rules and the UI showing behaving like with the built in advisors. The UI does not know that it needs to get the custom configuration and that’s it. It is still possible to prevent a save, but the UI won’t provide any information up front.

At this point I was very close to giving up. The issue had passed a lot of smart people’s desks at that time, including mine – 5 times at least. Why should I find a solution if no one else had the slightest idea?

The Solution

Well, when looking at the code, I realized some other built in operation behavior was wired up there as well. Code for the advisors to control required and read only attributes for conditions.

Advisors for ConditionsThis turned out to be the approach that allowed to implement the requirement. Create a custom condition that allows to configure the condition advisors in a way to provide the functionality as requested.

One important issue that became apparent in the process of creating this solution is that conditions are different from all the other attribute customization providers. This almost led to me failing in finding a solution to implement this.

Conditions need to be instantiated like all the other providers but

  1. Condition instances are not configured at the attribute
  2. Conditions are only configured in the aforementioned preconditions
  3. Conditions don’t get the information about the attribute they are configured for

My initial idea was to somehow configure the condition’s additional script parameters in the process XML with information about attribute ID’s, for which roles in which states the condition returns false. This does not work. Instead the condition gets information for which state Id for which work item category, which roles are relevant. This way one condition can handle all cases as we will see in the following sections.

Solution Summary

The condition, lets call it User Role for Type and State Condition is a Java based extension for the Eclipse client and the RTC server. It allows configuring roles mapped to work item type categories and states.
The condition checks if the current work items category and state has roles configured. If roles are found, and the user has any of the roles, the condition returns true, false otherwise.
This condition can be configured and be used to make work item attributes read-only or required for a work item type category in a specific state based on the roles a user has in this context.

License and Download

The post contains published code, so our lawyers reminded me to state that the code in this post is derived from examples from Jazz.net as well as the RTC SDK. The usage of code from that example source code is governed by this license. Therefore this code is governed by this license. I found a section relevant to source code at the and of the license. Please also remember, as stated in the disclaimer, that this code comes with the usual lack of promise or guarantee. Enjoy!

The code can be downloaded from DropBox here. Please note, there might be restrictions to access DropBox and the code in your company or download location.

Just Starting With Extending RTC?

If you just get started with extending Rational Team Concert, or create API based automation, start with the post Learning To Fly: Getting Started with the RTC Java API’s and follow the linked resources.

You should be able to use the code attached to this post in the development environment you set up in the Rational Team Concert Extensions Workshop and get your own extensions or automation working there as well.

In this context, please also consider to at least read through the Process Enactment Workshop for the Rational solution for Collaborative Lifecycle Management lab 4 and lab 5 to understand how attribute customization works.

Import The Code

Use the Eclipse importer to import existing projects into the workspace from an archive file.

Import Step 1

Browse for the archive.

Import Step 2

Select all projects and press finish. The code now shws up in your Eclipse workspace.

How The Code Works

The code comes in four projects.

Project Structure

com.ibm.js.team.workitem.attribute.user.role.condition.providers: The main project for the extension. It contains all the code that is needed and defines the plugin.xml.

com.ibm.js.team.workitem.attribute.user.role.condition.providers.feature: The feature project needed to be able to deploy the code.

com.ibm.js.team.workitem.attribute.user.role.condition.providers.updatesite: The update site needed to generate the code for deployment. This project output is also used to deploy the extension in RTC Eclipse clients.

com.ibm.js.team.workitem.attribute.user.role.condition.providers.serverdeploy: A special project to help deploying the code on RTC servers.

The structure of the main project looks like this.

Condition Code Structure
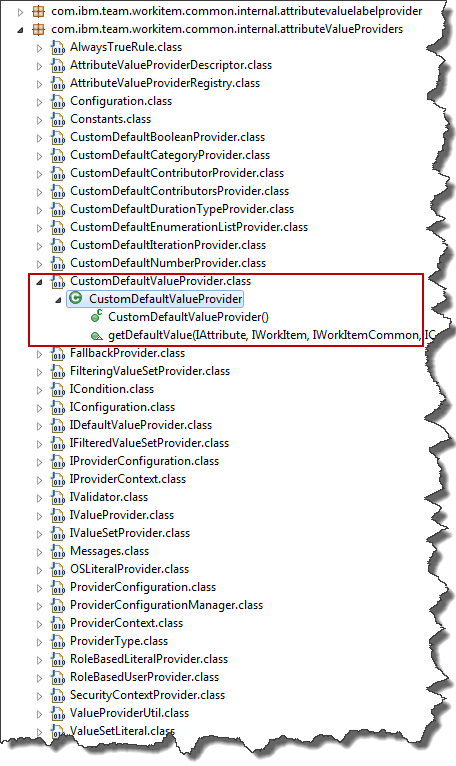
The source code is provided in four classes. The majority of the code is implemented by the class AbstractUserRoleTypeAndStateConditionProvider. It implements all of the behavior needed.

AbstractUserRoleTypeAndStateConditionProviderThe only piece missing in the code is the part that provides the process areas (project and team areas) used to look for the roles the user has. It is possible to use different approaches to configure this in RTC and based on how this is configured in RTC there are different possible approaches you want to use to get that information. So this is left abstract to be implemented in an extending class.

Possible strategies are:

  1. Look for the roles a user has in the team area that owns the work item
  2. Look for the roles a user has in the project area
  3. Look for all the roles a user has across the hierarchy of the area that owns the work item up to the project area

There might be other strategies, dependent on the context this is used in. It is possible to extend the abstract class and to provide the process areas to look into.

The class

  • ProcessAreaHierarchyUserRoleTypeAndStateConditionProvider implements strategy 3
  • ProcessAreaUserRoleTypeAndStateConditionProvider implements strategy 1
  • ProjectAreaUserRoleTypeAndStateConditionProvider implements strategy 2

Lets have a quick look at the code provided in the abstract class.it implements the method matches required by the Interface ICondition that is needed to be implemented for a condition.

/* (non-Javadoc)
 * @see com.ibm.team.workitem.common.internal.attributeValueProviders.ICondition#matches(com.ibm.team.workitem.common.model.IWorkItem, com.ibm.team.workitem.common.IWorkItemCommon, com.ibm.team.workitem.common.internal.attributeValueProviders.IConfiguration, org.eclipse.core.runtime.IProgressMonitor)
 */
@Override
public boolean matches(IWorkItem workItem, IWorkItemCommon workItemCommon,
		IConfiguration configuration, IProgressMonitor monitor)
		throws TeamRepositoryException {

	// Get the work item type category of the work item to determine if this
	// condition is configured for it
	IWorkItemType wiType = workItemCommon.findWorkItemType(
			workItem.getProjectArea(), workItem.getWorkItemType(), monitor);
	String typeCategory = wiType.getCategory();

	// Get the workflow action
	String actionId = configuration.getProviderContext()
			.getWorkflowAction();
	// Get the work item state. 
	// The state could be the current one, or it could be determined 
	// by the workflow action that is currently selected
	String wiState = findTargetStateId(workItem, actionId, workItemCommon,
			monitor);
	// Find the roles that are configured for the work item type (by type
	// category) for the work item state
	Set roles = getRoleConfiguration(typeCategory, wiState,
			configuration);
	if (null == roles) {
		// No Roles found, we can exit.
		return false;
	}

	// Get the roles the contributor has in this context
	Collection contributorRoles = getContributorRoles(workItem,
			workItemCommon, monitor);
	// Return true, if the contributor has any of the configured roles
	return hasMatchingRole(roles, contributorRoles);
}

This method first looks up the work item type and from that the work item type category. We use the type category, because all work item types of the same category have the same attributes and workflow. It would be possible to use the type directly, if needed.

Then it looks up the current workflow action from the provider context. As described in the AttributeCustomization wiki entry, conditions get the currently selected workflow action. The condition needs this to determine if a state change is about to happen and to get the roles configured for that state and not the current one. The state that is relevant for this operation is looked up.

The method then uses the work item type category, the relevant state and the configuration to determine the roles that are configured for this context. If there are no roles valid for this context the condition can end and return false.

If there are roles configured for this situation, the method gets the roles of the user trying to perform the operation.

The final check is, if the current user has any of the roles configured for this context.

Lets look at how finding the state of the work item works in findTargetStateId(). The code can be found in the SDK in the context of the preconditions.

/**
 * Find the target state of the work item for the condition. 
 * The target state is the current state if there is no workflow action selected
 * If there is a workflow action selected, the target state is the state
 * the action results in.
 * 
 * @param workItem
 * @param actionId
 * @param workItemCommon
 * @param monitor
 * @return the state ID (or null if there is no identifiable state) 
 * @throws TeamRepositoryException
 */
private static String findTargetStateId(IWorkItem workItem,
		String actionId, IWorkItemCommon workItemCommon,
		IProgressMonitor monitor) throws TeamRepositoryException {
	Identifier state = workItem.getState2();
	IWorkflowInfo wfInfo = workItemCommon.findWorkflowInfo(workItem,
			monitor);
	if (state == null && actionId == null && wfInfo != null) {
		actionId = wfInfo.getStartActionId() == null ? null : wfInfo
				.getStartActionId().getStringIdentifier();
	}
	if (wfInfo != null && state != null) {
		if (!Arrays.asList(wfInfo.getAllStateIds()).contains(state)) {
			actionId = wfInfo.getStartActionId() == null ? null : wfInfo
					.getStartActionId().getStringIdentifier();
		}
	}
	if (actionId != null && wfInfo != null) {
		state = wfInfo.getActionResultState(Identifier.create(
				IWorkflowAction.class, actionId));
		if (state == null) {
			actionId = wfInfo.getStartActionId() == null ? null : wfInfo
					.getStartActionId().getStringIdentifier();
			if (actionId != null) {
				state = wfInfo.getActionResultState(Identifier.create(
						IWorkflowAction.class, actionId));
			}
		}
	}
	// This is code that addresses a change in the process,
	// where the state of a work item can have only a number
	// Make sure the number is modified to reflect the state ID
	if (state != null) {
		String stateId = state.getStringIdentifier();
		try {
			Integer.parseInt(stateId);
			stateId = "s" + stateId;//$NON-NLS-1$
		} catch (NumberFormatException e) {
		}
		return stateId;
	}
	return null;
}

The code gets the work item state and the workflow information first. If there is no state and no action, then the work item is new and the action is the start action.

Then it looks at the case where there is a state and a work flow action, if it can’t find the current state in the workflow, there was a type change and the action is the start action (or none).

With the action identified, it calculates the target state. If there is none, the current state remains.

Finally there is a handling of the state ID’s. In some cases, for historical reasons, only a number is returned and not a sate id, The last bit of the code makes a proper state ID from the number, if needed.

The correct target state of the work item is returned at the end.

Another interesting part is to get the configuration for the roles from the process configuration done in getRoleConfiguration().

/**
 * Get the roles that are configured for the work item category and current target state
 * 
 * @param typeCategory
 * @param wiState
 * @param configuration
 * @return returns a set of roles that are configured for the 
 * work item category and state, or null, if there is not matching configuration 
 */
private Set getRoleConfiguration(String typeCategory,
		String wiState, IConfiguration configuration) {
	List workflowConfigurations = configuration
			.getChildren(CONFIGURATION_ELEMENT_WORKFLOW_PROPERTIES);
	if (null != workflowConfigurations) { // We got a configuration
		// For all configuration elements 
		for (IConfiguration workflowConfiguration : workflowConfigurations) {
			// Get the workitem state for this configuration element
			String foundStateID = workflowConfiguration
					.getString(CONFIGURATION_WORKFLOW_PROPERTY_ATTRIBUTE_STATE_ID);
			// Get the work item category for this configuration element
			String foundWorkflowCategory = workflowConfiguration
					.getString(CONFIGURATION_WORKFLOW_PROPERTY_ATTRIBUTE_WORK_ITEM_TYPE_CATEGORY);

			// If the configuration element applies to the current work item
			// state and category, get the roles that are configured
			if (foundStateID != null && foundWorkflowCategory != null
					&& foundWorkflowCategory.equals(typeCategory)
					&& foundStateID.equals(wiState)) {
				return getRoles(workflowConfiguration);
			}
		}
	}
	return null;
}

The conditions can be configured in the process configuration source as described here. The code reads the configuration data in the process.xml. It tries to find a configuration for the work item category and the state in the configuration. If one is found, it gets all roles specified and returns them.

The method getRoles() looks as below:

/**
 * Get the roles configured for this configuration element
 * 
 * @param workflowConfiguration
 * @return the roles found
 */
private Set getRoles(IConfiguration workflowConfiguration) {
	Set roles = new HashSet();
	List roleConfigurations = workflowConfiguration
			.getChildren(CONFIGURATION_ELEMENT_ROLE);
	for (IConfiguration roleConfiguration : roleConfigurations) {
		roles.add(roleConfiguration.getString(CONFIGURATION_ATTRIBUTE_ROLE_ID));
	}
	return roles;
}

It basically also reads the next level in the process configuration XML to get the configured role ID’s.

When designing the condition the following structure for the configuration was chosen.

Configuration SyntaxBasically provide the workflowProperties for the workitem type category and the state. Underneath provide the ID’s for the roles the condition should trigger.

As an example of the configuration in the process XML:

ConfigurationThe last step is to get the roles of the user that tries to perform the operation. This is done in getContributorRoles().

/**
 * Get the roles for a contributor
 * 
 * @param processArea
 * @param user
 * @param workItemCommon
 * @param monitor
 * @return
 * @throws TeamRepositoryException
 */
private Collection getContributorRoles(IWorkItem workItem,
		IWorkItemCommon workItemCommon, IProgressMonitor monitor)
		throws TeamRepositoryException {
	Collection roles = new HashSet();
	// Get Current User - we will check for the roles this user has
	IContributorHandle user = workItemCommon.getAuditableCommon().getUser();

	// Get the relevant process area(s) to look for the role
	Collection processAreas = getProcessAreas(workItem,
			workItemCommon, monitor);
		
	// Iterate the relevant process areas
	for (IProcessAreaHandle processAreaHandle : processAreas) {
		// Resolve the process area
		IAuditableCommonProcess auditableCommonProcess = workItemCommon
				.getAuditableCommon()
				.getProcess(processAreaHandle, monitor);
		IProcessArea processArea = (IProcessArea) workItemCommon
				.getAuditableCommon().resolveAuditable(processAreaHandle,
						ItemProfile.PROCESS_AREA_DEFAULT, monitor);
		// get the roles and add them to the list of roles the contributor has
		roles.addAll(auditableCommonProcess.getContributorRoles(user,
				processArea, monitor));
	}
	return roles;
}

The method gets the current user. Then it calls the abstract method getProcessAreas() to get the process areas to look for roles. It then iterates the process areas retrieved, gets the process and the roles of the user.

The method hasMatchingRole() just iterates the roles found and returns true, if the user has a role that is configured in the configuration for the given work item category and the state the work item has in this context.

/**
 * Check if the contributor has one of the configured roles.
 * 
 * @param roles
 * @param contributorRoles
 * @return true if the contributor has a role that is found in the configuration
 */
private boolean hasMatchingRole(Set roles,
		Collection contributorRoles) {
	for (IRole aRole : contributorRoles) {
		if (roles.contains(aRole.getId())) {
			// The user has a role that was relevant for this configuration
			return true;
		}
	}
	return false;
}

The classes that implement the AbstractUserRoleTypeAndStateConditionProvider basically have to implement which process areas to look at and to return them in getProcessAreas().

The version below is the most complex one, that iterates the whole hierarchy implemented in the class ProcessAreaHierarchyUserRoleTypeAndStateConditionProvider.

/***
 * 
 * Get the list of process areas to look up the roles for the contributor
 * Start with the process area a work item is filed against
 * and iterate the process area hierarchy up to the project area.
 * 
 * All found process areas are added to the search list.
 * 
 */
/*(non-Javadoc)
 * @see com.ibm.js.team.workitem.attribute.roletypestate.condition.providers.AbstractUserRoleTypeAndStateConditionProvider#getProcessAreas(com.ibm.team.workitem.common.model.IWorkItem, com.ibm.team.workitem.common.IWorkItemCommon, org.eclipse.core.runtime.IProgressMonitor)
 */
@Override
Collection getProcessAreas(IWorkItem workItem,
		IWorkItemCommon workItemCommon, IProgressMonitor monitor)
		throws TeamRepositoryException {
	// Get the project area
        HashSet processAreas = new HashSet();
        // Resolve with full data to get the hierarchy
	IProjectArea projectArea = (IProjectArea) workItemCommon
			.getAuditableCommon().resolveAuditable(workItem.getProjectArea(),
					ItemProfile.PROJECT_AREA_FULL, monitor);
		
	// Get the hierarchy to be able to find the process area parents
	ITeamAreaHierarchy hierarchy = projectArea.getTeamAreaHierarchy();

	// Start with the process area the work item is filed against
	IProcessAreaHandle processAreaHandle = workItemCommon.findProcessArea(workItem, monitor);
	do{
		// If this is a team area, add it and look for the parent area
		if (processAreaHandle instanceof ITeamAreaHandle) {
			processAreas.add(processAreaHandle);
			try {
				// Try to get the parent process area
				processAreaHandle = hierarchy.getParent((ITeamAreaHandle)processAreaHandle);
			} catch (TeamAreaHierarchyException e) {
				// this should not happen, if it does, stop the loop
				return processAreas;
			}
		} else if (processAreaHandle instanceof IProjectAreaHandle) {
			// If the area is the project area, we are done
			processAreas.add(processAreaHandle);
			return processAreas;
		}		
	} while (processAreaHandle!=null);	
	return processAreas;
}

It basically gets the project area of the work item and looks up the ITeamAreaHierarchy for it. Then it gets the process area that owns the work item. If that is a team area and not the project area, it adds the team area to the list and then tries the same with its patent process area. If the process area is a project area, it is added to the list and the method is done.

 The Plugin.XML

The plugin.XML basically defines the value providers that are available as well as the component for them.

Plugin.XMLThe condition providers are configured as shown below.

Condition Provider ConfigurationDeploying the Extension

Before deploying, the code has to be built. This is done in the project com.ibm.js.team.workitem.attribute.user.role.condition.providers.updatesite

Make sure the update site project is empty like below

Empty Update Site ProjectDelete any other files and folders visible besides the .project file and the site.xml, e.g. Jar-files and folders like plugins and features.

Open the site.xml and press Build All in the editor.

Build All Update SiteThe update site project now has new files and folders.

Update Site Ready to Deploy to ClientThese files will be used to deploy the extension to the server and later to deploy the extension on the RTC Eclipse client.

Deploy on the RTC CCM Server

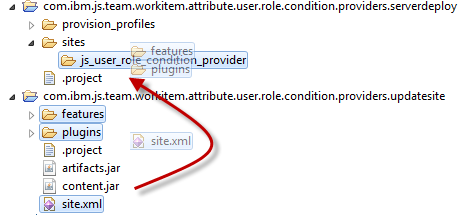
There is a special project that was artificially created to help with deploying on the server. The project com.ibm.js.team.workitem.attribute.user.role.condition.providers.serverdeploy contains a folder structure that resembles the structure in the configuration folder of the server. The folder provision_profiles/ contains the provisioning file js_user_role_condition_provider.ini that contains the information needed to deploy the extension on the server. It also contains the reference to the folder site/js_user_role_condition_provider which is reflected in the project structure as well. This folder needs to contain the built features and plugins. By setting this up this way, it is relatively easy to successfully deploy the extension.

Server Deploy Project

After building, copy the folders features, plugins and the file site.xml from the project com.ibm.js.team.workitem.attribute.user.role.condition.providers.updatesite into the folder sites/js_user_role_condition_provider in the project com.ibm.js.team.workitem.attribute.user.role.condition.providers.serverdeploy as displayed below.

Prepare Server Update Site

Open the conf/ccm folder for your deployed server (Try this on a test server first). Open the folder \JazzTeamServer\server\conf\ccm like shown below.

Server Configuration Folder

In the project com.ibm.js.team.workitem.attribute.user.role.condition.providers.serverdeploy, select the folders provision_profiles and sites. Then select Copy.

Copy Server Extension

In the folder \JazzTeamServer\server\conf\ccm paste the folders and files you just copied. Acknowledge overwriting folders (and files if the extension has been deployed).

Request a server reset and restart the server. See Is The Extension Deployed? How Can I Redeploy? for details.

Check if the server Extension is deployed as described in Is The Extension Deployed? How Can I Redeploy? Search for the component com.ibm.js.team.workitem.attribute.user.role.condition.providers.component.

Chack Component DeployedThe condition provider is now deployed on your CCM server.

Deploy on the RTC Eclipse Client

The condition needs to be installed on an Eclipse client to be configured. It also needs to be installed on all Eclipse Clients that are used by users that have to use this condition.

It is possible to install this in an Eclipse client (installed from a zip file) and ship the Eclipse client with the extension installed by zipping it up again and providing the zip file.

For users that use the Web UI, the Condition works as soon as it is set up in the process.

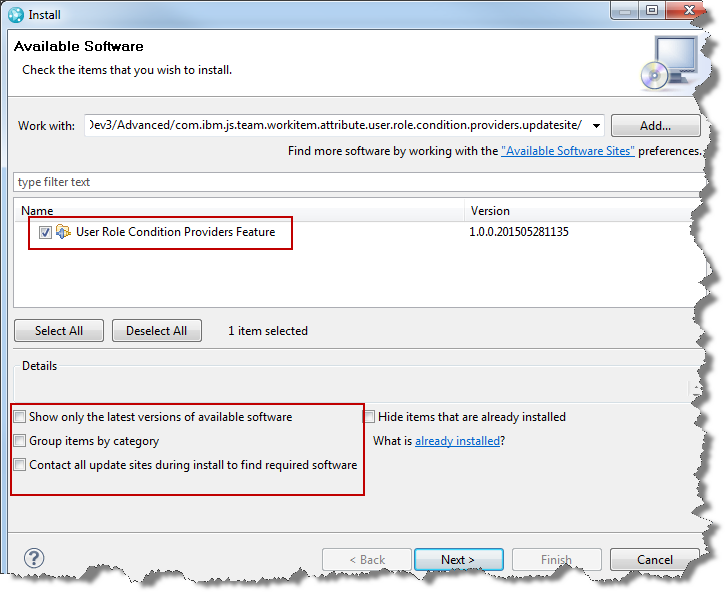
To install the extension on an Eclipse client start Eclipse and select the menu Help>Install New Software…

Install Client Extension Step 1

In the install wizard select add.

Install Client Extension Step 2
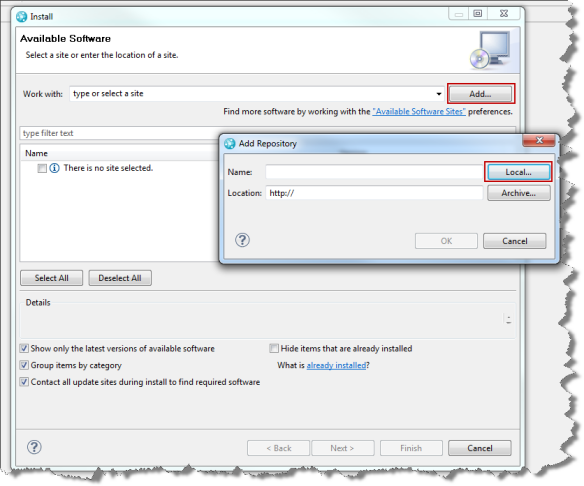
Then select Local and browse to the folder with your project com.ibm.js.team.workitem.attribute.user.role.condition.providers.updatesite

Select the User Role Condition Providers Feature, you might have to deselect the check boxes like below to see it.

Install Client Extension Step 3Press next and follow the wizard to install the extension. Restart the client.

Configure the Project

Open an Eclipse client that has the condition installed to configure it. Open the project area to configure its process.

Create Conditions for the Attributes

Open the Process Configuration. Select Process Configuration>Project Configuration>Configuration Data>Work Items>Attribute Customization.
For each attribute that needs to be read only or required, use the Add button to add a new condition.

Create New Conditions

Provide a name for the condition. The best approach is to name the condition in a naming schema that contains the usage of the condition and the attribute name. As an example name it Read_Only_AttributeName or Required_AttributeName. the reason will become apparent later. It basically helps finding it later to configure it in the operational behavior and the process XML.

You should now see the providers that you deployed in addition to Java Script. Select the provider that works best for you.

Select the ProviderPlease note, if you have groups of attributes that behave the same for all role configurations, you can create one condition for this group, instead of creating it for only one attribute.

After you created your configurations the Attribute Customization section should look as below.

Created Conditions

Configure the Operational Behavior

After creating the conditions needed, the next step is to activate the conditions for the attributes in the operational behavior.

Select Process Configuration>Team Configuration>Operation Behavior.

Select the “Everyone” role and add the preconditions Required Attributes For Condition and Read Only Attributes For Condition.

Precondition Configuration

Please note: if you want to configure this for another role, you have to configure the conditions for that role as well. How to do this efficiently is described below.

For each condition you created add a configuration for the related precondition. Select the condition and the attribute that the condition governs.

Configure Attribute In PreconditionIf you have groups of attributes that behave the same across all workflows and roles, you can use one condition for that group and select all affected attributes here.

The image below shows an example configuration.

Configured Example
Configure the Conditions in the Process Configuration Source

The Conditions don’t have any configuration for workflow states, work item categories and related roles yet. This needs to be done last. To configure the conditions it is necessary to add information to the process configuration source.
Locate the conditions in the process configuration source e.g. by searching for the name of a condition. The conditions are all in one block.

Configure Conditions In Process Configuration Source

For each condition, remove the closing /at the end of the condition element and add a new ending tag .

Configure Condition Step 1

The data should now look like the image below and there should be no errors. If there are errors, correct your XML.

Configure Condition Step 2

Now add the type, state and role configuration for each condition.

Configure Condition Step 3Configure Condition Step 4

You can configure for each condition for which work item type category (work item types with the same workflow), for which state, which roles should match the condition.

Save your work!

Test your work

To test, create a work item and move it through the workflow using user ID’s with role configurations that match your expectation. Make sure the user has roles that match the condition configuration.

Test ConditionIn this case the Attribute Filed Against is required due to the roles of the user and the description is read only in the state. Please note, that the work item is not yet initialized, but the target state is new. The section below explains the format and how to retrieve the data.

Retrieving the Configuration Data

To configure the condition, it is necessary to get the data to do the configuration. This section describes how to get the data.
The State ID’s and the Work Item Type categories as well as the Role ID’s can be retrieved from the process template.

The work item type category can be found in the web UI as well as in the Eclipse UI.
Find Work Item CategoryThe work item type category here is: “com.ibm.team.workitem.workItemType“.

To find the workflow state names use the Eclipse client and search the process configuration source  for the workflow name e.g. Defect Workflow in this case. Scroll down to find the state elements.

Find Workflow State NamesLook up the state ID’s for the states and document them. This is a one-time action and only needs to be maintained if you change workflows and add states.

The state New has the identifier “s1”, the state In Progress has id=”S2” etc.

To find the role Identifiers, open the project area or team area and select the roles.

Find Role Identifiers Step 1

The role test1 has the identifier “test1” the role Product Owner has the identifier “Product Owner”.

Find Role Identifiers Step 2The role “Everyone” has the identifier “default”.

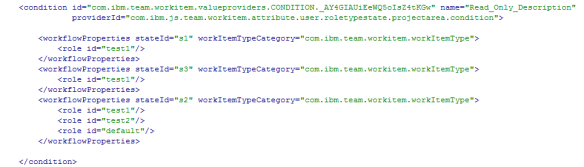
The configuration below configures the condition to return true for

  • a work item of this type category (a defect) in the New state “s1” for the role “test1”.
  • a work item of this type category (a defect) in the Resolved state “s3” for the role “test1”.
  • a work item of this type category (a defect) in the In Progress state “s3” for the roles “test1”, “test2” and Everyone.

Configuration ExampleSee another more complex example below.

Configuration Example 2

Configuring the Operational Behavior for Multiple Roles

Operational behavior still works as explained in Process behavior lookup in Rational Team Concert 2.0. If it is necessary to configure the operational behavior for multiple roles but to make sure the Required and Read Only Attributes work the same as in the configuration for the Everyone role, this can be easily achieved.

Configure the other role(s).

Multi Role Behavior 1

When configuring the operational behavior name the precondition with the role included. For example Required Attributes For Condition Everyone.

Configure the operational behavior for the new role including the Role Name but don’t configure anything. For example name it Required Attributes For Condition Role1.

Search for the configuration for the configured role in the process configuration source.

Multi Role Behavior 2Copy the configuration details into a file. The interesting parts are the sections and <readOnlyAttributes….> .

Now search for the configuration for the new role the same way. Copy the XML with the configuration for the Required Attributes into the operational behavior configuration.   Copy the XML with the configuration for the Read-Only Attributes into the operational behavior configuration.

Save your work!

Since the conditions are configured globally you have essentially cloned the configuration for the other role.

Summary

Using a custom condition and the out of the box operational behavior for Required Attributes For Condition and Read-Only Attributes For Condition, allows to achieve the required behavior.

Keep in mind this is by no means production code. You might want to do more testing.

As always I hope this helps someone out there to get their job done more efficient.

Using Reference Presentations to Create Links and Show Linked Work Items in RTC

I recently complained to our development that creating and displaying links between work items is too complex. I wanted a special presentation for that purpose. To my excitement I was instructed, that we have such a feature. Joy! This post explains how you use it.

I have done so much customization in RTC, that I was convinced I knew all of it already. Hubris! My bad. So there are things I haven’t done in RTC. I assume others also have not spotted this and I think it is worth blogging about.

Add a Presentation of Type References

To be able to show specific references (aka links) from the current work item to other items you basically have to add a new presentation to your editor presentation. On the Editor presentation editor select the section where you want to show the presentation and click Add Presentation….

The Presentation you want is a Non-Attribute-based Presentation. Choose this option and select References from the available set of choices.

In the Link Type selection drop down, select the reference (aka link type) you want to see and maintain here.

The image below shows the steps.

Add Reference Presentation

Use a Presentation of Type References

Once you have done that, you have a new presentation that will show only the references/links that qualify. It will also allow you to create new references/links from that dialog. The image below shows what you can do:

Use Reference PresentationSummary

This kind of presentation allows you to view and modify relationships in a more organized way on the work item editor and can help you understanding the relationships better, especially if the relationship represents important information in your object model.

As always I hope this information is useful to someone out there and helps using RTC more effective.

Using RTC Work Item Attributes to Display RTC Components and other Item Data

The RTC Work Item shall guide the user to the component, where the fix needs to be done. Is it possible to implement this requirement in RTC?

This was basically a requirement that I was asked for how to implement this with RTC. I also remember it being asked in the Jazz.net forum some time ago. I remember this, because my immediate thought was, this is only going to work using customization or extending RTC. I was quite surprised when a colleague monitoring the forum came up with a simple solution. I tried it out and it is really simple. However, it is quite hard to spot how this can be done. Therefore this post summarizes how you can easily do this yourself.

If you are just starting with customizing RTC Work Items, have a look at Process Enactment Workshop for the Rational solution for Collaborative Lifecycle Management 2012 especially Lab 3-5.

This was done with RTC 4.0.5 but it should work with earlier versions of RTC 4.x.

Create a New Attribute of Type Item

First you need to create a new attribute that will contain the information you want. There are a lot of attribute types you can choose from. There are special types that allow to select RTC Data such as users, team areas and the like. All these are for data related to the work item model. There is a special type for RTC data that is not work Item data from the RTC process model. It is easy to overlook. The type can be used as single selection or as a list. When creating the Attribute use

  • Item
  • ItemList

dependent upon your needs to select one or multiple elements.

Attribute Type Item
Attribute Type Item

If you select a ItemList, the work item UI supports selecting multiple items.

Configure the Editor Presentation

Once you have added the attribute, you need to configure the editor presentations to show the attribute as usual. You select

  • The Attribute
  • The Kind of the presentation

The available presentation kinds depend on the attribute type you selected. For the type ItemList, select Item List as kind.

Configure Editor PresentationFinally you can select which kinds of items the user can select. There are several choices that match types where RTC also provides a specialized attribute type, such as WorkItem or TeamArea.

The type Item or ItemList is more flexible and allows you to select any of these kinds and additional types that are not available in special attribute types such as SCM Component.

In the ItemList, you could have various objects that are interesting in this context. For example if you want to express what is affected by a work item.

You can select

  • Let the user choose
  • A specific item type

for the item type type be selectable in the presentation.

Save your changes, to make them available in the process.

Create a Work Item

Now you can create a new work item of the type you modified and select the new attribute. The presentation allows you to choose or add an element. The Select Component Dialog provides you with search and filter mechanisms to find what you need.

Select a ComponentSummary

You can use RTC work items to express relationships of a work item to other objects using special attribute types.

You can then use these new attributes and their values to drive new automation, e.g. check if a change set is actually for the component the related work item claims it to be. I shall see, if I can publish an article about such an advisor soon.

Attribute Customization – Java Based Value Providers, Conditions and Validators

I had to look into how RTC Attribute Customization can be done using Java based Eclipse Extensions. This post shows how this works and provides with examples if you need to get started on the topic.

Update: Also look at A Custom Condition to Make Attributes Required or Read-Only by Role to see more on this kind of extensions.

The Lab 5 talks about using JavaScript for implementing custom providers. It also talks about limitations of the JavaScript API. The current JavaScript API limits you to accessing attributes of the current work items and is also very limited when working with more complex attributes. The JavaScript API in RTC 3.x and 4.x is so limited as it

  • Does not provide means to access extended user information such as team membership or roles
  • Does not allow to access links to Items such as other work items and other work items attributes
  • Does not allow to access information such as subscriptions or attachments

In addition there are few built in providers (see Lab 4 in the workshop) that can be used with list type attributes.

Recently I had to work for a customer request where the built in functionality and the available JavaScript API were clearly not sufficient to match the requirements. This gave me the opportunity to look into extending Attribute Customization using Java based extensions. I thought this would be a nice experience to share.

License and Download

As always, our lawyers reminded me to state, that the code in this post is derived from examples from Jazz.net as well as the RTC SDK. The usage of code from that example source code is governed by this license. Therefore this code is governed by this license, which basically means you can use it for internal usage, but not sell. Please also remember, as stated in the disclaimer, that this code comes with the usual lack of promise or guarantee.

The code presented in this post can be downloaded from here. The code is also available in the RTC Extensions Stream (RTC AttributeCustomization component) in the Jazz In Flight project @ JazzHub. The code shows some simple providers as an entry point and some more complex ones to show the potential.

Just Starting With Extending RTC?

If you just get started with extending Rational Team Concert, or create API based automation, start with the post Learning To Fly: Getting Started with the RTC Java API’s and follow the linked resources.

You should be able to use the code attached to this post in the development environment you set up in the Rational Team Concert Extensions Workshop and get your own extensions working there as well.

In this context, please also consider to at least read through the Process Enactment Workshop for the Rational solution for Collaborative Lifecycle Management lab 4 and lab 5 to understand how attribute customization works.

I looked into Attribute Customization for the RTC Process Enactment Workshop. You should look into Lab 4 if you don’t know how value providers work and are configured in RTC.

See JavaScript Attribute Customization – Where is the log file? for the log file location for debugging.

The code in this post is common code running in the Eclipse client and the RTC Server.

Finding Information in the SDK

Because I never did this kind of extension before, I started with reviewing the Wiki Article about Attribute Customization on Jazz.net. It is also a good idea to review existing java code to get some ideas.

This section describes how to find example code in the SDK, which is very important to be able to do this kind of work.

The following steps require the development environment to be set up like described in this post. This allows basically to search for references to the extension point and find the code that is involved.

First create a plugin project based on the suggestions in the Wiki Article. Then search for references to the Extension point.

Search for References to an extension point

The search will find some plugins extending this extension point.

Available extensions

Just double click the plugin com.ibm.workitem.common to open the plugin XML and review the extensions. You can switch to the Extensions tab in the plugin editor and get a better overview. You can navigate to the extending classes by simply looking their name up in the Extension Element Details section, copying the class name and running a Java Search for the declaration for the type. In the search result, find the result related to the SDK and open it in the package explorer.

Type in the search result - Show in Package Explorer
Type in the search result – Show in Package Explorer

Browse the package explorer and explore the SDK source of all the interesting classes. Open classes to look into the code and find out how they work.

Explorer the SDK code
Explore the SDK code

There are some very interesting examples that are worth looking into. Especially the RoleBasedUserProvider and the SecurityContextProvider.

Code to explore
Code to explore

I find the SecurityContextProvider interesting, because I am interested in automation to control the visibility of work items in the context of working with customers. I have a todo created to try to find time to create my own implementation.

Example Implementations

As usual I started with some very simple examples.

  • A default value provider for string type attributes that returns some text
  • A calculated value provider for string and string list type attributes that returns some text
  • A validator for string type attributes that looks if the string contains some sub string and is configurable in the process configuration

These are available out of the box, but as examples easy enough to do without having to fight with more API and I learned a lot from them for reasons I did not expect.

Example Implementations: attributeType

The first decision necessary when following the suggestions in the Wiki Article and creating the extension, is to decide which type the provider should work for. The Article provides a list of examples for the type ID’s, but this is by no means complete. I am not sure yet, where to find the complete list. This section of a Wiki article could be a good starting point. You can look up examples in the extensions mentioned above. Another Theme seems to be to add List in case you want a list type attribute. For example if the return type is string and you want to support a list attribute, the attribute type is stringList.

Also be aware you can and should add several attribute type definitions if you want the extension to support more than one type. String provider are typical in this case. If you want to be able to select them for all string type attributes, define small, medium and large string like below.

ExtensionPointDefinitonsYou can leave out the settings for isDefault and requiresConfiguration in theExtension Elements Details.

API Available in Providers

All provider implementations get called with the following data:

  • IAttribute attribute, the attribute the provider is called for (not available for conditions)
  • IWorkItem workItem, the workitem context the provider is called for
  • IWorkItemCommon workItemCommon, as an entry point to get more API services
  • IConfiguration configuration, the configuration in the process XML related to this provider
  • IProgressMonitor monitor, the progress monitor (can be null)

You can use the workItemCommon to get other common services. Since the providers run in the client as well as in the server the API you have access to seems to be the API common to both. I found IAuditableCommon and IAuditableCommonProcess so far.

Default Value Provider

The code for a default value provider must implement the interface com.ibm.team.workitem.common.internal.attributeValueProviders.IDefaultValueProvider. The type is correctly generated if you follow the Wiki Article. The implementation here is very simple and just returns a string.

The code below shows a very simple default value provider.

/*******************************************************************************
 * Licensed Materials - Property of IBM
 * (c) Copyright IBM Corporation 2013. All Rights Reserved. 
 *
 * Note to U.S. Government Users Restricted Rights:  Use, duplication or 
 * disclosure restricted by GSA ADP Schedule Contract with IBM Corp.
 *******************************************************************************/
package com.ibm.js.team.workitem.attribute.customization.providers;

import org.eclipse.core.runtime.IProgressMonitor;

import com.ibm.team.repository.common.TeamRepositoryException;
import com.ibm.team.workitem.common.IWorkItemCommon;
import com.ibm.team.workitem.common.internal.attributeValueProviders.IConfiguration;
import com.ibm.team.workitem.common.internal.attributeValueProviders.IDefaultValueProvider;
import com.ibm.team.workitem.common.model.IAttribute;
import com.ibm.team.workitem.common.model.IWorkItem;

public class SampleStringDefaultProvider implements IDefaultValueProvider {

	public SampleStringDefaultProvider() {
	}

	@Override
	public String getDefaultValue(IAttribute attribute, IWorkItem workItem,
			IWorkItemCommon workItemCommon, IConfiguration configuration,
			IProgressMonitor monitor) throws TeamRepositoryException {
		return "String Default Value";
	}
}

Calculated Value Provider

The next example is a simple calculated value provider that returns a string containing the time since 1970 in milliseconds. The interface implemented is com.ibm.team.workitem.common.internal.attributeValueProviders.IValueProvider. Please note, all examples below are typed and specify the return type e.g. .

/*******************************************************************************
 * Licensed Materials - Property of IBM
 * (c) Copyright IBM Corporation 2013. All Rights Reserved. 
 *
 * Note to U.S. Government Users Restricted Rights:  Use, duplication or 
 * disclosure restricted by GSA ADP Schedule Contract with IBM Corp.
 *******************************************************************************/
package com.ibm.js.team.workitem.attribute.customization.providers;

import java.util.Date;

import org.eclipse.core.runtime.IProgressMonitor;

import com.ibm.team.repository.common.TeamRepositoryException;
import com.ibm.team.workitem.common.IWorkItemCommon;
import com.ibm.team.workitem.common.internal.attributeValueProviders.IConfiguration;
import com.ibm.team.workitem.common.internal.attributeValueProviders.IValueProvider;
import com.ibm.team.workitem.common.model.IAttribute;
import com.ibm.team.workitem.common.model.IWorkItem;

public class SampleStringCalculatedValueProvider implements IValueProvider {

	public SampleStringCalculatedValueProvider() {
	}

	@Override
	public String getValue(IAttribute attribute, IWorkItem workItem,
			IWorkItemCommon workItemCommon, IConfiguration configuration,
			IProgressMonitor monitor) throws TeamRepositoryException {
		Date date = new Date();
		return "String Calculated Value: "+date.getTime();
	}
}

Again, very basic to show and understand the concept.

A second example is showing a calculated value for a stringList attribute type. The difference is that it returns a List that contains several values.

/*******************************************************************************
 * Licensed Materials - Property of IBM
 * (c) Copyright IBM Corporation 2013. All Rights Reserved. 
 *
 * Note to U.S. Government Users Restricted Rights:  Use, duplication or 
 * disclosure restricted by GSA ADP Schedule Contract with IBM Corp.
 *******************************************************************************/
package com.ibm.js.team.workitem.attribute.customization.providers;

import java.util.ArrayList;
import java.util.List;

import org.eclipse.core.runtime.IProgressMonitor;

import com.ibm.team.repository.common.TeamRepositoryException;
import com.ibm.team.workitem.common.IWorkItemCommon;
import com.ibm.team.workitem.common.internal.attributeValueProviders.IConfiguration;
import com.ibm.team.workitem.common.internal.attributeValueProviders.IValueProvider;
import com.ibm.team.workitem.common.model.IAttribute;
import com.ibm.team.workitem.common.model.IWorkItem;

public class SampleStringListProvider implements IValueProvider {

	public SampleStringListProvider() {
	}

	@Override
	public List getValue(IAttribute attribute, IWorkItem workItem,
			IWorkItemCommon workItemCommon, IConfiguration configuration,
			IProgressMonitor monitor) throws TeamRepositoryException {
		List result = new ArrayList();
		result.add("Test 1");
		result.add("Test 2");
		result.add("Test 3");
		return result;
	}
}

Validator

The last simple example is a validator that validates if a text field contains a certain sub string. It implements the interface com.ibm.team.workitem.common.internal.attributeValueProviders.IValidator. The validator, configured for a string attribute, by default searches for the search string “Test” in the attribute value and issues a warning.

/*******************************************************************************
 * Licensed Materials - Property of IBM
 * (c) Copyright IBM Corporation 2013. All Rights Reserved. 
 *
 * Note to U.S. Government Users Restricted Rights:  Use, duplication or 
 * disclosure restricted by GSA ADP Schedule Contract with IBM Corp.
 *******************************************************************************/
package com.ibm.js.team.workitem.attribute.customization.providers;

import org.eclipse.core.runtime.IProgressMonitor;
import org.eclipse.core.runtime.IStatus;
import org.eclipse.core.runtime.Status;

import com.ibm.team.repository.common.TeamRepositoryException;
import com.ibm.team.workitem.common.IWorkItemCommon;
import com.ibm.team.workitem.common.internal.attributeValueProviders.IConfiguration;
import com.ibm.team.workitem.common.internal.attributeValueProviders.IValidator;
import com.ibm.team.workitem.common.model.IAttribute;
import com.ibm.team.workitem.common.model.IWorkItem;

/**
 * Validates if a string is contained in the text.
 * 
 * Configure in Process XML
 * 
 * 
 *
 */
public class SampleStringContainsSubstring implements IValidator {

	private static final String SMAPLE_STRING_CONTAINS_SUBSTRING = "com.ibm.js.team.workitem.attribute.customization.providers.SmapleStringContainsTestValidator";
	private static final String REQUIRED_CONTENT = "requiredContent";
	private static final String WARNING_LEVEL = "warning";
	private static final String SEVERITY = "severity";
	private static final String VALIDATION_OK_STATUS = "ValidationOK";
	private static final String CONFIGURATION = "configuration";

	private String fSearchString;
	private int fValidationSeverity;

	public SampleStringContainsSubstring() {
	}

	@Override
	public IStatus validate(IAttribute attribute, IWorkItem workItem,
			IWorkItemCommon workItemCommon, IConfiguration configuration,
			IProgressMonitor monitor) throws TeamRepositoryException {
		getConfiguration(configuration);

		String value = (String) attribute.getValue(workItemCommon.getAuditableCommon(), workItem, monitor);
		if(value.indexOf(fSearchString)>=0){
			return new Status(Status.OK, SMAPLE_STRING_CONTAINS_SUBSTRING,VALIDATION_OK_STATUS);
		}
		return new Status(fValidationSeverity, SMAPLE_STRING_CONTAINS_SUBSTRING, "Validation: String must contain '"+fSearchString+"'");
	}

	private void getConfiguration(IConfiguration configuration) {
		fSearchString = "Test";
		fValidationSeverity=Status.WARNING;
		IConfiguration parameters= configuration.getChild(CONFIGURATION);
		if(null!=parameters){ // We got a configuration
			String customSearchString=parameters.getString(REQUIRED_CONTENT);
			if(null!=customSearchString)
				fSearchString=customSearchString;
			String configuredValidationSeverity=parameters.getString(SEVERITY);
			if(null!=configuredValidationSeverity)
				fValidationSeverity =  configuredValidationSeverity.equalsIgnoreCase(WARNING_LEVEL)?Status.WARNING:Status.ERROR;
		}
	}
}

The code is a bit more complex, because it allows to configure the test string and the severity in the process XML. The configuration and defaults are read in getConfiguration() and stored in fields. Then the attribute value is read and tested if it contains the substring. If not, a message is created that shows in the UI. Based on the configuration the severity is of level error or warning. Error would allow to prevent saving a work item together with the Attribute Validation work item save precondition. The configuration would look like this:

Validator configuration in the process XML

Condition

I could not come up with an easy condition. Instead I looked into more complex things next. The next examples I did, were focused to automate something based on the role of a user.

The following condition provides information, if the user has a set of roles in the process area the workitem is owned by. It can for instance be used to make attributes mandatory or read only based on this information. The condition is fully configurable in the process XML and can manage one or more roles.

Please be aware that the extension point schema has an issue. If you create the class to handle the extension, you get an error. Create it manually or fix it. The class you create should implement com.ibm.team.workitem.common.internal.attributeValueProviders.ICondition.

Please see the code blow for details.

/*******************************************************************************
 * Licensed Materials - Property of IBM
 * (c) Copyright IBM Corporation 2013. All Rights Reserved. 
 *
 * Note to U.S. Government Users Restricted Rights:  Use, duplication or 
 * disclosure restricted by GSA ADP Schedule Contract with IBM Corp.
 *******************************************************************************/
package com.ibm.js.team.workitem.attribute.customization.providers;

import java.util.List;

import org.eclipse.core.runtime.IProgressMonitor;

import com.ibm.team.repository.common.IContributorHandle;
import com.ibm.team.repository.common.TeamRepositoryException;
import com.ibm.team.workitem.common.IWorkItemCommon;
import com.ibm.team.workitem.common.internal.attributeValueProviders.ICondition;
import com.ibm.team.workitem.common.internal.attributeValueProviders.IConfiguration;
import com.ibm.team.workitem.common.model.IWorkItem;

/**
 * Condition that checks if the user editing the work item has a specific role
 * 
 * Configure in Process XML
 * 
 * 
 * 
 *
 */
public class SampleCurrentUserHasRoleCondition implements ICondition {

	/* (non-Javadoc)
	 * @see com.ibm.team.workitem.common.internal.attributeValueProviders.ICondition#matches(com.ibm.team.workitem.common.model.IWorkItem, com.ibm.team.workitem.common.IWorkItemCommon, com.ibm.team.workitem.common.internal.attributeValueProviders.IConfiguration, org.eclipse.core.runtime.IProgressMonitor)
	 * 
	 * Return true if the user has the specified role, else false
	 */
	@Override
	public boolean matches(IWorkItem workItem, IWorkItemCommon workItemCommon,
			IConfiguration configuration, IProgressMonitor monitor)
			throws TeamRepositoryException {
		List lookupRoles = ContributorUtil.getConfiguration(configuration);
		IContributorHandle user= workItemCommon.getAuditableCommon().getUser();
		return ContributorUtil.hasRole(workItem, user, lookupRoles, workItemCommon, monitor);
	}
}

That is short. The reason is, that all the code is in the class ContributorUtil. I was able to reuse that code in several ways and ended up collecting it in the utility class. The method getConfiguration() basically gets the roles to look for from the process configuration.

Then the code gets the IContributorHandle of the current user and the method hasRole check if the user has the role.

The code for the ContributorUtil is below.

/*******************************************************************************
 * Licensed Materials - Property of IBM
 * (c) Copyright IBM Corporation 2013. All Rights Reserved. 
 *
 * Note to U.S. Government Users Restricted Rights:  Use, duplication or 
 * disclosure restricted by GSA ADP Schedule Contract with IBM Corp.
 *******************************************************************************/
package com.ibm.js.team.workitem.attribute.customization.providers;

import java.util.ArrayList;
import java.util.Arrays;
import java.util.Collection;
import java.util.List;

import org.eclipse.core.runtime.IProgressMonitor;

import com.ibm.team.process.common.IProcessArea;
import com.ibm.team.process.common.IProcessAreaHandle;
import com.ibm.team.process.common.IRole;
import com.ibm.team.repository.common.IContributor;
import com.ibm.team.repository.common.IContributorHandle;
import com.ibm.team.repository.common.TeamRepositoryException;
import com.ibm.team.workitem.common.IAuditableCommonProcess;
import com.ibm.team.workitem.common.IWorkItemCommon;
import com.ibm.team.workitem.common.internal.attributeValueProviders.IConfiguration;
import com.ibm.team.workitem.common.model.IWorkItem;
import com.ibm.team.workitem.common.model.ItemProfile;

/**
 * Utility class to provide contributor related utilities
 *
 */
public class ContributorUtil {

	private static final String DEFAULT_ROLE_TEAM_MEMBER = "ScrumMaster";
	static final String ROLE = "role";
	static final String PROCESSAREA = "processArea";

	/**
	 * Returns a list of members that have a certain role in the process area a work item is filed against
	 * 
	 * @param workItem
	 * @param lookupRoles
	 * @param workItemCommon
	 * @param monitor
	 * @return a list of contributor handles
	 * @throws TeamRepositoryException
	 */
	public static List findProcessAreaMembersByRole(IWorkItem workItem, Collection lookupRoles,
			IWorkItemCommon workItemCommon, IProgressMonitor monitor)
			throws TeamRepositoryException {
		IProcessAreaHandle processAreaHandle = workItemCommon.findProcessArea(workItem, monitor);
		IProcessArea processArea = (IProcessArea) workItemCommon.getAuditableCommon().resolveAuditable(processAreaHandle,
				ItemProfile.PROCESS_AREA_DEFAULT,monitor);
		IAuditableCommonProcess auditableCommonProcess= workItemCommon.getAuditableCommon().getProcess(processArea, monitor);
		IContributorHandle[] userhandles = auditableCommonProcess.getContributorsWithRole(processArea.getMembers(), processArea, lookupRoles.toArray(new String[lookupRoles.size()]), monitor);
		return workItemCommon.getAuditableCommon().resolveAuditables(Arrays.asList(userhandles), ItemProfile.CONTRIBUTOR_DEFAULT, monitor);
	}

	/**
	 * Returns true if the user working on the work item has a specified role in the process area 
	 * the work item is filed against
         *
	 * @param workItem
	 * @param user
	 * @param lookupRoles
	 * @param workItemCommon
	 * @param monitor
	 * @return true if the user has the specified role, else false
	 * @throws TeamRepositoryException
	 */
	public static boolean hasRole(IWorkItem workItem, IContributorHandle user, List lookupRoles,
			IWorkItemCommon workItemCommon, IProgressMonitor monitor)
			throws TeamRepositoryException {
		IProcessAreaHandle processAreaHandle = workItemCommon.findProcessArea(workItem, monitor);
		IProcessArea processArea = (IProcessArea) workItemCommon.getAuditableCommon().resolveAuditable(processAreaHandle,
				ItemProfile.PROCESS_AREA_DEFAULT,
				monitor);
		IAuditableCommonProcess auditableCommonProcess= workItemCommon.getAuditableCommon().getProcess(processArea, monitor);
		Collection roles = auditableCommonProcess.getContributorRoles(user, processArea, monitor);
		for (IRole aRole : roles) {
			if(lookupRoles.contains(aRole.getId())){
				return true;
			}
		}
		return false;
	}

	/**
	 * Reads the role configuration
	 * 
	 * Configure in Process XML
	 * 
	 * 
	 * 
	 * 
	 * @param configuration
	 * @return
	 */
	public static List getConfiguration(IConfiguration configuration) {
		ArrayListlookupRoles=new ArrayList();

		List processAreaConfigurations= configuration.getChildren(PROCESSAREA);
		if(null!=processAreaConfigurations&&!processAreaConfigurations.isEmpty()){ // We got a configuration
			for (IConfiguration roleConfiguration : processAreaConfigurations) {
				String foundRole=roleConfiguration.getString(ROLE);
				if(foundRole!=null){
					lookupRoles.add(foundRole);
				}
			}
		} else {
			lookupRoles.add(DEFAULT_ROLE_TEAM_MEMBER);
		}
		return lookupRoles;
	}
}

The method ContributorUtil.hasRole() basically gets the process area and then gets the roles of the user in this process area and then checks if one of the roles matches a configured role.

ContributorUtil.getConfiguration() basically reads the process XML configured for the extension and returns a list of roles configured. By default and unconfigured it looks for Team Member. Please be aware it looks for the role ID and not the display name.

Value Set Provider

As an example for a value set provider that implements com.ibm.team.workitem.common.internal.attributeValueProviders.IValueSetProvider see the example that provides a set of users with roles. The code looks as shown below:

/*******************************************************************************
 * Licensed Materials - Property of IBM
 * (c) Copyright IBM Corporation 2013. All Rights Reserved. 
 *
 * Note to U.S. Government Users Restricted Rights:  Use, duplication or 
 * disclosure restricted by GSA ADP Schedule Contract with IBM Corp.
 *******************************************************************************/
package com.ibm.js.team.workitem.attribute.customization.providers;

import java.util.List;

import org.eclipse.core.runtime.IProgressMonitor;

import com.ibm.team.repository.common.IContributor;
import com.ibm.team.repository.common.TeamRepositoryException;
import com.ibm.team.workitem.common.IWorkItemCommon;
import com.ibm.team.workitem.common.internal.attributeValueProviders.IConfiguration;
import com.ibm.team.workitem.common.internal.attributeValueProviders.IValueSetProvider;
import com.ibm.team.workitem.common.model.IAttribute;
import com.ibm.team.workitem.common.model.IWorkItem;

/**
 * This ValueSet Provider returns a list of users that have the configured role 
 * in the process area the work item is filed against
 * 
 * Configure in Process XML
 * 
 *   
 * 
 *
 */
public class SampleUsersWithRoleValueSetProvider implements IValueSetProvider {

	@Override
	public List<? extends IContributor> getValueSet(IAttribute attribute, IWorkItem workItem,
			IWorkItemCommon workItemCommon, IConfiguration configuration,
			IProgressMonitor monitor) throws TeamRepositoryException {
		List lookupRoles = ContributorUtil.getConfiguration(configuration);
		return ContributorUtil.findProcessAreaMembersByRole(workItem, lookupRoles,
				workItemCommon, monitor);
	}
}

It uses the same methods provided by the ContributorUtil class used by the other more complex providers and conditions.

It works for contributor as well as contributorList attribute types.

Additional Providers

ContributorUtil.findProcessAreaMembersByRole() basically finds the users that have a role matching the list of roles in the process area and returns the users as list. I used this in several other providers.

  • Sample User With Role In ProcessArea Default provides a default value for one user with matching roles (the first of the returned users) for a user type attributes
  • Sample User With Role In ProcessArea Default provides a default value for all users with matching roles  for a userList type attributes
  • Sample User With Role In ProcessArea Calculated Value returns the first user in the list of found users with one of the roles back as calculated value for user type attributes
  • Sample Users With Role In ProcessArea Calculated Value returns all matching users found for userList attribute types
  • Sample Users With Role In ProcessArea provides users with matching roles

The image below shows the classes that implement the required interfaces.

Additional Providers for users with roles

All the provider classes look very similar. They implement one or more interfaces and use the utility class to get the required data. Here an example:

/*******************************************************************************
 * Licensed Materials - Property of IBM
 * (c) Copyright IBM Corporation 2013. All Rights Reserved. 
 *
 * Note to U.S. Government Users Restricted Rights:  Use, duplication or 
 * disclosure restricted by GSA ADP Schedule Contract with IBM Corp.
 *******************************************************************************/
package com.ibm.js.team.workitem.attribute.customization.providers;

import java.util.List;

import org.eclipse.core.runtime.IProgressMonitor;

import com.ibm.team.repository.common.IContributor;
import com.ibm.team.repository.common.TeamRepositoryException;
import com.ibm.team.workitem.common.IWorkItemCommon;
import com.ibm.team.workitem.common.internal.attributeValueProviders.IConfiguration;
import com.ibm.team.workitem.common.internal.attributeValueProviders.IDefaultValueProvider;
import com.ibm.team.workitem.common.internal.attributeValueProviders.IValueProvider;
import com.ibm.team.workitem.common.model.IAttribute;
import com.ibm.team.workitem.common.model.IWorkItem;

/**
 * Implements a value provider that returns the users that have a specific role in the process
 * area the work item is filed against.
 * 
 * Configure in Process XML
 * 
 * 
 * 
 * 
 *
 */
public class SampleUserWithRoleValueProvider implements IDefaultValueProvider,IValueProvider {

	public SampleUserWithRoleValueProvider() {
	}

	@Override
	public IContributor getValue(IAttribute attribute, IWorkItem workItem,
			IWorkItemCommon workItemCommon, IConfiguration configuration,
			IProgressMonitor monitor) throws TeamRepositoryException {

		List lookupRoles = ContributorUtil.getConfiguration(configuration);
		List users = ContributorUtil.findProcessAreaMembersByRole(workItem, lookupRoles,
				workItemCommon, monitor);
		if(!users.isEmpty()){
			return users.get(0);
		}
		return null;
	}

	@Override
	public IContributor getDefaultValue(IAttribute attribute,
			IWorkItem workItem, IWorkItemCommon workItemCommon,
			IConfiguration configuration, IProgressMonitor monitor)
			throws TeamRepositoryException {

		return getValue(attribute, workItem, workItemCommon, configuration, monitor);
	}
}

All these providers can be configured for one or more roles in the process XML like shown below. The configuration is within the entry for the provider as described in the Jazz.net Wiki entry about attribute customization.

Provider configured with two roles

Deploying

I ran this in a test environment set up as described here.

The downloadable code contains a feature and an update site project. Follow the Rational Team Concert Extension Workshop and the instructios in the Wiki Article about Attribute Customization to deploy the code on the client and the server.

Related Posts

Summary

The code above is a good starting point if you want to create your own providers. There are more capabilities that you can use with Java compared to JavaScript. What data really is accessible remains to be seen. I still have to look if it would be possible to for example access SCM components and the like. I hope it is work reading and helps some users out there to save some time to get started with this topic.