After looking into how to create and update work items the question becomes, how to find work items to begin with. OSLC provides a query mechanism to allow querying for items. This post intents to show how OSLC queries work including some examples that work for me. The techniques explained in the previous posts in this series are important. If necessary, go back to the previous posts to understand the details. As usual the focus in this blog is EWM/RTC, however, the OSLC Query mechanism works for all product supporting it. So what is explained here based on EWM will work with ETM, DNG etc.
Context of the blog post is the series
This is the series of planned posts I intent to publish over time. Most of the examples will be EWM based, but quite a lot of the content applies to more ELM applications. The examples where performed with versions 6.0.6.1 and 7.0.x.
- Using the EWM REST and OSLC APIs
- ELM Authentication
- EWM Discovery
- EWM Work Item OSLC CM API
- EWM OSLC Query API – this post
- EWM REST API to access existing Work Item Queries
- EWM Reportable REST API
External Links
I used at least the following links for exploring the OSLC Query mechanism. The latest version of the OSLC Query V3 document contains several examples which are very helpful. I still found it a challenge to get some of the queries working.
RDF XML or JSON?
The examples in this blog are using the content type application/rdf+xml. Some examples work with the content type application/json, provided the function to parse the files are switched to using a JSON parser, some do not. The posts in this blog series are using RDF+XML and I decided to stay with it, to make it easier to follow.
Query Base
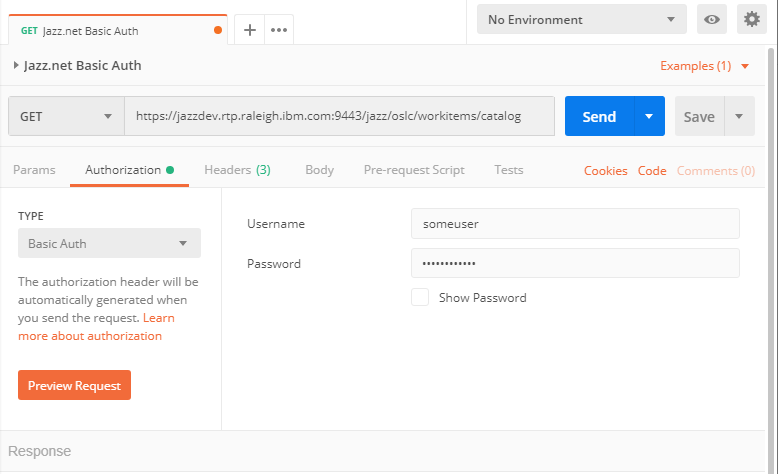
Before being able to execute a query, it is necessary to discover the query base. The query base is the URI that defines the root for the OSLC query. The first step is to get the service provider catalog from the rootservices document as described in the blog post about EWM OSLC Discovery. Get the rootservices document
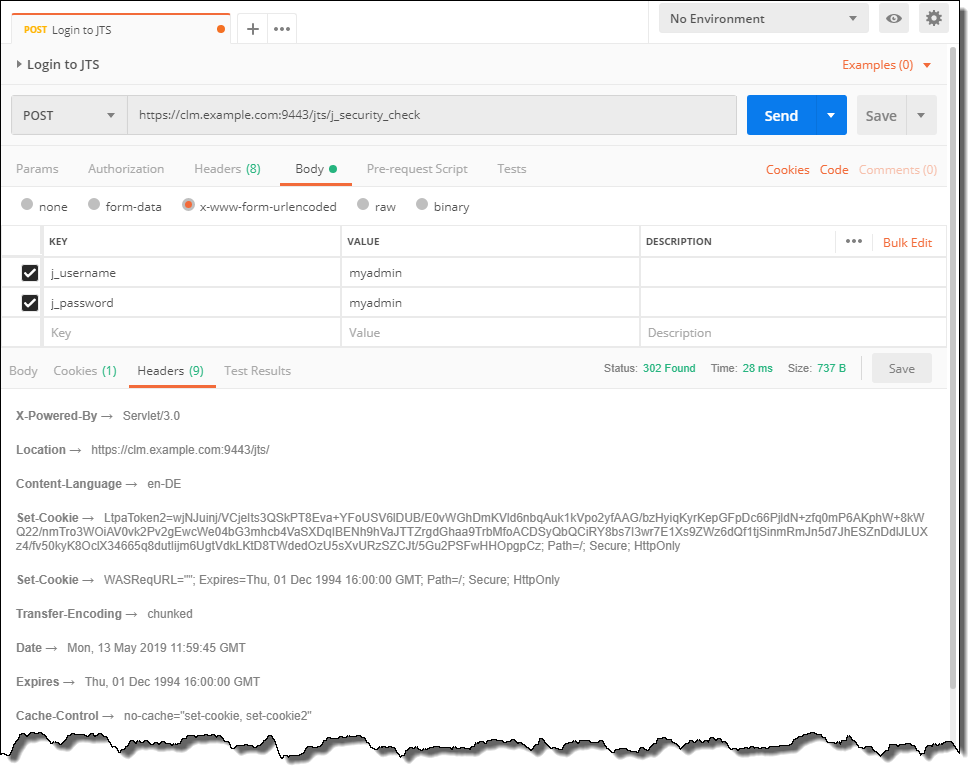
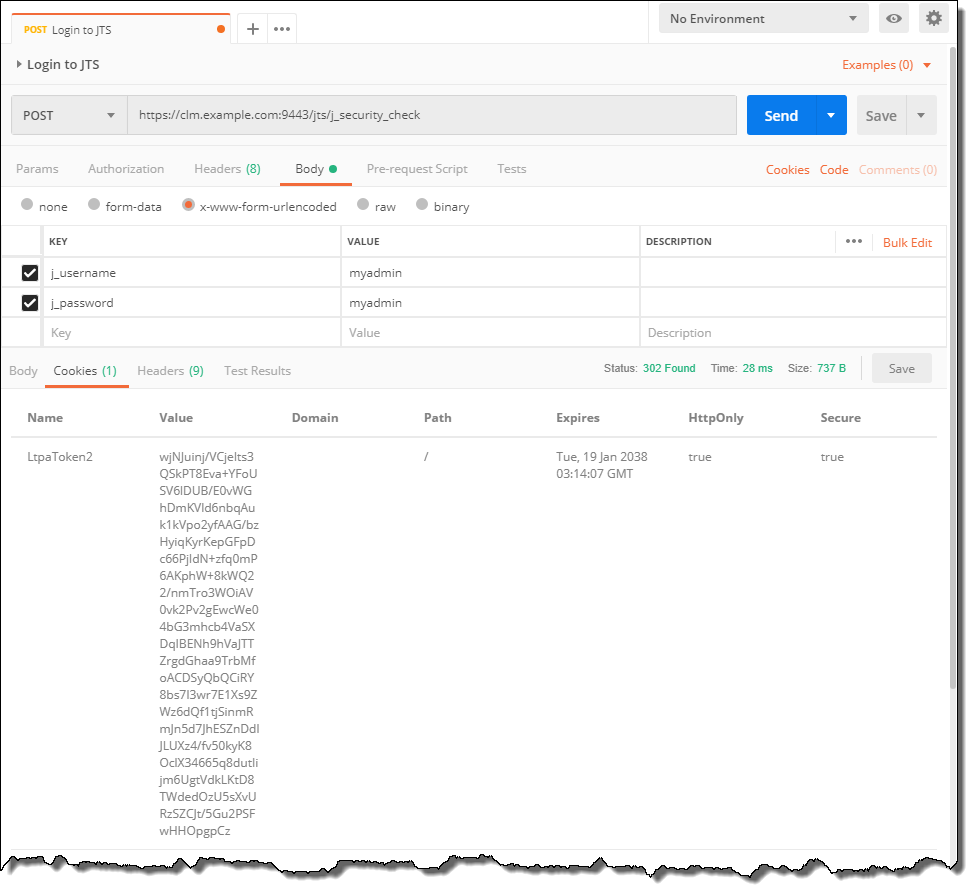
GET https://elm.example.com:9443/ccm/rootservices
Accept application/rdf+xml; charset=utf-8
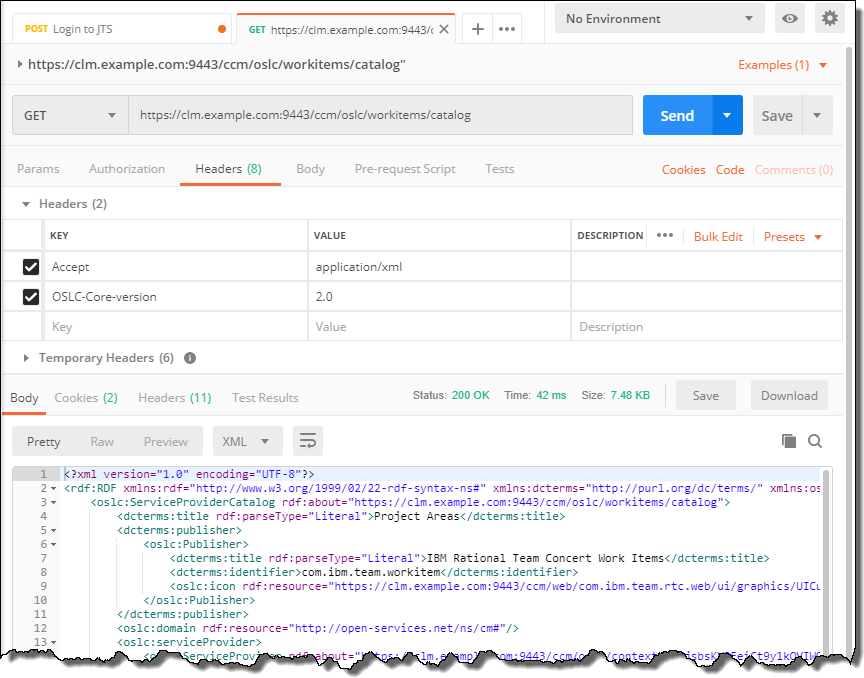
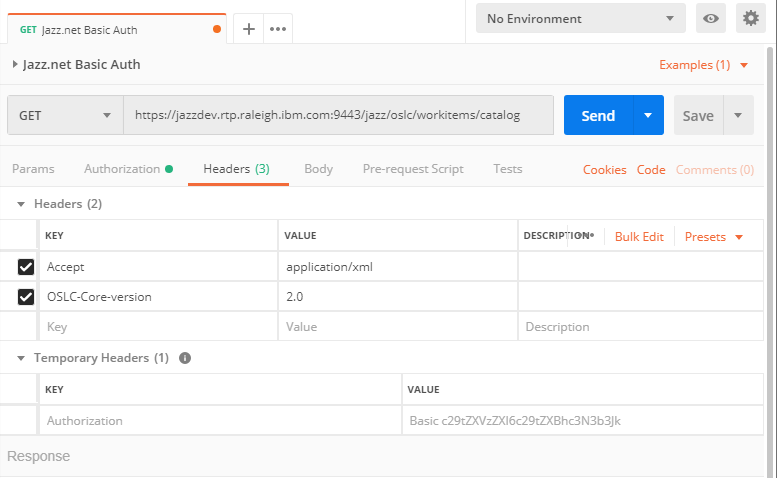
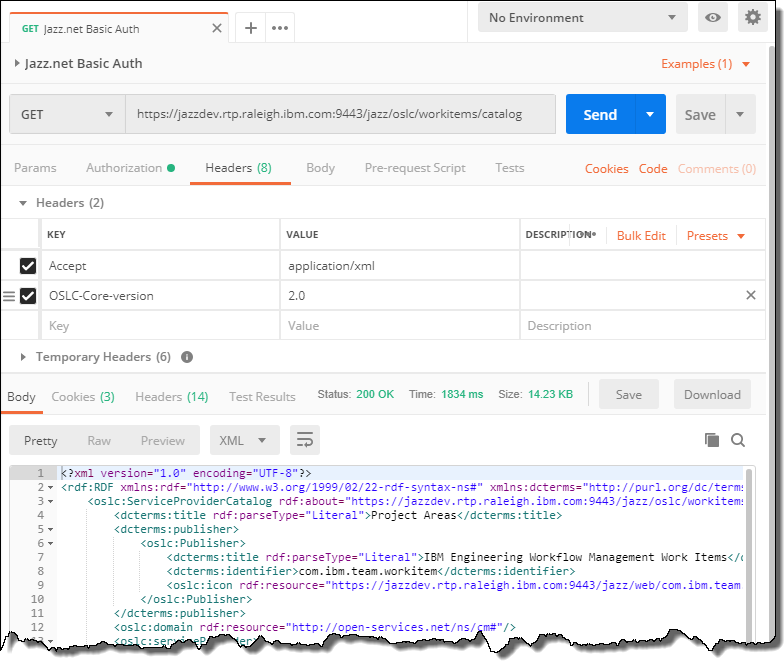
OSLC-Core-Version 2.0Get the service provider catalog like below. Pass the OSLC-Core-Version and the Accept content type header. This step requires authentication to be done.
https://elm.example.com:9443/ccm/oslc/workitems/catalogThe catalog lists the services available for each project area. To narrow down to a project area perform a GET on the work item service for the desired project area, providing the headers mentioned above. As an example
GET https://elm.example.com:9443/ccm/oslc/contexts/_8e5qfFpmEeukW7cqqDjAuA/workitems/servicesThe resulting response body contains various services that are provided for the various work item types of he project area.
- Various dialogs such as OSLC selection, creation dialogs and pickers
- The OSLC creation factories for all the work item types
- The OSLC resource shapes for all the work item types
- The OSLC query capabilities
To be able to query for work items, it is necessary to analyze the query capabilities provided by the service provider. The query capabilities can be found by searching for the oslc:queryCapability nodes.
There are usually at least two query capabilities in the work item service provider for an EWM project area. One is the query capability for deliverables. A deliverable is also referred to as a release and is a work item attribute type. The query capabilities for deliverables can be found using the resourceType http://open-services.net/ns/cm#Deliverable.
The second query capability is for work items (in OSLC referred to as change requests). The image below shows the oslc query capabilities for work items. This can be identified by the resourceType http://open-services.net/ns/cm#ChangeRequest

The oslc:queryBase is the URI for the work item OSLC query mechanism for the selected project area. It will be used in constructing the OSLC Query URI. The query base has the form:
https://elm.example.com:9443/ccm/oslc/contexts/_8e5qfFpmEeukW7cqqDjAuA/workitemswhere the second last segment is the internal unique ID of the project area.
The query capability also provides a resource shape for the Tracked Resource Set (TRS) provider. The resource shape has the form
https://elm.example.com:9443/ccm/oslc/context/_8e5qfFpmEeukW7cqqDjAuA/trs/shapes/workitems/queryThe resource shape provides the information about the attributes provided by the TRS. The resource shape contains a oslc:valueShape for work items based on the work item type defect.

This provides the value shape that defines the common work item attributes, their types and the allowed values for these work item attribute value types. It is possible to GET the oslc:valueShape value shape (provide the OSLC related headers) like below:
GET https://elm.example.com:9443/ccm/oslc/context/_8e5qfFpmEeukW7cqqDjAuA/shapes/workitems/defect This value shape provides with all the common attribute and link types. The work item of a specific type might still have additional custom attributes. The post EWM Work Item OSLC CM API explains how to get that information using the work item type specific resource shape associated with the creation factory.
The image below shows the code that gets the query capabilities out of the project area work item service provider document.

This code shows how the query base is extracted from the service provider catalog. To do this, the code identifies the change request resource type and gets the associated query base.

Having the query base it is now possible to execute OSLC queries. The code below executes the most simple form of OSLC query:

The code performs the GET method on the query base.
GET https://elm.example.com:9443/ccm/oslc/contexts/_8e5qfFpmEeukW7cqqDjAuA/workitems

Accept application/rdf+xml; charset=utf-8
OSLC-Core-Version 2.0
Please note the OSLC headers Accept and OSLC-Core-Version above. The same headers are used in all calls in this blog.
Paging
The request is redirected to support paging like shown below. The paging mechanism is used to split queries with large result sets into smaller, more manageable chunks.

The response body contains the work item URI’s for the first page of work items. Note, because there is no query parameter, the query only returns the work item URI’s and not any other property data. To get more properties of the resulting work items e.g. to display the summary would, in this case, require to get the work item using the URI from the response.

In addition the response contains information about the total amount of results and the URL to get the next page, in case the number of results exceeds the maximum items returned by this page. The image above shows the oslc:responseInfo which contains oslc:nextPage with the URI to get the next query result page and the oslc:totalCount with the total count of query results.
The code below shows how the query is executed. In the while loop a GET request to the query URI is executed. The result of the call is analyzed and this provides the next page of the query, if paging is needed. If no next page is available, the query is finished.

The code below processes the result for a result page and gets the resulting work items to display them. It prints the work item URI. It also tries to get and print the identifier (Id) and the title (summary) of each work item in the query. If the identifier or the summary is not available nothing is printed. The code then analyzes the paging information. It returns the next page URL if there is one. It also returns the total count of the result.

URL Encoding
OSLC Query provides a mechanism to create simple queries to retrieve items. These queries are sent as a URL in a GET HTTP request. There are limitations on which characters can be sent in the URL. Some characters have specific meanings in the URL. To avoid creating and sending the wrong or illegal URLs, parts of the OSLC query parameters need to be URL encoded. See some explanations about the URL encoding here:
In the code below url encoding is done using the function urlEncodeString as shown below.
comm.urlEncodeString('URL Encode me')The code URL encodes the data in a way that has worked for me. I am not totally sure I understand the URL encoding in all its details and there might be issues in the code below. If I got something incorrect, please leave a comment with a suggestion to correct it.
More complex OSLC Queries
The code below uses the following constants (mind the = at the end of each term) which are used to compose more complex OSLC Queries:
select = 'oslc.select='
where = 'oslc.where='
searchTerms = 'oslc.searchTerms='
orderBy = 'oslc.orderBy='
prefix = 'oslc.prefix='
The statements represented by above constants and how they work are explained in the following sections.
The oslc.select Statement
OSLC queries support selecting the properties supposed to be returned in the query. The statement that is used for that is the oslc.select statement. The code below shows how the select statement is used. The first three lines are used to control running the queries and creating the file name for logging and can be ignored.
The interesting part is the selectString1. It defines the list of properties that should be returned for each query result. In the case below we want the type, the id, the title, the description, when it was last modified, who modified it, when it was created and who created it for each work item. This information is encoded in the selectString1 by creating a comma separated list of property identifiers. The select statement term is then created by concatenating the select statement ‘oslc.select=’ with the URL encoded version of the selectString1. This term is added to the query base as first query parameter using the separator ‘?’.

When this query is run, the query result contains the properties for the work items that are returned in the query result. The image below shows the resulting data in the response.

The select statement can be nested to provide nested data. It is possible to use ‘*’ to select all available properties. The amount of data that is transferred can impact performance of the communication. The specification mentions that the servers SHOULD accept rdf:nil as single property. Both extremes are commented out in the cod above.
The oslc.properties Statement
The oslc.properties statement can be used to limit the set of properties or attributes of a work item that are considered in the OSLC request. The oslc.properties can be used in a GET request. In this case it can be used to specify which properties the requestor is interested in. The server does not have to collect and transmit all properties, but only the ones of interest.
The oslc.properties can be also used when updating a work item. This allows to perform partial updates. There is no example provided in this blog, but the syntax and encoding of oslc.properties and oslc.select are the same.
The oslc.where Statement
The oslc.where statement can be used to specify which work items to query. The first example below shows a query for the work item with the identifier 1. The select statement uses * to select all work item properties.

The URL that is created can be seen below. The encoding makes it hard to understand. The important request headers are the OSLC-Core-Version and the Accept header.

The image below shows parts of the resulting RDF-XML for the work item with all the data for its properties.

The In statement can be used to search for properties being in a range. The code below searches for the work items with identifiers being 1, 3, 9, 50. The query would run successful, if there are IDs that are not found.

Please note as documented here, especially in the syntax section, the oslc.where statement only supports to compose complex conditions using the boolean operation ‘and‘. The operation ‘not’, ‘or’ or other complex nesting is not supported.
Before looking into more examples lets introduce the next statement.
Sorting – The oslc.orderBy Statement
The statement oslc.orderBy can be used to define the order for the result set. The example below finds all work items with the type defect and requests the result set to be ordered by severity (descending) and then by id (ascending). The order is defined with a prefix for the property. The prefix is + for ascending and – as descending order. Multiple order specification can be given in a comma separated list.

Unfortunately, the orderBy seems not to work for EWM 7.0.2 and the accept format application/rdf+xml. I have seen it working with application/json.
Full text Search – the oslc.searchTerms Statement
The statement oslc.searchTerms can be used for full text search. The query below finds all work items that can be fond by full text searching for the term ‘dividend‘ creates 20 hits with the JKE Banking Sample.

Define a Namespace Prefix – oslc.prefix
The OSLC query mechanism allows to define new namespace prefixes that can be used in the oslc.where, oslc.orderBy, and oslc.select statement. My experimentation with this feature was quite problematic. What worked for me is the following:
To define a namespace create a variable with the namespace prefix, including the equals sign, and encode the URL. Then use only one namespace in the oslc.prefix definition Only define one prefix for one namespace in each oslc.prefix statement.
pdcterms = 'dcterms=' + comm.urlEncodeString('<http://purl.org/dc/terms/>')
prefixTerm = 'oslc.prefix=' + pdcterms
The code below defines several namespaces (mind the encoding part). Based on these namespaces I create a prefix term for each of the namespaces based on ‘oslc.prefix=’ and the namespace URI. To define multiple namespaces in a query concatenate the prefix terms with ‘&’. Some discussions on Jazz.net indicate it might be possible to use a comma separated list. I could not get this to work.

To use the prefixes in a query, just include the prefixes as query parameter.

The query URI can become very long when providing many prefixes.

Search For Items With a Specific Enumeration Literal Value
The image below shows a query that selects only work items that have the severity set to critical. The enumeration literal to be provided for the selection is information that can be looked up by querying the resource shape and allowed values for each work item type associated to the creation factories. For common work item attributes the available attributes and allowed values can be found using the chain resourceShape to valueShape associated with the query base.

Search For Items Modified After a Certain Date
The image below shows a where term that selects all work items that are modified after a certain date.

Compound Where Terms
The OSLC Query mechanism supports compound where terms are built form simple terms. The only supported boolean operation is and. Or is not supported, neither is ‘not’. The code below shows a query that looks for work items of type ‘defect’ and severity ‘critical’.

Summary
This concludes my short blog about the OLSC Query mechanism. My intention, in addition to understand it better myself, was to provide some working examples and how to create the queries. I have tried this in the past and got some where, but it was quite challenging. The documentation I had available in the past was often lacking some small but important information. The documentation for OSLC CM 3.0 has improved a lot, but apparently there are still issues you can run into.
So as always I hope I was able to provide simple but relevant examples that help users of this technology to achieve their goals and save some time.