After looking into how to create and update work items the question becomes, how to find work items to begin with. OSLC provides a query mechanism to allow querying for items. This post intents to show how OSLC queries work including some examples that work for me. The techniques explained in the previous posts in this series are important. If necessary, go back to the previous posts to understand the details. As usual the focus in this blog is EWM/RTC, however, the OSLC Query mechanism works for all product supporting it. So what is explained here based on EWM will work with ETM, DNG etc.
Context of the blog post is the series
This is the series of planned posts I intent to publish over time. Most of the examples will be EWM based, but quite a lot of the content applies to more ELM applications. The examples where performed with versions 6.0.6.1 and 7.0.x.
I used at least the following links for exploring the OSLC Query mechanism. The latest version of the OSLC Query V3 document contains several examples which are very helpful. I still found it a challenge to get some of the queries working.
The examples in this blog are using the content type application/rdf+xml. Some examples work with the content type application/json, provided the function to parse the files are switched to using a JSON parser, some do not. The posts in this blog series are using RDF+XML and I decided to stay with it, to make it easier to follow.
Query Base
Before being able to execute a query, it is necessary to discover the query base. The query base is the URI that defines the root for the OSLC query. The first step is to get the service provider catalog from the rootservices document as described in the blog post about EWM OSLC Discovery. Get the rootservices document
GET https://elm.example.com:9443/ccm/rootservices

Accept application/rdf+xml; charset=utf-8
OSLC-Core-Version 2.0
Get the service provider catalog like below. Pass the OSLC-Core-Version and the Accept content type header. This step requires authentication to be done.
The catalog lists the services available for each project area. To narrow down to a project area perform a GET on the work item service for the desired project area, providing the headers mentioned above. As an example
GET https://elm.example.com:9443/ccm/oslc/contexts/_8e5qfFpmEeukW7cqqDjAuA/workitems/services
The resulting response body contains various services that are provided for the various work item types of he project area.
Various dialogs such as OSLC selection, creation dialogs and pickers
The OSLC creation factories for all the work item types
The OSLC resource shapes for all the work item types
The OSLC query capabilities
To be able to query for work items, it is necessary to analyze the query capabilities provided by the service provider. The query capabilities can be found by searching for the oslc:queryCapability nodes.
There are usually at least two query capabilities in the work item service provider for an EWM project area. One is the query capability for deliverables. A deliverable is also referred to as a release and is a work item attribute type. The query capabilities for deliverables can be found using the resourceType http://open-services.net/ns/cm#Deliverable.
The second query capability is for work items (in OSLC referred to as change requests). The image below shows the oslc query capabilities for work items. This can be identified by the resourceType http://open-services.net/ns/cm#ChangeRequest
Query capability for work items.
The oslc:queryBase is the URI for the work item OSLC query mechanism for the selected project area. It will be used in constructing the OSLC Query URI. The query base has the form:
The resource shape provides the information about the attributes provided by the TRS. The resource shape contains a oslc:valueShape for work items based on the work item type defect.
Value shape for work items
This provides the value shape that defines the common work item attributes, their types and the allowed values for these work item attribute value types. It is possible to GET the oslc:valueShape value shape (provide the OSLC related headers) like below:
GET https://elm.example.com:9443/ccm/oslc/context/_8e5qfFpmEeukW7cqqDjAuA/shapes/workitems/defect
This value shape provides with all the common attribute and link types. The work item of a specific type might still have additional custom attributes. The post EWM Work Item OSLC CM API explains how to get that information using the work item type specific resource shape associated with the creation factory.
The image below shows the code that gets the query capabilities out of the project area work item service provider document.
Extract the query capabilities from the service provider document
This code shows how the query base is extracted from the service provider catalog. To do this, the code identifies the change request resource type and gets the associated query base.
Get the query base for the work items
Having the query base it is now possible to execute OSLC queries. The code below executes the most simple form of OSLC query:
Querying the query base.
The code performs the GET method on the query base.
GET https://elm.example.com:9443/ccm/oslc/contexts/_8e5qfFpmEeukW7cqqDjAuA/workitems

Accept application/rdf+xml; charset=utf-8
OSLC-Core-Version 2.0
Please note the OSLC headers Accept and OSLC-Core-Version above. The same headers are used in all calls in this blog.
Paging
The request is redirected to support paging like shown below. The paging mechanism is used to split queries with large result sets into smaller, more manageable chunks.
Paging redirect
The response body contains the work item URI’s for the first page of work items. Note, because there is no query parameter, the query only returns the work item URI’s and not any other property data. To get more properties of the resulting work items e.g. to display the summary would, in this case, require to get the work item using the URI from the response.
Response body contains work item URI’s and information about paging.
In addition the response contains information about the total amount of results and the URL to get the next page, in case the number of results exceeds the maximum items returned by this page. The image above shows the oslc:responseInfo which contains oslc:nextPage with the URI to get the next query result page and the oslc:totalCount with the total count of query results.
The code below shows how the query is executed. In the while loop a GET request to the query URI is executed. The result of the call is analyzed and this provides the next page of the query, if paging is needed. If no next page is available, the query is finished.
Execute an OSLC Query
The code below processes the result for a result page and gets the resulting work items to display them. It prints the work item URI. It also tries to get and print the identifier (Id) and the title (summary) of each work item in the query. If the identifier or the summary is not available nothing is printed. The code then analyzes the paging information. It returns the next page URL if there is one. It also returns the total count of the result.
Try to get at the result details of the query page
URL Encoding
OSLC Query provides a mechanism to create simple queries to retrieve items. These queries are sent as a URL in a GET HTTP request. There are limitations on which characters can be sent in the URL. Some characters have specific meanings in the URL. To avoid creating and sending the wrong or illegal URLs, parts of the OSLC query parameters need to be URL encoded. See some explanations about the URL encoding here:
In the code below url encoding is done using the function urlEncodeString as shown below.
comm.urlEncodeString('URL Encode me')
The code URL encodes the data in a way that has worked for me. I am not totally sure I understand the URL encoding in all its details and there might be issues in the code below. If I got something incorrect, please leave a comment with a suggestion to correct it.
More complex OSLC Queries
The code below uses the following constants (mind the = at the end of each term) which are used to compose more complex OSLC Queries:
The statements represented by above constants and how they work are explained in the following sections.
The oslc.select Statement
OSLC queries support selecting the properties supposed to be returned in the query. The statement that is used for that is the oslc.select statement. The code below shows how the select statement is used. The first three lines are used to control running the queries and creating the file name for logging and can be ignored.
The interesting part is the selectString1. It defines the list of properties that should be returned for each query result. In the case below we want the type, the id, the title, the description, when it was last modified, who modified it, when it was created and who created it for each work item. This information is encoded in the selectString1 by creating a comma separated list of property identifiers. The select statement term is then created by concatenating the select statement ‘oslc.select=’ with the URL encoded version of the selectString1. This term is added to the query base as first query parameter using the separator ‘?’.
Select statement is provided to the OSLC query
When this query is run, the query result contains the properties for the work items that are returned in the query result. The image below shows the resulting data in the response.
The query result for a query using a select statement
The select statement can be nested to provide nested data. It is possible to use ‘*’ to select all available properties. The amount of data that is transferred can impact performance of the communication. The specification mentions that the servers SHOULD accept rdf:nil as single property. Both extremes are commented out in the cod above.
The oslc.properties Statement
The oslc.properties statement can be used to limit the set of properties or attributes of a work item that are considered in the OSLC request. The oslc.properties can be used in a GET request. In this case it can be used to specify which properties the requestor is interested in. The server does not have to collect and transmit all properties, but only the ones of interest.
The oslc.properties can be also used when updating a work item. This allows to perform partial updates. There is no example provided in this blog, but the syntax and encoding of oslc.properties and oslc.select are the same.
The oslc.where Statement
The oslc.where statement can be used to specify which work items to query. The first example below shows a query for the work item with the identifier 1. The select statement uses * to select all work item properties.
Get the work item with the ID 1 and return all properties.
The URL that is created can be seen below. The encoding makes it hard to understand. The important request headers are the OSLC-Core-Version and the Accept header.
The GET request with headers and URL encoding
The image below shows parts of the resulting RDF-XML for the work item with all the data for its properties.
The response with all properties
The In statement can be used to search for properties being in a range. The code below searches for the work items with identifiers being 1, 3, 9, 50. The query would run successful, if there are IDs that are not found.
Find the work items out of a list of ID’s
Please note as documented here, especially in the syntax section, the oslc.where statement only supports to compose complex conditions using the boolean operation ‘and‘. The operation ‘not’, ‘or’ or other complex nesting is not supported.
Before looking into more examples lets introduce the next statement.
Sorting – The oslc.orderBy Statement
The statement oslc.orderBy can be used to define the order for the result set. The example below finds all work items with the type defect and requests the result set to be ordered by severity (descending) and then by id (ascending). The order is defined with a prefix for the property. The prefix is + for ascending and – as descending order. Multiple order specification can be given in a comma separated list.
Search for all defects and sort by descending severity and ascending id
Unfortunately, the orderBy seems not to work for EWM 7.0.2 and the accept format application/rdf+xml. I have seen it working with application/json.
Full text Search – the oslc.searchTerms Statement
The statement oslc.searchTerms can be used for full text search. The query below finds all work items that can be fond by full text searching for the term ‘dividend‘ creates 20 hits with the JKE Banking Sample.
Full text search for ‘dividend’
Define a Namespace Prefix – oslc.prefix
The OSLC query mechanism allows to define new namespace prefixes that can be used in the oslc.where, oslc.orderBy, and oslc.select statement. My experimentation with this feature was quite problematic. What worked for me is the following:
To define a namespace create a variable with the namespace prefix, including the equals sign, and encode the URL. Then use only one namespace in the oslc.prefix definition Only define one prefix for one namespace in each oslc.prefix statement.
The code below defines several namespaces (mind the encoding part). Based on these namespaces I create a prefix term for each of the namespaces based on ‘oslc.prefix=’ and the namespace URI. To define multiple namespaces in a query concatenate the prefix terms with ‘&’. Some discussions on Jazz.net indicate it might be possible to use a comma separated list. I could not get this to work.
Defining prefixes
To use the prefixes in a query, just include the prefixes as query parameter.
Using prefixes in queries
The query URI can become very long when providing many prefixes.
The prefixes can make the query quite lengthy.
Search For Items With a Specific Enumeration Literal Value
The image below shows a query that selects only work items that have the severity set to critical. The enumeration literal to be provided for the selection is information that can be looked up by querying the resource shape and allowed values for each work item type associated to the creation factories. For common work item attributes the available attributes and allowed values can be found using the chain resourceShape to valueShape associated with the query base.
Queries for the severity literal representing the severity ‘Critical’
Search For Items Modified After a Certain Date
The image below shows a where term that selects all work items that are modified after a certain date.
Items modified after
Compound Where Terms
The OSLC Query mechanism supports compound where terms are built form simple terms. The only supported boolean operation is and. Or is not supported, neither is ‘not’. The code below shows a query that looks for work items of type ‘defect’ and severity ‘critical’.
Items of type ‘defect’ and severity ‘Critical’
Summary
This concludes my short blog about the OLSC Query mechanism. My intention, in addition to understand it better myself, was to provide some working examples and how to create the queries. I have tried this in the past and got some where, but it was quite challenging. The documentation I had available in the past was often lacking some small but important information. The documentation for OSLC CM 3.0 has improved a lot, but apparently there are still issues you can run into.
So as always I hope I was able to provide simple but relevant examples that help users of this technology to achieve their goals and save some time.
After looking into EWM Discovery, how can one create or update a work item using the techniques explained so far? This post will look into the steps that are required to create and update a work item. The techniques explained in the previous posts in this series are important. If necessary, go back to the previous posts to understand the details.
This blog was originally separated into two sections, creating a work item and then updating the work item. The first part mentioned programming and Python, the second used RESTClient to demonstrate the concepts. This was just due to the code I have written so far and due to complexity of the operations. The blog post was recently updated with Python code snippets for work item update and additional content.
Update: The blog post has also been rearranged and updated to separate getting a work item and updating a work item.
Update: The blog post has been rearranged and updated to show the usage of the oslc.properties query parameter for partial get and update.
Update: The blog post has been rearranged and updated to show how to resolve a work item and setting the resolution.
Update: The blog post has been updated with how to get the complete workflow information needed to navigate the workflow states and actions.
Context of the blog post is the series
This is the series of planned posts I intent to publish over time. Most of the examples will be EWM based, but quite a lot of the content applies to more ELM applications. The examples where performed with versions 6.0.6.1 and 7.0.x.
To create a work item using the OSLC API requires some information that is provided by the OSLC API and can be discovered. To create a work item first requires a URI/URL of a creation factory providing the capability to create the work item.
EWM supports customizable work item types with customizable attributes of customizable attribute types. Each work item type has its own creation factory URL that needs to be looked up to create a work item of that type.
Work item types have potentially different sets of attributes configured. Each attribute has a type from a number of available attribute types. EWM allows to create custom attribute types. Some of the attribute types are primitive and are easy to handle. As an example the summary of a work item is just a string and it is easy to provide data. Other attribute types are far more complex. Many attributes are enumeration types. Enumerations are a number of available literals with an ID and a display name for each literal. A work item usually has an owner or subscribers. These represent users that are available in the system referenced by a unique URI. Work items can be assigned to a project or team area, which are other attribute types available in a project areas process. Which process area a work item is assigned to is controlled by a Category that maps a user readable string to the process area represented by its URI.
Note, some data that shows up in the work item is not attribute based. As example the collection of reviews and approvals, the attachments and the comments are not attribute type based. Some attributes that show up are only presentations or are calculated and can not be changed. Some of the not attribute based data is provided as pseudo attribute e.g. to be able to export the data.
To create a work item it is necessary to find out which attributes of which types a work item can have and which values the attribute of such a type can have. Attribute types can be single value such as enumerations or strings or they can have multiple values such as enumeration lists or string lists. All this information is required when creating a work item.
The information which work item attributes with what types a work item type can have, can be discovered in OSLC APIs as part of discovering the creation factory. The information is accessible via a resource shape. How the discovery process works in general is described in EWM Discovery.
Reminder, for all requests use the mandatory OSLC header:
OSLC-Core-Version 2.0
To receive RDF encoded data use the Accept header and for sending RDF use the content Type header as shown below:
Accept application/rdf+xml; charset=utf-8
Content Type application/rdf+xml; charset=utf-8
The image below shows the RDF form of a part of the service provider catalog for a project area. Using the namespace
xmlns:oslc="http://open-services.net/ns/core#"
the oslc:CreationFactory entry contains the resourceType(s) and the resourceShape. The first resourceType http://open-services.net/ns/cm#ChangeRequest is used for OSLC integrations.The second resourceType provides the link to the work item type definition. The entry oslc:creation contains the creation factory URI.
RDF form of the creation factory for defect and task
To receive JSON encoded data use the Accept header and for sending JSON use the content Type header as shown below.
Accept application/json; charset=utf-8
Content Type application/json; charset=utf-8
The image below shows the JSON format of the creation factory entry for the work item type defect. The data is provided analogue to the RDF format and can also be used to access the data for the creation factories.
JSON form of the creation factory for defect
Discover Resource Type and Shape
Following the resourceType URI provides the details of the work item type. The image below shows the details for the defect. Getting the resourceType
GET https://elm.example.com:9443/ccm/oslc/types/_8e5qfFpmEeukW7cqqDjAuA/defect
with the headers introduced above provides more details. The display name is Defect and the work item type ID is defect. The data also contains the URI for the EWM project area that defines the work item type. The image below shows the result of such a GET request.
Type definition for defect
The Python code block below processes the RDF data and extracts the important data. The important take away are the predicates to select the information to be iterated.
Extract the creation factory information
The code operates on some simplifications. The code gets the work item type ID by filtering out the entry that starts with the public URI root. The code assumes that the end segment is equal to the work item type ID. This just saves the call to the resourceType URI which would contain the information. The code gets the creation factory URI and the resource shape URI.
To be able to create a work item, GET the resource shape using its URI and the headers described above. As an example:
GET https://elm.example.com:9443/ccm/oslc/context/_8e5qfFpmEeukW7cqqDjAuA/shapes/workitems/defect
The resource shape contains a number of attribute type definitions for the attributes (and link types) the work item type can have. The information contains the name (id) of the type, the title (display name) of the attribute type, the allowed values, the default value, if the attribute is read only etc. The image below shows one example for the attribute Priority with ID priority, the default attribute literal and the link to the allowed values. The attribute is defined for values in an enumeration. The allowed values URI describes the available values defined in the enumeration.
Allowed Values
To get the allowed values for the attribute Priority perform a GET using the shape URI. As always provide the OSLC headers.
GET https://elm.example.com:9443/ccm/oslc/context/_8e5qfFpmEeukW7cqqDjAuA/shapes/workitems/defect/property/internalPriority/allowedValues
The result of the request is shown below.
Allowed values for the work item attribute Priority with ID internalPriority
Note that the allowed values, the priority enumeration literals, do not provide any information about the display name or any other details. To get the display name it is necessary to GET (OSLC headers!) each of the priority literal resource URIs and analyze the results.
To create a work item, the next steps would be to get allowed values for all required attributes and to create a request body containing this information.
Required Attributes
At the time of writing, OSLC does not provide a mechanism to get the list of attributes that are required to create a work item due to restrictions in the process. If the target system requires special attributes to be set e.g. in certain states, or expects special values, the work item creation or save will fail. To successfully create or update work items, it is necessary to know such limitations ore provide a configuration capability to adjust for such information.
Request Body
For the JKE Banking Example that is shipped with EWM, the process requires the following information to create a defect:
Summary
Category
To make the example a bit nicer we also want to also set the description of the work item. The summary and the description attributes are easy. This is just a string value. The category is the mapping to a process area. This is not a trivial attribute and it is necessary to get an allowed value. A valid approach is to get all allowed values into an array and to pick one value. If it is desired to find the correct allowed value based on a display value or some other characteristics, iterate all allowed value URIs and get the details.
The code below is the code that creates the payload for the request body needed to create the work item. It looks more complicated than it is, probably because of the RDF library. The code creates an empty graph, a node for the work item and then adds the predicate object configuration that represents the desired information e.g. the text for the summary and the description.
Create the payload and the work item
The payloadString serialized in createRDFWorkItem from the graph simply looks like the RDF XML below. It only contains the information about the summary, description and the category
Creating the Work Item
To create the work item, POST to the work item types creation factory URI like shown below:
POST https://elm.example.com:9443/ccm/oslc/contexts/_8e5qfFpmEeukW7cqqDjAuA/workitems/defect
Provide the required headers to declare OSLC, and the headers to control the content encoding that were already explained. The Content-Type defines the format of the request body. The request body is the payloadString created above.
The response status should be a 201. The response headers should contain the location header with the URI of the work item. The URI of the work item is the unique URI of the work item and can be used in subsequent operations to identify the work item. E.g. in GET, or PUT operations to retrieve or modify the work item. The URI is also used in the process of linking work items. The URI can be used in a redirect to open the work item editor in a web UI.
The response headers contain a new important header called ETag. The ETag value describes the state of the work item. Every time the work item is changed it gets a new ETag. When trying to update a work item it is necessary to send the ETag value from the previous GET in a special If-Match header. The server can use this value to evaluate the state of the work item the update is supposed to be applied to based on the current ETag. If the ETag in the request is not the current ETag of the work item state, the request is based on stale data. New changes where done to the work item. The server detects the mismatch and alerts the client that the change can not be executed. The client needs to refresh the work item information, GET the latest state, modify it accordingly and retry to update the work item based on this information.
The response body sent back by the server, contains the data for the new work item. The information is usually much more than the information that went into the creation of the work item. The server creates several special attributes such as the creation date, the creator and similar information. In addition attributes with default values are automatically set and will be returned.
Response body for the POST to the creation factory.
All subsequent operations on the work item should be based on this state, or a never version state that was retrieved by a GET on the work item URI.
The code below shows the creation of the work item and gets the work item URI from the results location header and the etag from the results ETag header.
The work item creation and the response analysis for RDF.
The same process can be used with the JSON format. The image below shows an example for a work item creation using the JSON encoding with the same attributes used with RDF above.
JSON payload to create a work item
JSON requires to use the headers shown below instead. The header Content-Type only needs to be set when a request body is sent.
The following sequence is done with the RESTClient extension installed in Firefox. RESTClient is a Firefox extension that runs in the browser. This allows you to log in to the server with the web UI in Firefox and then use the RESTClient without worrying about the authentication because RESTClient reuses the authentication done in the UI. Another Option would be Postman, but that requires to log into the CCM server as explained here. Install RESTClient and Firefox to do these steps yourself.
To get a work item we need the public URI of the work item. The public URI was returned in the Location header when creating the work item. It can also be located e.g. using an OSLC Query. The public URI has this form:
where the number at the end is the work item unique ID for the repository. Note that the URI of the work item is not the URL for the work item editor you get when you copy the address URL from the browser. That URL contains information like the project area name and is not stable.
Open the Web UI of EWM. Open a work item e.g. the one created before. Get the work item URI by copying it out of the Web UI like shown below. You can also use the work item URI from the automation to create the work item.
Use copy link location on the icon to get the work item URI
To get the current state of the work item it is necessary to perform a HTTP GET operation on the public URI. Open a RESTClient and prepare to get a work item. As an example select GET as method and paste the work item URI into the URL address.
GET https://elm.example.com:9443/ccm/resource/itemName/com.ibm.team.workitem.WorkItem/242
Use the OSLC, Accept and Content Type headers as explained above.
Prepare the GET request
Push the Send button to execute the request.
The request should succeed with a status 200. Here the Request and the response headers in RESTClient in Firefox.
The successful GET request to read the work item 242
Browse the response Headers tab first. Note the ETag header. This is important for a later update.
Property Selection
Update: It is possible to use the oslc.properties query parameter to select which properties (attributes) are of interest in this OSLC request. Note that the oslc.properties require URL encoding to allow to send them in the request URL. The code shown below shows which part of the URI needs to be URL encoded. It is the the comma separated section of property definitions behind the
oslc.propertis=
The oslc.properties can be used in a GET request. In this case it can be used to specify which properties the requestor is interested in. The server does not have to collect and transmit all properties, but only the ones of interest. This saves computing resources and bandwidth.
The image below shows the result of a GET request on a work item URI, providing a oslc.properties selection. Note the response body only returns a limited amount of properties compared to the full GET above.
OSLC properties selection in a GET request.
The image below shows how the requested properties are selected using Python code.
Selection of the properties the request is interested in.
Update a Work Item
To update a work item it is necessary to get the current state of the work item. For this it is necessary to perform a HTTP GET operation on the public URI as shown above. Go back to the result of the previous section or open a RESTClient and prepare to get a work item. For the latter make sure to select GET as method have the work item URI into the URL address.
Make sure to use the OSLC, Accept and Content Type headers as explained above.
Perform the GET request
Push the Send button to execute the request.
The request should succeed with a status 200.
The ETAG in the successful GET request to read the work item 242
Browse the response Headers tab first to prepare for updating the work item. Copy the ETag header into a text editor, we need the value of the header later.
Switch over to the Response tab. Search the content for :title to locate the XML containing the work item summary attribute. Mark the response body and copy its content.
The work item summary attribute
Open a new RESTClient window. Paste the response body from the previous GET request into the request body of the new request. Copy the work item URI into the address URL. Change the method to PUT.
Search for the :title in the new request body. Modify the text enclosed in the tag e.g. to An updated summary like below.
Now add another header If-Match with the ETag value from the GET method.
If-Match "c6eebbc9-257c-335a-9726-287f39732012"
See the image below how the request looks like. Perform the send.
The update should succeed with a 200 status and contain a new ETag.
Successful update with a new ETAG.
Open the work item in a work item editor. You can do this by pasting the work item URI into the browser address field. If the work item editor is already open the editor should show the work item was changed. Refresh the editor if this is the case. The summary attribute was successfully updated:
The updated work item summary in the Web UI
Performing a subsequent GET in the initial RESTClient window provides the same information and the new ETag. The ETag will change if the work item is changed again.
Update: change a work item in Python code
The code below retrieves the work item based on its URI.
Getting a work item and the ETag for updating it.
After getting the work item and the etag, the response body is parsed into a graph that has the required namespaces bound to it. The response has the work item URI as subject in the response, this is retrieved and validated. The work item data is analyzed and some data is pulled out by querying the graph for objects with a specific predicate (e.g. DCTERMS.identifier) and the data is printed.
The code below shows the modification of the summary of the work item.
Updating the work item with If-Match header
The new summary is computed based on a timestamp. Then the value of the subject node is set using the code below.
# Set a RDF entry for a node, predicate and object.
    def setRDFAttribute(self, graph, node, rdfPredicate, rdfObject):
        graph.set((node, rdfPredicate, rdfObject))
The update header is created, including the If-Match header with the work items ETag from the get operation. The RDF graph is serialized to be sent. Then the PUT operation is performed. The change will have a new ETag, so that is received.
The response body is parsed into an RDF graph again and the information for some of the attributes is again analyzed and printed. The image below shows the console output that is created.
Successful update of a work item with the original and new ETag
Property Selection
Update: It is possible to use the oslc.properties query parameter to select which properties (attributes) are of interest in this OSLC request.
The oslc.properties can also be used in create and update requests. This can be used for partial updates. Please carefully read this section about updating work items and also check the examples that are provided. Especially for creating and removing links and custom attributes.
For using the oslc.properties query parameter, to limit the amount of properties to a subset, please check the sections oslc.select and oslc.properties in the post EWM OSLC Query API. Syntax and encoding for these query parameters are the same. You have to provide the oslc.properties as a query parameter URL encoded like shown below.
PUT https://elm.example.com:9443/ccm/resource/itemName/com.ibm.team.workitem.WorkItem/242?oslc.properties=rdf%3Atype%2Cdcterms%3Aidentifier%2Cdcterms%3Atitle%2Cdcterms%3Adescription%2Cdcterms%3Amodified%2Crtc_cm%3AmodifiedBy%2Cdcterms%3Acreated%2Cdcterms%3Acreator
As a summary, the usage of the oslc.properties query parameter allows to
Limit the properties returned in a GET request to the selected properties. Instead of sending all properties, the server can just respond with the sub set of properties.
Limit the properties that are considered to be received to the selected properties in PUT and POST requests. This can be used to just have to send a limited amount of attributes, and not all, to achieve a partial update. This can also used to remove properties by including a property in the oslc.properties but not sending data for it.
The link above mentions to use the PATCH method for partial updates a couple of times. I briefly tried to use PATCH to partially update a work item, but I got an “Error 501: Not Implemented”, so I assume PATCH is not available.
Work Item Workflow State change
One important work item attribute is the workflow state also abbreviated with state of the work item (not to be confused with the ETag). When checking the Resource Oriented Work Item API V2 it mentions that the state is read only. It mentions the capability to use an action to perform a state change, but there is no documentation provided that shows how that works. Digging deeper into the Jazz.net forum there are answers that hint on how it could work, but every one of the answers I found was lacking some detail. Here what I was able to come up with to make it work for me.
The work item workflow is defining the states of the workflow and actions that are valid to get from one state to another. States and actions have unique ID’s.
Analyzing the resource shape of the work item type, the state attribute with ID internalState can be located. The attribute has allowed values that can be discovered. The allowed values are the states of the workflow. As an example for one state there is a URI like below:
We are not interested in the state, we need the ID of the action to perform the workflow action. I have not found any simple way to discover the URI to get the workflow actions. There is however a pattern how to access the required information for workflows and actions and other information required to manipulate the workflow state of a work item.
Looking at the path of the URI for the workflow state reveals that the path section after the section workflows is the project area ID. The next path section is states and the section after that describes the workflow ID. The last section is the workflow state ID.
If we remove the workflow state ID section, and perform an GET on the resulting URI e.g.
GET https://elm.example.com:9443/ccm/oslc/workflows/_8e5qfFpmEeukW7cqqDjAuA/states/com.ibm.team.workitem.defectWorkflow
the resulting response is a list of the workflow states available for the workflow.
Please note, that I experienced issues with the headers to be used here, dependent on the headers used different information was returned in some cases. I would suggest to test using the OSLC headers. If there is a lack of information try to only use the header Accept application/xml (or application/json). The result could contain more information. Please note that in this case the format is not RDF.
If we replace the section states in the URI by actions we get an URI that allows to GET all the workflow actions.
GET https://elm.example.com:9443/ccm/oslc/workflows/_8e5qfFpmEeukW7cqqDjAuA/actions/com.ibm.team.workitem.defectWorkflow

Accept application/xml
Please note, to get the complete workflow information, use only the header Accept application/xml (or application/json). Do not use the Accept application/rdf+xml and do not use the OSLC-Core-Version or any other header. Run the call as shown above.
This way you receive the full workflow table. This contains the information of the workflow action including the resulting state. Given this information it is then possible to extract all workflow information necessary to navigate the workflow. I found this hint in this answer.
To get the information in JSON use only the header application/json.
The image below shows how the complete workflow information looks like, if you get it in the correct way.
The complete workflow information, including the result state of an action.
Once a desired workflow action ID is selected, it is possible to perform a workflow action. This can be achieved by adding a query parameter ?_action=<actionID>, to the work item URI, where <actionID> is replaced by the ID found as workflow action. The result is shown in the image below. Please note the familiar OSLC and content headers as well as the ETag for the last state of the work item are needed as well.
Updating the work item performing a workflow action with an empty resource representation.
It is also necessary to send the representation of the work item, otherwise the PUT call will fail. To get an ETag, it is necessary to do a GET, so all the information is already available. By default OSLC expects the complete representation and deletes data that is no longer available in the request.
I have tried to send an “empty” work item representation as hinted in one of the forum questions and the one shown above in the image and below as code worked for me. Note that there is no guarantee that this works with all versions and forever. An attempt to do a partial update using PATCH resulted in an not implemented response. In general see some hints on partial representations in Resource Oriented Work Item API V2.
Important Update about partial update: Please see the Updating Work Items section in the Resource Oriented Work Item API with OSLC_CM 1.0 wiki page and scan through the documentation, especially for partial update. Note the usage of the query parameter oslc_cm.properties. By providing a list of properties that is to be updated it is possible to send only part of the representation containing said properties. The oslc_cm.properties uses the same syntax used by the oslc_cm.select statement. See the post EWM OSLC Query API and check the section about oslc.select for how to create, compose and encode the parameter.
To get the minimal RDF shown here, I cut out all content and stripped it down to the bare minimum. RDF libraries should be able to serialize empty graphs as well and it should be easy enough to find a minimal empty body for JSON.
The URL below successfully updated the work item state without the need to pass additional attributes. The minimal request body above was used with the URL below and the work item state update was successfully performed.
PUT https://elm.example.com:9443/ccm/resource/itemName/com.ibm.team.workitem.WorkItem/241?_action=https://elm.example.com:9443/ccm/oslc/workflows/_8e5qfFpmEeukW7cqqDjAuA/actions/com.ibm.team.workitem.defectWorkflow/com.ibm.team.workitem.defectWorkflow.action.startWorking&oslc.properties=
With headers:
OSLC-Core-Version 2.0
Accept Type application/rdf+xml; charset=utf-8
Content Type application/rdf+xml; charset=utf-8
If-Match "fcd3b360-d152-367d-956e-d1f9f428ced4"
Note that the oslc.properties statement did not work with rdf.nil. But it was possible to omit a value as shown above to clarify that no property value would be included. IT would be possible to specify additional values in oslc.properties that would be sent in the request body. One example is the resolution – see below how that looks like.
Please note, that it is necessary to satisfy all required attributes when performing a workflow action. The new state might require additional values that you might have to provide, in which case you want to definitely use the full information from the resource.
Please also note that I am not seeing errors if the workflow action can not be done or does not exist. The response is 200, regardless of this fact.
Resolve Work Item With Resolution
One example for attributes that might become required with respect to a state change is the resolution attribute
rtc_cm:resolution
that might be required in certain states when resolving/closing the work item. Following the pattern we discovered the resolutions can be found using the workflow URI and replacing the section states by resolutions. The resulting URI provides the available resolutions.
Please note, that I experienced issues with the headers to be used here, dependent on the headers used different information was returned in cases such as the actions above. I would suggest to test using the OSLC headers. If there is a lack of information try to only use the header Accept application/xml (or application/json). The result could contain more information. Please note that in the latter case the format is not RDF.
Since I had built all the logic to get the action information using XML (minidom) and not RDF in python, I used only Accept application/xml as header to get the resolution information and reused the code written to analyze the actions.
GET https://elm.example.com:9443/ccm/oslc/workflows/_8e5qfFpmEeukW7cqqDjAuA/resolutions/com.ibm.team.workitem.defectWorkflow

Accept application/xml
With the call above it is possible to GET all resolution information like ID’s and names. The image below shows an example. Mind the request header used.
Get the resolution information.
It is then possible to add or set the attribute value like below.
See the response from a GET response to an work item URI, containing the value below as the example.
Setting the resolution results in this additional attribute.
The example below shows all that is needed to close the work item and set the resolution updated in the same request. In addition to the workflow action as above use the the oslc.properties and define an additional property, the resolution attribute, to be provided.
PUT https://elm.example.com:9443/ccm/resource/itemName/com.ibm.team.workitem.WorkItem/241?_action=https://elm.example.com:9443/ccm/oslc/workflows/_8e5qfFpmEeukW7cqqDjAuA/actions/com.ibm.team.workitem.defectWorkflow/com.ibm.team.workitem.defectWorkflow.action.resolve&oslc.properties=rtc_cm%3Aresolution
The request URL contains the workflow action and the request body contains the data for the additional attribute to be set as follows:
The request headers, including the If-Match header, have been shown already and show up in the image below which shows all the important data in RESTClient:
Resolving the work item with setting the resolution attribute.
This is a complete example of a state change while changing the resolution attribute in addition. This can be expanded on to set more properties using oslc.properties.
I found numerous questions around this in the Jazz forum, but there was still some considerable amount of work to be done, to get the state change working.
The page Resource Oriented Work Item API V2 also describes other interesting concepts like query mechanisms and representations. Some of them will be presented in subsequent upcoming posts. Something I have not yet explored are the draft work items. Intriguing. Maybe I find time to look at it.
Summary
I am fully aware that I am quite late to the party, but despite trying, I was unable to find examples for the whole process that were consistent and simple enough, covered most of the ground or worked for me. There was quite some research that needed to be done to get all the concepts covered. All the information in the blog series I am currently writing has been collected to help customers as well as IBM internal resources with the ELM APIs.
So, as always I hope that the content of this blog (series) is of interest to users out there and helps to save some time achieving their goals.
I always wanted to do a Server Work Item Save advisor, so here is a simple example. This advisor will prevent closing work items for any user that is not the owner of the work item. Since the code turned out to be very simple, I will try to emphasize some other useful details about creating it. Please note, that this code can be easily changed to do more complex things e.g. only work for certain work item types or workflows, look at roles of the user that does the save to act on that and much more. There are various code examples in this blog that could be used to extend the code below to achieve those goals. The API code in this post is Server and Common API.
License
The post contains published code, so our lawyers reminded me to state that the code in this post is derived from examples from Jazz.net as well as the RTC SDK. The usage of code from that example source code is governed by this license. Therefore this code is governed by this license. I found a section relevant to source code at the and of the license. Please also remember, as stated in the disclaimer, that this code comes with the usual lack of promise or guarantee. Enjoy!
You should be able to use the following code in this environment and get your own automation or extension working.
The example in this blog post shows RTC Server and Common API.
Creating the Plug-in(s)
The first step is, as usual, to create a plug-in. This is easily enough using the New Project wizard and choosing the Plug-in Project. All you need to provide is a name for the project and some settings.
Using a name like “OnlyOwnerCanSaveAdvisor” looks great and a lot of people do this. Its a trap!
When choosing the name of the project I have learned over the years, it is a good idea to have a certain naming convention. The most important point here is to be able to easily find your plug-ins and features again, once they are deployed. If you deploy into the Eclipse Client, your extension might end up between 1500 other extensions. If you don’t know an easy way to locate your code, you have a problem. It can take a lot of time to find it. If you don’t know where stuff is going to end on disk and if something is deployed or not, being able to search for a file name helps a lot.
Tip: Name your extensions in a way that allows you to easily search and identify them. Create a namespace pattern to support this.
I use a Java namespace structure to name my projects. I always use com.ibm.js as prefix in the name. So I can easily search for files named com.ibm.js. The rest of the name usually has something to do with the purpose. In this case I chose com.ibm.js.team.workitem.extension.advisor.statechange.service as name for the plug-in project. I chose service, because this plug-in runs on the server.
If I have to develop more complex extensions, I often end up having several plug-in projects that belong together. To be able to easily locate them in my workspace I ended up to have a common name part and a special suffix for each of the projects. The common name here would be com.ibm.js.team.workitem.extension.advisor.statechange and suffixes would be service, component, feature, updatesite and potentially others. This makes it so much easier to find around in the Eclipse UI.
The other choices here are trivial. We don’t need an activator class for this. Keep the other defaults. There is no template to choose from, so finish the wizard.
Once the plug-in project is created, give it a useful name and leave the other information as it is. Especially leave the.qualifier suffix in the version. This allows Eclipse to create a unique version extension. Your plug-in overview tab should look like below.
Tip: Keep the Version number structure with the .qualifier suffix as provided by the default. This allows Eclipse to create a unique version extension.
The next step is typically adding the dependencies. I usually start with some I have from other extensions. org.eclipse.core.runtime is almost always needed.
Tip: Start with dependencies used in other extensions. It is easy to remove dependencies later.
You can add dependencies easily by following the namespace pattern used in RTC. The pattern starts with com.ibm.team then there is a domain such as workitem and the suffix is typically service, common, client where
serviceis API that is only available on the server
common is API that is available to the server and (Java/Eclipse) clients
client is API only available to (Java/Eclipse) clients
The domains are
process for API related to the process specification for process areas (project areas/team areas)
repository for API related to accessing data in the repository
workitem for work item related API
filesystem for the SCM API
interop for API to develop work item synchronizers
amongst others.
Tip:Use the namespace pattern provided by the RTC SDK to find the API plug-ins you have dependencies to.
To add dependencies, use the add button and the namespace pattern to find interesting plug-ins.
Please be aware that there is a domain reports that continues with the usual pattern, including the domain names in the suffix as subdomains. Avoid to accidentally pick one of those if you don’t work in the reports API. If you want to use API and the classes can not be found, although the dependency was meant to be added, check if you accidentally picked the reports domain and fix the dependency. This happened to me many, many times.
Tip: The reporting API can sneak in because its namespace space includes the other domains as subdomain. Make sure to pick the right plug-ins.
It is a good idea to start with adding the usual suspects as dependencies. If you need additional API later, you can always add it on the fly and save the plugin.xml to be able to access the API.
This is a typical first iteration of dependencies:
When adding the dependency, there is compatibility information added. This information would require at least a certain version of the dependency to be available. It is possible to remove this information to make the extension more compatible e.g. to earlier versions of RTC. In the dependencies above, I removed the minimal version. Since this extension was developed with RTC 4.0.5, but would work with other, earlier versions, as well this would now be deployable e.g. in RTC 4.0 or even 3.0.
Tip: Manage the required versions in the dependencies, if you want to be able to deploy in RTC versions with lower version numbers than the version you use to develop your plug-in.
The next step is to add the extension you want to hook up to. In our case we want an operationAdvisor. It can be found the same way we found the dependencies. If you can’t find your extension point, please uncheck the option Show only extension points from the required plug-ins, to make sure you can see all the extension points, even if you have not yet added the required dependency.
Once the extension point is added, provide the required information. You need to provide data for the operation advisor.
There are several mandatory fields here. I stick to my namespace pattern and provide the following information:
id – com.ibm.js.team.workitem.extension.advisor.statechange.RestrictClosingToOwner
class – com.ibm.js.team.workitem.extension.advisor.statechange.service.RestrictClosingToOwner
name – Restrict Closing Work Item to Owner
operationId – we want to react on work item save so choose com.ibm.team.workitem.operation.workItemSave from the list of available Extension Points and Operation ID’s.
Clicking in the field name class* in front of the class definition allows to create a class. It also shows you what the class is required to provide to be able to conform to the specification of the extension point. When you create the class make sure to use com.ibm.team.repository.service.AbstractService as superclass and choose the com.ibm.team.process.common.advice.runtime.IOperationAdvisor interface as implemented. The class definition should look like:
public class RestrictClosingToOwner extends AbstractService implements IOperationAdvisor {
The code of the class is going to be presented later below. For now, just quickfix and let it add the methods to implement. In order for the code to run later, you need to specify an extension service to provide the component ID this extension belongs to and specify the implementation class for this service. The interface is required in the operationAdvisor specification. The AbstractService comes in in the next step.
Tip: Make sure to create the extending class with the right interface by looking at the editor.
Click on the operationAdvisor node and add the extension service. You can also add a description.
The extension service needs to be specified. Stay with the namespace pattern and provide a component ID. As implementationClass, select the one that was just created.
Tip: Server extensions usually extend AbstractService which provides capabilities needed later e.g. to get services.
This class needs to be based on AbstractService, which was already dealt with.
The Jazz compnent extension with the ID that was just chosen still needs to be defined. There is a special extension point for this. The extension point to specify the Jazz component is com.ibm.team.repository.common.components.
Tip: Create the Extension providing a jazz component in a different plug-in. This allows to use the component later if server as well as client extensions are needed, e.g. to provide an aspect editor to configure the extension in the UI.
It would be possible to define the component in the current plug-in. However, if the component is needed in server as well as client extensions, it is necessary to bundle it with both. In this case it is better to create a special plug-in for the component. Provide the same ID that was used in the definition of the extension service and provide a name for the component.
Tip: To get more information about the extension point look at the description, the schema, declaration and references. You can find all kinds of information easily, including plug-ins that extend this point and the classes that implement the extension.
There are several means that allow you to find out more about the extension point and implementations. Just be curious and look at it. The image beow shows where to access this information.
Another place is where you add new extensions to the point.
It will be necessary later, to declare the services that are used by the extension. Unfortunately the schema does not contain the node to do so. This is a manual that needs to be done in the plugin.xml.
Implement the Extension
The class that is to be called by the extension point has already been created. However, the implementation is still missing and needs to be provided. It is easy to open the class from the plug-in editor.
The entry point into the class called by the extension point is the run() method. The implementation code is provided below. As all advisors (preconditions) and participants (follow-up actions) the run() method gets the information about the work item and other information about the context it is running.
This information is checked first and the work item is extracted. The advisor code contains a section that is commented out right now.This code could later be used to limit the restriction only to specific work item types.
The advisor shall not limit saving the work item in closed stats, it should only preventing to change the state to a state in the closed group. So the next check is looking at the workflow action to determine if there is a state change. If not, the advisor does not prevent the operation. So a user could still update attributes, while it is closed,however, only the owner can change states to states in the closed group.
The last section checks if the new state of the work item is in the closed group. If not, nothing needs to be done.
If there is a workflow action, the next step is to check the state the work item will enter. If the new state is not in the closed group, nothing needs to be done.
If the new state is in the close groups, the final check is comparing the owner and the current user. If the ID’s match, nothing needs to be done. Note, this is also the case if the work item is already closed and someone wants to move it to another closed state. Only the owner will be able to do this, provided the advisor is configured for all roles.
Finally, this is a state change into a closed state and the current user is not the owner. The advisor provides a problem info and returns it. This will block the save. Please note, this is also true if the owner is unassigned.
Here is the code:
/*******************************************************************************
 * Licensed Materials - Property of IBM (c) Copyright IBM Corporation 2005-20014.
 * All Rights Reserved.
 *
 * Note to U.S. Government Users Restricted Rights: Use, duplication or
 * disclosure restricted by GSA ADP Schedule Contract with IBM Corp.
 ******************************************************************************/
package com.ibm.js.team.workitem.extension.advisor.statechange.service;

import org.eclipse.core.runtime.IProgressMonitor;

import com.ibm.team.process.common.IProcessConfigurationElement;
import com.ibm.team.process.common.advice.AdvisableOperation;
import com.ibm.team.process.common.advice.IAdvisorInfo;
import com.ibm.team.process.common.advice.IAdvisorInfoCollector;
import com.ibm.team.process.common.advice.runtime.IOperationAdvisor;
import com.ibm.team.repository.common.IAuditable;
import com.ibm.team.repository.common.IContributorHandle;
import com.ibm.team.repository.common.TeamRepositoryException;
import com.ibm.team.repository.service.AbstractService;
import com.ibm.team.workitem.common.ISaveParameter;
import com.ibm.team.workitem.common.model.IWorkItem;
import com.ibm.team.workitem.common.workflow.IWorkflowInfo;
import com.ibm.team.workitem.service.IWorkItemServer;

public class RestrictClosingToOwner extends AbstractService implements IOperationAdvisor {

	@Override
	public void run(AdvisableOperation operation,
			IProcessConfigurationElement advisorConfiguration,
			IAdvisorInfoCollector collector, IProgressMonitor monitor)
			throws TeamRepositoryException  {
		Object data = operation.getOperationData();
		if (data instanceof ISaveParameter) {
			IAuditable auditable = ((ISaveParameter) data).getNewState();
			if (auditable instanceof IWorkItem) {
				IWorkItem workItem = (IWorkItem) auditable;

//				// If this needs to be limited to a special type
//				if (workItem.getWorkItemType() != "Enter Type ID Here")
//					return;

				// We want to allow saving the work item, if there is no state change happening.
				String action = ((ISaveParameter) data).getWorkflowAction();
				if(action==null)
					return;

				// Get the workflow info and check if the new state is in the closed group.
				IWorkItemServer iWorkItemServer = getService(IWorkItemServer.class);
				IWorkflowInfo workflowInfo = iWorkItemServer.findWorkflowInfo(workItem,
						monitor);
				if (!(workflowInfo.getStateGroup(workItem.getState2()) == IWorkflowInfo.CLOSED_STATES)) {
					return; // nothing to check if the new state is not closed.
				}

				// work item is going to a state in the closed group.
				// Check if the current user is owner of the work item.
				IContributorHandle loggedIn = this
						.getAuthenticatedContributor();
				IContributorHandle owner = workItem.getOwner();
				if ((owner != null && owner.getItemId().equals(
						loggedIn.getItemId())))
					return;

				IAdvisorInfo info = collector.createProblemInfo(
						"The work item can only closed by its owner!",
						"The work item can only closed by its owner! If the owner is unassigned and it can also not be closed.",
						"error");
				collector.addInfo(info);
			}
		}
	}
}
Before we can do the debugging the last thing we need to do is to require the service IWorkItemServer we use to be available to the server in the plugin.xml. The plugin.xml needs to be changed to reflect that.
Add the prerequisite section with the service(s) required as presented below.
Tip: Since the extension point schema does not have the prerequisite added, this is something you simply have to know how to do it.
Please also see Creating Custom Link Types for Rational Team Concert, especially the sections Prepare to Deploy and the following 2 sections describing the additional project to make deployment a little easier.
The advisor presented above will prevent anyone, except the owner, to use any action that changes the state of a work item to a closed state. Users, other than the owner can still update work item attributes, but if it is configured for a user, state changes to a closed state are only possible for the owner of a work item.
As always, I hope the code above helps someone out there with extending RTC.
I will blog about the next steps, like debugging and deploying the advisor in one of the next posts.
When I started with customizing RTC, the biggest challenge was how to get started on work item attributes. Since getting work item attributes is also one of the most popular search terms on this blog, I think a small summary would be useful for new users of the RTC Java API’s.
*Update* The RTC Work Item Command Line is open source and contains downloadable code that performs most of the activities required for reading and modifying work items, their attributes, and all kinds of links. This includes reading and writing work item attribute of all kinds, including list attribute types. The interesting code can be found in the com.ibm.js.team.workitem.commandline.helper package in the class WorkItemHelper. For reading values look at the class ExportWorkItemsCommand and look at ExportWorkItemsCommand.getStringRepresentation(IWorkItem, ParameterValue) and the subsequently called methods. All techniques described below are used there. You can familiarize yourself with the concepts in this post and then look into that project for how it is used.
License and how to get started with the RTC API’S
As always, our lawyers reminded me to state that the code in this post is derived from examples from Jazz.net as well as the RTC SDK. The usage of code from that example source code is governed by this license. Therefore this code is governed by this license, which basically means you can use it for internal usage, but not sell. Please also remember, as stated in the disclaimer, that this code comes with the usual lack of promise or guarantee. Enjoy!
If you look at the examples below, you will note that the code below uses the interfaces
com.ibm.team.workitem.common.IWorkItemCommon
or
com.ibm.team.workitem.client.IWorkItemClient
to access work item data. Always look at the interface com.ibm.team.workitem.common.IWorkItemCommon first and use it if the method you need is available. The common API is usable in the client and the server API and is the preferred API to use. Only use specific client or server API if the common API does not have this API(the namespace is like com.ibm.*.domain.client for client API or com.ibm.*.domain.server for server API).
Most of the usage of the methods available on IWorkItemClient are inherited from IWorkItemCommon and it is better to replace usage of IWorkItemClient with usage of IWorkItemCommon whereever possible.
Why did I use IWorkItemClient? I was inexperienced and found the client API first in examples and It only later occurred to me that it is better to search the common API first.
Getting the Work Item’s Attribute ID’s in the UI
You can find the work item attributes and their ID’s in the project area administration Web UI in the section Work Items, subsection Types and Attributes. Select the work item type you are interested in. The attribute IDs for the built in and the custom attributes for the selected work item type can be found in the ID column.
RTC Web Administration UI shows valid attribute ID’s
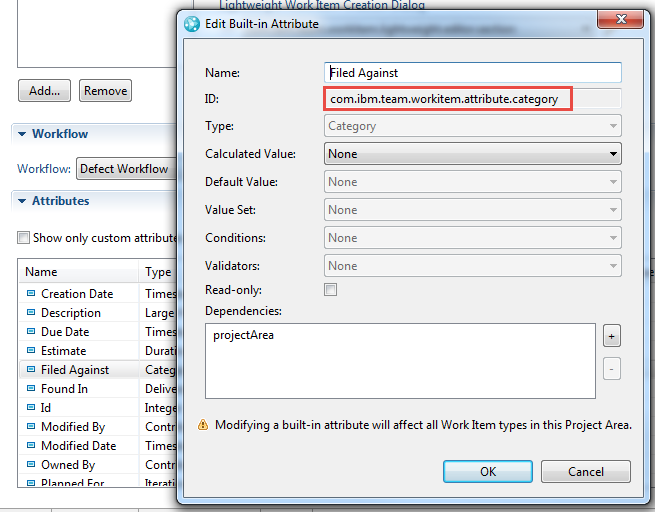
Please note, do not use the attribute ID’s you find in the project area administration in the RTC Eclipse client. The RTC Eclipse client shows attribute ID’s with a prefix com.ibm.team.workitem.attribute such as such as com.ibm.team.workitem.attribute.category. This attribute ID is not the one that works with the work item API. I am not sure what they really do, but they don’t work to get attribute values. See the Enhancement Request 219100 RTC Eclipse Client shows wrong IDs for internal Work Item Attributes for Java API for details.
RTC Eclipse Client shows wrong attribute ID’s for internal attributes
Getting the Work Item’s Attributes in the API
You can also find the attribute ID’s in the API. The Work Item Command Line uses this for the command printtypeattributes.
If you have a work item, an object of type IWorkItem in the API, you will realize that you have only a very limited set of getters and setters to access information for the work item. You have access to the Summary, Owner, and some other built in attributes of the work item. If you look at a RTC work item, you realize there is much more information in it. The question is how to access this information?
The RTC data meta-model provides a special interface that is used to access arbitrary attributes of a work item. The interface is com.ibm.team.workitem.common.model.IAttribute. To access an arbitrary Attribute at a work item, you need to get the IAttribute first.
There are several ways how this can be done. Please note that most of the functionality used below is available in the interface com.ibm.team.workitem.common.IWorkItemCommon. This interface can be used in both the client and the server API. In the client API com.ibm.team.workitem.client.IWorkItemClient inherits the IWorkItemCommon interface. in the server API com.ibm.team.workitem.service.IWorkItemServer also inherits the IWorkItemCommon interface. Use IWorkItemCommon where possible.
If you have the Attribute ID available as a string, you can use this code to get the attribute.
Another example if you know the work item ID, it is possible to find the work item form the string value.
IWorkItemCommon workItemCommon = (IWorkItemCommon ) fTeamRepository.getClientLibrary(IWorkItemCommon.class);
IAttribute attribute = workItemCommon.findAttribute(projectArea, attributeID,
				getMonitor());
if(attribute != null){
	// Do something with it.
}
RTC defines some built-in attributes that are typical for all kinds of work items. You can get the ID’s for these attributes using the interface com.ibm.team.workitem.common.model.IWorkItem. The interface defines several properties containing the ID’s for built-in the work item attributes.
This code for example gets the attribute for the built-in duration.
If this is not feasible, because you do some automation and don’t want to hard code it, the code below gets all the built in attributes of a project area.
List builtInAttributeHandles = workItemCommon.findBuiltInAttributes(fProjectArea, monitor);
If you are looking for all attributes, this method below retrieves the list.
List allAttributeHandles = workItemCommon.findAttributes(fProjectArea, monitor);
There is no method that returns only the custom attributes from the project area. You can however get the custom attributes directly from a work item using the code below:
List custAttributeHandles = workItem.getCustomAttributes();
The code to get the attributes, returns only a handle. You have to resolve the handle to the full object. The code below shows how that can be done.
Once you have the IAttribute, you can get the value of the attribute using the method IWorkItem.getValue(). However, as described in the post Using an Expression to Synchronize Attributes for Work Items of a Specific Type, work items do not necessarily have all attributes already. This especially holds true for custom attributes. You either need to check for a null value, or you can check if the work item actually has the attribute using code like below.
if (workItem.hasAttribute(iAttribute)) {
	Object value = workItem.getValue(iAttribute);
}
The call returns a plain object. You have to cast the returned value to the expected type, to use it. Examples for basic objects are String, Integer, Boolean. You can use these to access the data. The API has many more attribute types that you can also use to cast and access the data.
Here an example how to access a attribute of type String:
if (workItem.hasCustomAttribute(customString)){
	Object value = workItem.getValue(customString);
	if (value instanceof String) {
		String attributeValue = (String) value;
		// do something with the value
	}
}
It is necessary to understand the type that is returned. The information is can easily be picked up during debugging.
Typical Attribute Types
The available attribute types can be found in the process configuration in the Web UI (or the Eclipse UI). To get the valid information for built in and custom attributes, the Web UI works best. The Type column shows the type, the ID column shows the ID of the attribute. Note, the Eclipse Client shows an external ID for built in attributes, that does not work.
Please find below some examples how to access work item attributes of different types. The examples are taken from the Work Item Command Line which has examples for almost every attribute type. You can download the code from here. All the examples expect the object returned by calling
Object value = workItem.getValue(customString);
where customstring is the IAttribute. Work items have some additional attributes where the IWorkItem interface provides direct access to the data e.g. getSummary().
For a complete list of attribute values and their conversion to text see the WorkItem Command Line and the class ExportWorkItemsCommand and look at ExportWorkItemsCommand.getStringRepresentation(IWorkItem, ParameterValue) and the subsequently called methods to convert the attributes to strings.
The most important attribute types are shown below.
Category
The attribute “Filed Against” returns a category. The conversion to user readable text looks like this:
/**
 * Compute the string representation for a category
 *
 * @param value
 * @return
 * @throws TeamRepositoryException
 */
private String calculateCategoryAsString(Object value)
		throws TeamRepositoryException {
	if (value != null) {
		if (value instanceof ICategoryHandle) {
			return getWorkItemCommon().resolveHierarchicalName(
				(ICategoryHandle) value, getMonitor());
		}
		throw new WorkItemCommandLineException(
				"Convert Category - Incompatible Type Exception: "
						+ value.toString());
	}
	return CONSTANT_NO_VALUE;
}
Number Types
There are several number types supported. Here the conversion to text values.
/**
 * Compute the string representation for a number
 *
 * @param value
 * @param format
 * @return
 */
private String calculateNumberAsString(Object value, String format) {
	if (value == null) {
		return CONSTANT_NO_VALUE;
	}
	if (value instanceof Integer) {
		return ((Integer) value).toString();
	}
	if (value instanceof Long) {
		return ((Long) value).toString();
	}
	if (value instanceof Float) {
		return ((Float) value).toString();
	}
	if (value instanceof BigDecimal) {
		return ((BigDecimal) value).toString();
	}
	throw new WorkItemCommandLineException(
			"Calculate number - Incompatible Type Exception: "
					+ value.toString());
}
/**
 * Compute a string representation for one enumeration literal
 *
 * @param value
 * @param attribute
 * @return
 * @throws TeamRepositoryException
 */
private String calculateEnumerationLiteralAsString(Object value,
		IAttribute attribute) throws TeamRepositoryException {
	if (value == null) {
		return CONSTANT_NO_VALUE;
	}
	if (!(value instanceof Identifier)) {
		return "Value not an enumeration literal";
	}
	IEnumeration enumeration = getWorkItemCommon()
			.resolveEnumeration(attribute, getMonitor());
	@SuppressWarnings("unchecked")
	Identifier currentIdentifier = (Identifier) value;
	ILiteral literal = enumeration
			.findEnumerationLiteral(currentIdentifier);
	return literal.getName();
}
Comments
Comments are not an attribute, but a collection that can be accessed. Here an example how to get at the information.
IComments comments = workItem.getComments();
IComment[] theComments = comments.getContents();
List commentText = new ArrayList(theComments.length);
int i = 1;
for (IComment aComment : theComments) {
	if (i > 1) {
		commentText.add("\r");
	}
	commentText.add(i + ". " + aComment.getHTMLContent().getPlainText());
	i++;
}
Contributor Type Attributes
User references are stored as com.ibm.team.repository.common.IContributorHandle as handles for IContributors. To access the contributor information it is necessary to get the handle and resolve the contributor. This is shown below.
/**
 * Compute the string representation for a contributor/user
 *
 * @param value
 * @return
 * @throws TeamRepositoryException
 */
private String calculateContributorAsString(Object value)
		throws TeamRepositoryException {
	if (value == null) {
		return CONSTANT_NO_VALUE;
	}
	if ((value instanceof IContributorHandle)) {
		IContributor contributor = (IContributor) getTeamRepository()
				.itemManager().fetchCompleteItem(
						(IContributorHandle) value, IItemManager.DEFAULT,
						getMonitor());
		return contributor.getName();
	}
	throw new WorkItemCommandLineException(
			"Convert Contributor - Incompatible Type Exception: "
					+ value.toString());
}
Timestamps
Timestamps are stored as java.sql.Timestamp. The code below shows how to get the data.
/**
 * Compute the string representation for a timestamp
 *
 *
 * @param value
 * @return
 */
private String calculateTimestampAsString(Object value) {
	if (value != null) {
		if (value instanceof Timestamp) {
			Timestamp timestamp = (Timestamp) value;
			return SimpleDateFormatUtil.getDate(timestamp,
					getSimpleDateTimeFormatPattern());
		}
		throw new WorkItemCommandLineException(
				"Convert timestamp - Incompatible Type Exception: "
						+ value.toString());
	}
	return CONSTANT_NO_VALUE;
}
The class com.ibm.js.team.workitem.commandline.utils.SimpleDateFormatUtil is part of the WorkItem Command Line and uses java.text.SimpleDateFormat to convert the value to a string.
Durations
Durations such as “Time Spent” are stored as long. The code below converts the value.
/**
 * Compute the string representation for a duration
 *
 * @param value
 * @param attribType
 * @return
 */
private String calculateDurationAsString(Object value, String attribType) {
	if (value != null) {
		if (value instanceof Long) {
			Long milliseconds = (Long) value;
			return SimpleDateFormatUtil.convertToTimeSpent(milliseconds);
		}
		throw new WorkItemCommandLineException(
				"Calculate Duration - Incompatible Type Exception: "
						+ value.toString());
	}
	return CONSTANT_NO_VALUE;
}
The class com.ibm.js.team.workitem.commandline.utils.SimpleDateFormatUtil is part of the WorkItem Command Line and uses java.text.SimpleDateFormat to convert the value to a string.
Iterations
Iterations are returned as IIterations. To resolve the iteration see the code below. The WorkItem Command Line contains the class com.ibm.js.team.workitem.commandline.helper.DevelopmentLineHelper to convert Iterations and Timelines to user readable text.
/**
 * Get the IIteration object from a handle
 *
 * @param handle
 * @return
 * @throws TeamRepositoryException
 */
public IIteration resolveIteration(IIterationHandle handle)
		throws TeamRepositoryException {
	if (handle instanceof IIteration) {
		return (IIteration) handle;
	}
	IIteration iteration = (IIteration) fTeamRepository.itemManager()
			.fetchCompleteItem((IIterationHandle) handle,
					IItemManager.DEFAULT, fMonitor);
	return iteration;
}
Work Item State
To get the work item state see the code blow.
/**
 * Convert a work item state to a string
 *
 * @param workItem
 * @return
 * @throws TeamRepositoryException
 */
private String calculateStateAsString(IWorkItem workItem)
		throws TeamRepositoryException {
	Identifier state = workItem.getState2();
	IWorkflowInfo wfInfo = getWorkItemCommon().findWorkflowInfo(workItem,getMonitor());
	String stateName = wfInfo.getStateName(state);
	if (stateName == null) {
		return "";
	}
	return stateName;
}
Subscriptions
Subscriptions is another pseudo attribute that really is a collection.
Approvals is also a pseudo attribute and is accessed using a collection. The conversion is quite sophisticated as the approval information is composed of several descriptors and approval records. Please see the WorkItem Command Line and the ExportWorkItemsCommand.calculateApprovalsAsString(IWorkItem) for the code.
Work Item Attributes have a type for example smallString, mediumString, myCustomEnumeration and many more. Since RTC 4.x it is possible to have attributes defined that can contain a list of attribute values. The attributes are defined by picking the attribute type with the post-fix list in the attribute type selection for example string list, myCustomEnumeration list, Work Item list, Team Area list etc.
Basically the returned object for attribute types is a list object an instance of:
List
to get at the contained values, cast to a list. Then iterate the list and work on the returned object.
/**
 * Compute the string representation for a string list object
 *
 * @param value
 * @return
 */
private String calculateStringListAsString(Object value) {
	if (value == null) {
		return CONSTANT_NO_VALUE;
	}
	List resultList = new ArrayList();
	if (value instanceof List) {
		List items = (List) value;
		for (Object object : items) {
			resultList.add(calculateString(object));
		}
	}
	return StringUtil.listToString(resultList, SEPERATOR_NEWLINE);
}
For the objects returned cast them to the correct instance and then use the values as fits. Her an example for a string type.
/**
 * Compute the string representation for a string object
 *
 * @param value
 * @return
 */
private String calculateString(Object value) {
	if (value != null) {
		if (value instanceof String) {
			return (String) value;
		}
		throw new WorkItemCommandLineException(
				"Convert string - Incompatible Type Exception: "
						+ value.toString());
	}
	return CONSTANT_NO_VALUE;
}
See the WorkItem Command Line and ExportWorkItemsCommand.getStringRepresentation(IWorkItem, ParameterValue) for how to analyze the attribute types and call the conversions.
Set the Work Item Attribute
Very similar to getting the work item Attribute, you can set the value of an attribute. You need to have a WorkItemWorkingCopy of the work item to be able to set an work item attribute value. See the Jazz Team Wiki or for example this post for how to retrieve a working copy. This post shows some of the code for the server. The code below shows this for a custom integer attribute. First it checks if the work item attribute is available and then sets the value. The IWorkItem.setValue() method assumes it is able to cast the value in order to be able to set it. You need to provide a value of a matching type to set the attribute.
IWorkItem workItem = IWorkItem workItem = workingCopy.getWorkItem();
Integer value = new Integer("4");
if (workItem.hasCustomAttribute(customInteger))
	workItem.setValue(customInteger, value);
}
The various types that can be set are explained above. The data has to be provided as retrieved above. Typical types are String, Integer, Long, BigDecimal, enumerations, Timestamps.
For List attributes you have to construct a list of attributes and set the list. e.g. A very simple example would be for a custom enumeration. Construct a list of attribute values (e.g. the Identifier for the enumeration literal) and use the list to set the values:
List values = new ArrayList();
values.add(getLiteralEqualsString("foo", customEnumerationList));
values.add(getLiteralEqualsString("bar", customEnumerationList));
workItem.setValue(customEnumerationList,values);
Regardless whether you read a value or write a value, you usually can’t just use the value. As described in Understanding and Using the RTC Java Client API you need to cast the object you get to something you can use. A String, an Int, an enumeration literal, or for more complex itens to an ItemHandle and resolve the handle to be able to access the data.If you want to set a value, you have to make sure that the Object you pass conforms to the attribute type as well.If your data does not conform to the value that is returned or expected, your code will throw a ClassCastException.My experience so far is, that such exceptions usually were my fault and not the fault of the API. So in case of exceptions first look at your code before posting the API is broken in the forum.
Examples for setting work item attributes
The Work Item Command Line has examples for a complete set of work item attribute types. The class com.ibm.js.team.workitem.commandline.helper.WorkItemUpdateHelper provides examples for how to find the work item attributes from an ID, get the attribute type and set a value from a string representation. The entry points are
com.ibm.js.team.workitem.commandline.helper.WorkItemUpdateHelper.updateProperty() – the method tries to find the attribute and calculate the attribute type
com.ibm.js.team.workitem.commandline.helper.WorkItemUpdateHelper.getRepresentation() – the method takes the calculated attribute type IAttribute and the string representation and tries to get an object that represents the value in the repository; the code tries to find a contributor from the ID, tries to find an iteration or a category from a text description.
Various methods with the prefix calculate, find, get, create, update are provided that do the work to convert or lookup the data.
This is a short overview about the basics you need to know to access and modify work item attribute values. Other posts in this blog and several other examples on Jazz.net and IBM Developerworks provide more information on the API.
This post is about a Participant that creates an approval when saving a work item. I was interested in posting this, because I was interested on how to get at project member and role information in a server extension. I had already helped a partner with a similar effort in the past, where the approver information was supposed to be read in an external system. Back then I couldn’t find how to access the project area information and to find the roles.
License and how to get started with the RTC API’S
As always, our lawyers reminded me to state that the code in this post is derived from examples from Jazz.net as well as the RTC SDK. The usage of code from that example source code is governed by this license. Therefore this code is governed by this license, which basically means you can use it for internal usage, but not sell. Please also remember, as stated in the disclaimer, that this code comes with the usual lack of promise or guarantee. Enjoy!
The code provides you with several classes. The interesting one is com.ibm.js.team.workitem.createapproval.participant.CreateApprovalParticipant. This class implements the participant that creates an approval if a workitem changes into the state "com.ibm.team.workitem.common.model.IState:com.ibm.team.apt.story.tested".
In case this state change is detected, the participant runs the following code to get approvers by their role Product Owner.
The method called to find the approvers looks like the following code. The code gets the process area that governs the work item. and tries to get contributors with matching roles.
If there are no contributors that could be found with a matching role, it tries the same with the project area. The contributors are returned to create the approval.
Please note, this strategy could be changed into recursively start at the project area an find the enclosed team area hierarchy and then try all team areas in the hierarchy from the one that owns the work item up to the project area. This is left as a good example for the you to implement.
/**
 * Finds Approvers by role. Looks in the process area that owns the work item first,
 * then looks at the project area if it was not already looking at it.
 *
 * @param newState
 * @param roleName
 * @param monitor
 * @return
 * @throws TeamRepositoryException
 */
private IContributorHandle[] findApproversByRole(IWorkItem newState,
		String roleName, IProgressMonitor monitor) throws TeamRepositoryException {
	IProcessAreaHandle processAreaHandle = fWorkItemServer.findProcessArea(
		newState, monitor);
	IProcessArea processArea = (IProcessArea) fAuditableCommon.resolveAuditable(processAreaHandle,
		ItemProfile.createFullProfile(IProcessArea.ITEM_TYPE), monitor);
	IContributorHandle[] contributors = findContributorByRole(processArea, roleName, monitor);

	if(contributors.length==0){
		IProjectAreaHandle projectAreaHandle = processArea.getProjectArea();
		if(!projectAreaHandle.getItemId().equals(processAreaHandle.getItemId())){
			IProcessArea projectArea = (IProcessArea) fAuditableCommon.resolveAuditable(projectAreaHandle,
				ItemProfile.createFullProfile(IProcessArea.ITEM_TYPE), monitor);
			return findContributorByRole(projectArea, roleName, monitor);
		}
	}
	return contributors;
}
The code to find the approvers by role gets the members of the process area, then gets the contributors with the role name provided and returns the result. The code can be seen below.
/**
 * Find contributors by role on a process area.
 *
 * @param processArea
 * @param roleName
 * @param monitor
 * @return
 * @throws TeamRepositoryException
 */
public IContributorHandle[] findContributorByRole(
		IProcessArea processArea, String roleName,
		IProgressMonitor monitor) throws TeamRepositoryException {
	fProcessServerService = getService(IProcessServerService.class);
	IContributorHandle[] members = processArea.getMembers();
	IContributorHandle[] matchingContributors = fProcessServerService
		.getContributorsWithRole(members, processArea,
		new String[] { roleName });
	return matchingContributors;
}
Finally the code below creates the approval if there are approvers that are passed. It gets the full state of the work item. Then it gets the approvals and creates a new descriptor for the new approval. For each approver it creates an approval with the new descriptor and then adds it to the approvals. Finally it saves the work item.
In case there are no approvers or the save is prevented, an error info is generated.
/**
 * Creates an approval and adds all approvers from an array
 *
 * @param workItem
 * @param collector
 * @param monitor
 * @throws TeamRepositoryException
 */
private void createApproval(IWorkItem workItem,
		IParticipantInfoCollector collector, IContributorHandle[] approvers,
		IProgressMonitor monitor) throws TeamRepositoryException {

	if (approvers.length==0) {
		String description = NLS.bind("Unable to create the Approval",
			"Unable to find an approver for the work item ''{0}''.",
			workItem.getItemId());
		IReportInfo info = collector.createInfo(
			"Unable to create approval.", description);
		info.setSeverity(IProcessReport.ERROR);
		collector.addInfo(info);
		return;
	}
	// Get the full state of the parent work item so we can edit it
	IWorkItem workingCopy = (IWorkItem) fWorkItemServer.getAuditableCommon()
		.resolveAuditable(workItem, IWorkItem.FULL_PROFILE, monitor)
		.getWorkingCopy();

	IApprovals approvals = workingCopy.getApprovals();
	IApprovalDescriptor descriptor = approvals.createDescriptor(
		WorkItemApprovals.REVIEW_TYPE.getIdentifier(), APPROVAL_NAME);
	for (IContributorHandle approver : approvers) {
		IApproval approval = approvals.createApproval(descriptor, approver);
		approvals.add(approval);
	}
	IStatus saveStatus = fWorkItemServer.saveWorkItem2(workingCopy, null, null);
	if (!saveStatus.isOK()) {
		String description = NLS.bind("Unable to create the Approval",
			"Unable to save the work item ''{0}''.",
			workItem.getItemId());
		IReportInfo info = collector.createInfo(
			"Unable to create approval.", description);
		info.setSeverity(IProcessReport.ERROR);
		collector.addInfo(info);
	}
}
The code to download contains other examples for how to get approvers.
Summary
The code is experimental. I have tested it in a Jetty based test server using the Scrum template. It is by no means production ready and can be enhanced for various scenarios. However, as always, I hope the code is an inspiration and helps someone out there to save some time. If you are just starting to explore extending RTC, please have a look at the hints in the other posts in this blog on how to get started.
This post is about a Participant that resolves the parent work item, if all children are resolved. It is the example I used to understand the server API for manipulating work item states. I would probably not use it on a production system, because I strongly believe that a human being should do a conscious decision in cases like that, but it is a nice example about the RTC Work Item Server API.
License and how to get started with the RTC API’S
As always, our lawyers reminded me to state that the code in this post is derived from examples from Jazz.net as well as the RTC SDK. The usage of code from that example source code is governed by this license. Therefore this code is governed by this license, which basically means you can use it for internal usage, but not sell. Please also remember, as stated in the disclaimer, that this code comes with the usual lack of promise or guarantee. Enjoy!
The download contains the (slightly enhanced) UpdateParentDuration Participant described in this post, the UpdateParentStateParticipant and the WorkFlowPathfinderfrom this post as Eclipse projects. In Eclipse use File>Import and select Existing Projects into Workspace. Select the downloaded archive file and do the import. This version of the WorkFlowPathFinder has the Plain Java Client Libraries dependency removed and is treated as real plug in, to provide its services to the other plug ins.
The project com.ibm.js.team.workitem.extension.updateparent.participant contains the class UpdateParentState. This implements the Participant that
Checks if there was a state change
Checks if the new state is a closed state
Checks if there is a parent
If there is a parent, checks if all children are closed
Resolves the parent If all children are closed
The UpdateParentStateParticipant can use different strategies to do the state change. The code below shows some of the available options.
if (!resolveBF(parentHandle, monitor)) {
// if (!resolveDF(parentHandle, monitor)) {
// if (!resolveWithResolveActionID(parentHandle, monitor)) {
// if (!gotoStateBF(parentHandle,"4",true, monitor)) {
The methods resolveBF() and resolveDF() use the Breadth First and the Depth First strategy against the resolve action. The method gotoStateBF() uses the Breadth First strategy but uses a target state instead. The method resolveWithResolveActionID() only tries to apply the action ID. You can play around with the different strategies and pick the one you like best.
The resolve Action needs to be defined in the RTC work Item workflow as shown below, otherwise the state change can’t be done, because no path can be found.
The WorkflowPathFinder class in the download provides two other ways to find a target state, instead of a target action. The methods are called findPathToState_DF() and findPathToState_BF().
UpdateParentDurationParticipant
The UpdateParentDurationParticipant is slightly enhanced compared to the state in RTC Update Parent Duration Estimation and Effort Participant post. It checks if there are changes to the duration and estimate values before doing anything else.
The code also contains several methods to analyze the work item links on the server as described in The RTC WorkItem Server Link API post.
Summary
The code is experimental. I have tested it in a Jetty based test server using the Scrum template. It is by no means production ready and can be enhanced for various scenarios. However, as always, I hope the code is an inspiration and helps someone out there to save some time. If you are just starting to explore extending RTC, please have a look at the hints in the other posts in this blog on how to get started.