
Is it possible to add customized actions to the context menus in Eclipse? This is an interesting question that recently came up in the context of my work.
This post shows how this can be done, in case you are asked to do this kind of work. It explains
- What extensions are possible in general
- What you need to know to try to create such extensions
- How to get at some of the data you need
- A simple example that shows the main steps you need to take and the most interesting code snippets
* Update * If you need to get rid of menu entries, check this post.
License
As always, the code in this post is derived from examples from Jazz.net as well as the RTC SDK. The usage of code from that example source code is governed by this license. Therefore this code is governed by this license, which basically means you can use it for internal usage, but not sell. Remember that this code comes with the usual lack of promise or guarantee. Enjoy!
Just Starting With Extending RTC?
If you just get started with extending Rational Team Concert, or create API based automation, start with the post Learning To Fly: Getting Started with the RTC Java API’s and follow the linked resources.
You should be able to use the following code in this environment and get your own automation or extension working.
The Example
The example adds a context menu action on snapshots. It provides an example for an action directly in the context menu as well as an example for a sub menu that can be used to organize several actions. The outcome looks like below.
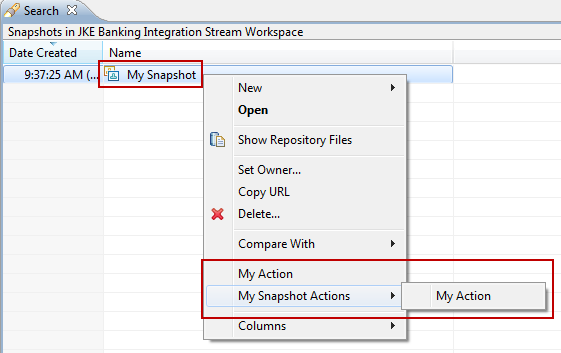
- Pop up menu action for a Snapshot

If the action is performed, the example will get the object and do something with it.
What Can be Extended?
I knew that this would be possible in general. I have created such context menu extensions for our Eclipse based modelling tools in the past. Eclipse is built to be extended. In general you can create all kinds of tools that extend Eclipse. For example
- Eclipse Views – Tree, Table, Table Tree Views
- Eclipse Editors
- Eclipse Menus – menu bars, custom actions, pop up menus
- Extend existing Eclipse extensions e.g. provide context menu extensions or add functionality
- Decorators for tree views
All these capabilities are described in numerous books about extending Eclipse and in even more tutorials available on the web. This article describes how to create menu contributions. I won’t go too deep into what is covered in these information sources. Instead I will try to focus on the interesting topics related to RTC.
What is the Problem?
So, if this is all possible, why blog about it here? The problem is, that all these extensions require information about the objects and editors you want to extend. As an example a pop up menu contribution providing an action to the context menu of a view requires the class of the object that is provided in the tree node to work. Without this information you can’t do anything.
I found it very hard to get the information in the past. You can obviously start with a very general object and try to debug. However this can be very tedious. How can you find this information more efficient?
The answer to that is using tools available to find the information. I will show some of the tools available and how they can be used. Lets get started with creating our example.
Example Project
We want a pop up menu extension that allows to perform some action on a snapshot in some views.
The easiest way to start is to use the Plug-in Project wizard Use File>New>Project and create a Plug-in Project. Pick a good project name. As a best practice I always use a naming pattern that is aligned with the naming patterns used in Jazz, adding a unique infix that will later allow me to search for the code in case it is deployed. As an example I use com.ibm.js.team.filesystem.snapshot.menucontribution. Then use Next to go to the next specification step. As a best practice use the name as ID and specify the other values. The image below shows my choices.
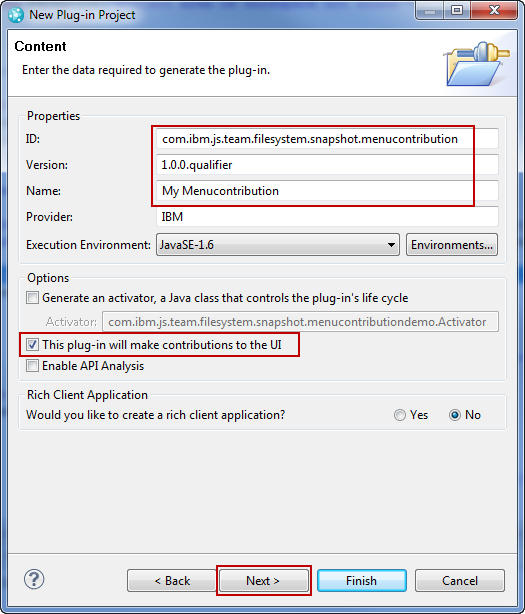
- Specify the project properties

Use Next to get to the extension templates. Select Plug-in with a Popup menu and click Finish. The wizard does its miracles and you now have a new project.
Inspecting the project reveals a plugin.xml and a new action class have been created. The project is fully functional. It would be possible to start an Eclipse Client Debug run-time and find a new pop up menu if clicking on a file in the Eclipse Navigator, Project Explorer or other views. If you click on a snapshot in the search view, you see – nothing.
However, that is not our target. What makes this work and what needs to be done to make this work for the given example?
For what objects this works is basically hidden in the plugn.xml. It looks as follows:
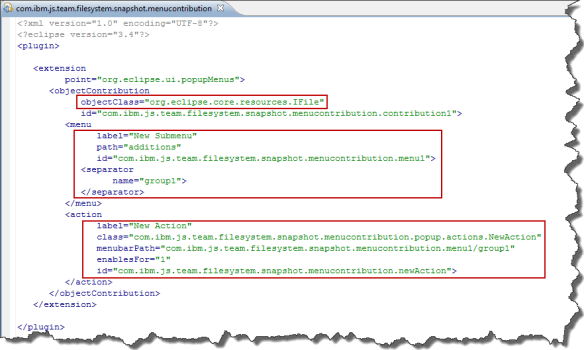
- Generated Plugin XML

The extension is an object contribution. It works for objects displayed in views that are of the class org.eclipse.core.resources.IFile. The menu defines a sub menu that is inserted before a place called additions and defines a new menu group group1. The Action in this sub menu enables for selections of one element and calls the specified action class.
A snapshot is not of the class org.eclipse.core.resources.IFile. So much is clear, but what class do we need here?
YARI – Yet Another RCP Inspector
One way of finding out this crucial detail, that works for me, is using one of the many Eclipse inspection tools. I found YARI – Yet Another RCP Inspector searching the Web due to a hint and use this tool since then. It needs to be installed into Eclipse as described in the install instructions. Once installed it provides various new views that you can use to inspect Eclipse RCP applications, including Eclipse itself. The data it provides can be overwhelming at times, but is very useful. Use the documentation and FAQ’s provided to understand better what you can find in the data.
To find out what is exposed in the search view for a snapshot, open the view SWT Inspector that YARI provides.
Now search for a snapshot. Select the ‘capture mouse down‘ action in the SWT Inspector and click on the snapshot in the search view. Click at the ‘capture mouse down’ action in the SWT Inspector again, to switch it off. Now you can look at the captured data and use the mouse without capturing again.
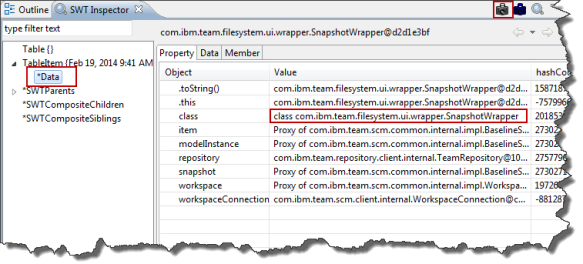
- The captured data

Look at the captured data. The data node in the TableItem element is what we need in this context. The class that is exposed here is class com.ibm.team.filesystem.ui.wrapper.SnapshotWrapper. This is basically the class that we need in the object contribution.
Plug-in Spy
Another Tool, that you can use to look under the covers of Eclipse extensions, is Plug-in Spy. This tool is now bundled with Eclipse in the Plugin Develupment Environment (PDE). You can invoke Plug-in Spy using SHIFT-ALT-F1 on a window. It tells you information such as which class provides the editor and what plugin contributes it. This is useful e.g. to find out how the Editors work and what API they use. We don’t need this information for the example, but other cases have proven this to be useful.
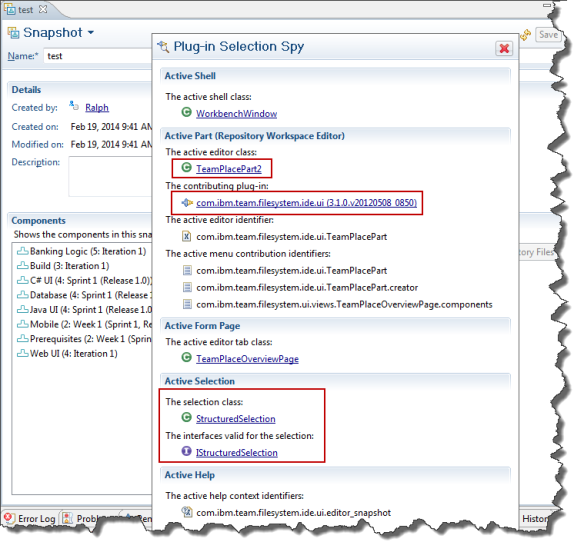
- Plug-in Spy

Plug-in Referencs
You can also, from the extension in a plugin.xml search for Plug-in Referencs. This shows other plug-ins that extend the same extension point. Since RTC does this, you can find and open related plugin.xml files and look for contribution classes, editor id’s and other useful information.
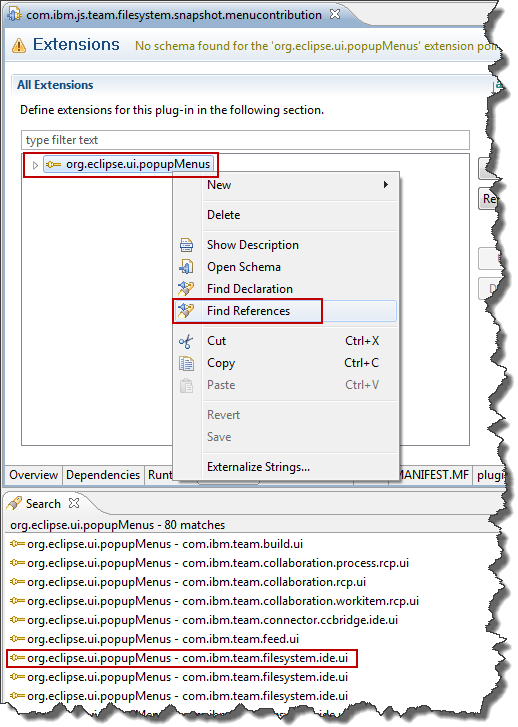
- Plug-ins referencing the same extension point

In this case com.ibm.filesystem.ide.ui is the best candidate to look at first. We don’t need the information for this example, but other examples would require to look here.
Modifying the Example
We can now modify the example to provide us with the desired solution. The steps are
- Renaming the action class
- Renaming ID’s and display text in the plugin XML
- Adding a new contribution to the plugin
- Adding required dependencies to RTC plug-ins
- Adding code to the action
After renaming the acion class – and making sure that the new class name is actually correctly used in the plugin.xml – modify the plugin.xml to show menu captions as desired and add another contribution that directly contributes to the context menu, without creating a sub menu.
After the modifications the plugin.xml looks as below.
 Both contributions are very similar. The difference is that the first contribution in the XML creates a new sub-meu and maps the action on to the menubarPath for this sub menu. The second contribution maps an action directly into the menubarPath ‘additions‘.
The order these contributions will show up in the menu is actually the reverse order of their definition in the plugin.xml.
Please Note: Don’t ask me how this works in detail. I just know enough and have example pattern that work for me. If you need more information search the Web for articles or find a good book about it.
What is left is to actually do something in the action.
SnapshotAction
The code below shows the class SnapshotAction that executes if the pop up menu is selected. Most of the code that actually works with the API is left out, because it is not that interesting. The code below can easily be used as a starting point for any menu action for any RTC object.
package com.ibm.js.team.filesystem.snapshot.menucontribution.popup.actions;

import org.eclipse.core.runtime.IProgressMonitor;
import org.eclipse.core.runtime.NullProgressMonitor;
import org.eclipse.jface.action.IAction;
import org.eclipse.jface.dialogs.MessageDialog;
import org.eclipse.jface.viewers.ISelection;
import org.eclipse.jface.viewers.IStructuredSelection;
import org.eclipse.swt.widgets.Shell;
import org.eclipse.ui.IActionDelegate;
import org.eclipse.ui.IObjectActionDelegate;
import org.eclipse.ui.IWorkbenchPart;

import com.ibm.team.filesystem.ui.wrapper.SnapshotWrapper;
import com.ibm.team.process.common.IProjectArea;
import com.ibm.team.process.common.IProjectAreaHandle;
import com.ibm.team.repository.client.IItemManager;
import com.ibm.team.repository.client.ITeamRepository;
import com.ibm.team.repository.common.IAuditableHandle;
import com.ibm.team.repository.common.TeamRepositoryException;
import com.ibm.team.scm.common.IBaselineSet;
import com.ibm.team.scm.common.IWorkspace;
import com.ibm.team.workitem.client.IQueryClient;
import com.ibm.team.workitem.client.IWorkItemClient;
import com.ibm.team.workitem.common.IAuditableCommon;
import com.ibm.team.workitem.common.expression.AttributeExpression;
import com.ibm.team.workitem.common.expression.Expression;
import com.ibm.team.workitem.common.expression.IQueryableAttribute;
import com.ibm.team.workitem.common.expression.QueryableAttributes;
import com.ibm.team.workitem.common.expression.Term;
import com.ibm.team.workitem.common.model.AttributeOperation;
import com.ibm.team.workitem.common.model.IWorkItem;
import com.ibm.team.workitem.common.query.IQueryResult;
import com.ibm.team.workitem.common.query.IResult;
import com.ibm.team.workitem.rcp.ui.WorkItemUI;

public class SnapshotAction implements IObjectActionDelegate {

	private Shell shell;
	private IWorkbenchPart fTargetPart;
	private SnapshotWrapper fSelection;
	private IWorkItemClient fWorkItemClient;
	private IAuditableCommon fAuditableCommon;
	private ITeamRepository fTeamRepository;

	/**
	 * Constructor for Action1.
	 */
	public SnapshotAction() {
		super();
	}

	/**
	 * @see IObjectActionDelegate#setActivePart(IAction, IWorkbenchPart)
	 */
	public void setActivePart(IAction action, IWorkbenchPart targetPart) {
		shell = targetPart.getSite().getShell();
		fTargetPart = targetPart;
	}

	/**
	 * @see IActionDelegate#run(IAction)
	 */
	public void run(IAction action) {
		IProgressMonitor monitor = new NullProgressMonitor();
		IBaselineSet snapshot = fSelection.getSnapshot();
		String snapshotUUID = snapshot.getItemId().getUuidValue();
		try {
			fTeamRepository = (ITeamRepository) snapshot.getOrigin();
			fWorkItemClient = (IWorkItemClient) fTeamRepository
					.getClientLibrary(IWorkItemClient.class);
			fAuditableCommon = (IAuditableCommon) fTeamRepository
					.getClientLibrary(IAuditableCommon.class);

			performAction(snapshotUUID, monitor);
			MessageDialog.openInformation(
					shell,
					"SnapshotMenuContribution",
					"My Action was executed on Snapshot: '"
							+ snapshot.getName() + "' UUID [" + snapshotUUID
							+ "]");

		} catch (Exception e) {
			MessageDialog.openError(shell, "SnapshotMenuContribution",
					e.getMessage() + "\nMy Action was executed on Snapshot: '"
							+ snapshot.getName() + "' UUID [" + snapshotUUID
							+ "]");
		}
	}

	private void performAction(String snapshotUUID, IProgressMonitor monitor)
			throws Exception, TeamRepositoryException {
			// Do something here
	}

	/**
	 * @see IActionDelegate#selectionChanged(IAction, ISelection)
	 */
	public void selectionChanged(IAction action, ISelection selection) {
		fSelection = null;

		if (selection instanceof IStructuredSelection) {
			Object first = ((IStructuredSelection) selection).getFirstElement();
			if (first instanceof SnapshotWrapper) {
				fSelection = (SnapshotWrapper) first;
			}
		}
	}
}
Lets look at the interesting parts first. The class implements IObjectActionDelegate. This is an interface of the Eclipse framework that is always used for this type of actions.
The method selectionChanged() is used to get the selected element(s). It is called when selecting elements for the contribution. The code is fairly typical and can also be refined to get a list of selections.
/**
 * @see IActionDelegate#selectionChanged(IAction, ISelection)
 */
public void selectionChanged(IAction action, ISelection selection) {
	fSelection = null;

	if (selection instanceof IStructuredSelection) {
		Object first = ((IStructuredSelection) selection).getFirstElement();
		if (first instanceof SnapshotWrapper) {
			fSelection = (SnapshotWrapper) first;
		}
	}
}
The code inspects the selection, uses IStructuredSelection to get at the elements, and checks that the correct class is passed, casts the input and stores it in a field.
The method setActivePart() is used to store some information about the UI that can be used later. Some UI elements such as message dialogs need the current shell. Others need the target part. These values are stored in fields.
/**
 * @see IObjectActionDelegate#setActivePart(IAction, IWorkbenchPart)
 */
public void setActivePart(IAction action, IWorkbenchPart targetPart) {
	shell = targetPart.getSite().getShell();
	fTargetPart = targetPart;
}
The method run() finally is called when clicking the action. The interesting parts of this method are getting the snapshot from the wrapper and then getting the UUID.
Another interesting piece of code is to get the ITeamRepository. The code uses the method getOrigin() available from all RTC data objects and gets the team repository of the selected element. Keep in mind, the client could be connected to several different repositories and we want the one that contains the selected element. Once we have the ITeamRepository, it is possible to get client libraries needed for the areas of the API.
The code would do something to the selected element, or search for related elements and then perform some action with it. This code is left out in the example. The example shows a dialog window coming up on the end of the action or in case an exception occurred.
/**
 * @see IActionDelegate#run(IAction)
 */
public void run(IAction action) {
	IProgressMonitor monitor = new NullProgressMonitor();
	IBaselineSet snapshot = fSelection.getSnapshot();
	String snapshotUUID = snapshot.getItemId().getUuidValue();
	try {
		fTeamRepository = (ITeamRepository) snapshot.getOrigin();
		fWorkItemClient = (IWorkItemClient) fTeamRepository
				.getClientLibrary(IWorkItemClient.class);
		fAuditableCommon = (IAuditableCommon) fTeamRepository
				.getClientLibrary(IAuditableCommon.class);
			performAction(snapshotUUID, monitor);
		MessageDialog.openInformation(
				shell,
				"SnapshotMenuContribution",
				"My Action was executed on Snapshot: '"
						+ snapshot.getName() + "' UUID [" + snapshotUUID
						+ "]");
		} catch (Exception e) {
		MessageDialog.openError(shell, "SnapshotMenuContribution",
				e.getMessage() + "\nMy Action was executed on Snapshot: '"
						+ snapshot.getName() + "' UUID [" + snapshotUUID
						+ "]");
	}
}
Some interesting code we found during our work on Jazz.net is how to open a work item editor for a work item in the UI.
The code looks like this:
while (results.hasNext(null)) {
	IResult result = (IResult) results.next(null);
	IWorkItem workItem = fAuditableCommon.resolveAuditable(
			(IAuditableHandle) result.getItem(),
			IWorkItem.SMALL_PROFILE, monitor);
	workItemsFound += workItem.getId() + " ";
	WorkItemUI.openEditor(fTargetPart.getSite().getPage(), workItem);
}
The code runs on a query result as described in the posts Using Expressions For Automation or Using Work Item Queries For Automation and opens the work items found in the Eclipse UI.
Summary
The example above shows how you can add menu contributions for RTC objects in Eclipse and also, how to get the information needed. Interestingly the menu contribution also works in the Snapshot editor context menu.
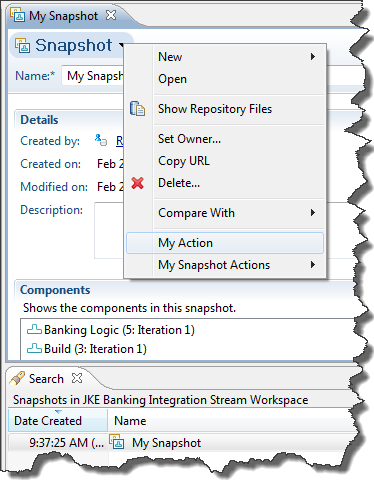
- Menu addition in the snapshot editor

As always, the code is very simple and has very few error handling implemented. You want to improve on that. However, I hope the example is useful for others out there trying to extend RTC.
