Finally, to close the series of posts, there is another public REST API available for EWM. The Reportable REST API provides information about resources that may be useful in reporting, and provide some features not available in a “normal” REST API. This API is intended to be consumed in a number of scenarios, including:
For direct consumption by a reporting or document generation tool such as Rational Publishing Engine (RPE).
The ETLs (data collection jobs) in RTC use these APIs as a source of data to deposit into the data warehouse.
Context of the blog post is the series
This is the series of planned posts I intent to publish over time. Most of the examples will be EWM based, but quite a lot of the content applies to more ELM applications.
This series mentions OSLC a lot. The Reportable REST API is not an OSLC API. It uses different representations and no headers.
The Reportable REST API
I did completely miss the reportable REST API for years. Some 2 years ago, I helped a team working with a customer to access data that is not accessible in OSLC. The data is specifically the approval data for a work item.
I developed a solution prototype to access this data using a web microservice based on the plain Java Client Libraries API. When I did a presentation for the Engineering Community of Practice about that prototype, a colleague in the audience pointed out to me, the approval data would be available in the Reportable REST API. So I checked and they where right.
This made the microservice I had done part of the final solution unnecessary. The usage of the Reportable REST API had several additional advantages. It did not require its own application server, no updates for newer versions. Authentication, security, role based access was all supported. The solution was easier, cheaper, faster.
Although the documentation for the Reportable REST Service is quite good, I think some hints and examples might be useful.
Root URL
Assuming PublicURI being the public URI of the CCM server e.g. https://elm.example.com:9443/ccm the URL for the EWM Reportable REST API is
PublicURI + '/rpt/repository'
Supported Resources
The EWM Reportable REST API supports the following resource types.
foundation: Common artifacts such as project areas, team areas, contributors, iterations and links
scm: Source Control artifacts such as streams and components, as well as stream sizing deltas
build: Build artifacts such as build results, build result contributions, build definitions, and build engines
apt: Agile Planning artifacts such as team capacity and resource schedules and absences
workitem: Work Item artifacts such as work items, categories, severities, and priorities
For each resource name ResourceType from the selection above, the URL is
PublicURI + '/rpt/repository/' + ResourceType
As an example for the workitem resource the URL is
Trying to GET the URL above does not return any detailed data. The reason is, that the properties/attributes to display are not yet specified.
Resource Schema
For any of the supported resources a schema can be requested by a HTTP GET on the resource type URL of the resource type and the query parameter ?metadata=schema appended. As an example the GET below gets the schema for the work item resource type (no header required).
GET https://elm.example.com:9443/ccm/rpt/repository/workitem?metadata=schema
The schema information sent back looks like below.
Please also check the Examples. The reportable REST API provides a query language that allows to select items based on certain criteria that are based on the schema.
As an example this query below finds the work item with the Id 1 and provides the id and the summary property for the work item.
The part workitem/workItem selects all work items. The part [id=1] selects the work item with id 1. Removing this term would query for all work items. The section /(id|summary) selects the work item properties/attributes id and summary to be returned. The image below shows this executed.
Execution of a query for the work item with id 1.
Paging
The reportable REST API supports paging. The documentation for EWM/RTC does not document how, but The DNG Reportable Rest API does.
The pagination supports these two query parameter to set the size and the size as well as the position (controlling the page).
size=10

size=10&pos=10
By default the pagination is set to 100, but other values are supported. The query parameter has to be added with a prefix ? or &, dependent on the parameters position in the URL.
The response data provides the URL for the next page. The reference is sent in the first block (see the blue box above). Please note that you can not use the URL as it is. It is necessary to url decode the URL first. The image below shows the URLs with paging information. The URL QueryURI is called. The code then gets the nextPage URL from the result, URL decodes it, and executes the next page.
Code to get the next page from the query. Page size is set to 10.
Please note that the URL for the next page contains a reference (id=_7dgCcJl2Eey2fKi1TcCeOA) to the previous query that can be used to call the next page. The URL in the call below, that shows this, was urldecoded from the response shown above.
GET https://elm.example.com:9443/ccm/rpt/repository/workitem?id=_7dgCcJl2Eey2fKi1TcCeOA&fields=workitem/workItem/(id)&size=10&pos=10
Nested Property/Attribute Data
The properties/attributes to be displayed can be nested. Below is a more complex query that gets approval data for the work item 1 and displays the details about the approval data:
GET https://elm.example.com:9443/ccm/rpt/repository/workitem?fields=workitem/workItem[id=1]/(id|summary|approvalDescriptors/(id|typeIdentifier|typeName|name|cumulativeStateIdentifier|cumulativeStateName|dueDate|approvals/(stateIdentifier|stateDate|stateName|approver/(name)|approvalDescriptor/(id))))
The query selects work item with id 1. For the selected work item(s) it returns the properties/attributes work item id, the summary and the approval descriptors. For the approval descriptors it returns the id, typeIdentifier, the typeName, name, cumulativeStateIdentifier, cumulativeStateName, dueDate and the approvals. For the approvals within, it returns the stateIdentifier, stateDate, stateName, the approvers and the approvalDescriptors. For the approvers it returns the user name. For the approvalDescriptors the ID is returned.
The / behind an item type refers to an instance of that item type. The term in brackets () specifies which attributes should be returned in the result. The attributes are separated by |. If an attribute is a complex type it can be referred to with a nested / and a specification which attributes to return in a nested () statement.
This concludes my mini blog series about EWM OSLC and REST APIs. As usual I hope that I am able to help someone out there and make their work easier. IF you have suggestions and feedback, please leave a comment.
After looking into the EWM OSLC CM API, including the OSLC Query API, a natural question that comes up is: Is it possible to take advantage of the existing EWM work item queries? Is it possible to use that query mechanism and run existing work item queries to get the result set back?
I had to look into that for a customer and an internal project and where experiencing some difficulties. So I think it is valuable to share my experiences and examples that finally worked for me.
Context of the blog post is the series
This is the series of planned posts I intent to publish over time. Most of the examples will be EWM based, but quite a lot of the content applies to more ELM applications.
Be aware of some characteristics and limitations discussed in work item 522500
EWM Stored Query API Introduction
EWM provides its own REST API that supports finding and running predefined, shared or personal work item queries that are stored in the repository. The API allows to query for all the stored work item queries available. The API allows to run such a query and to access the result information to present the work items and their data. This API is EWM only as far as I can tell. It is not documented to be available for any of the other products. It is also important to note, this API is not an OSLC API, even if the query URL contains oslc as part of the path.
The examples for how to use built in query are nice to have, but I found the documentation was lacking essential information. Maybe it is jut me and it comes naturally to all the native cloud wizz kids. I struggled to get the examples to work. One pattern I have now seen several times in documentation and examples is a lack of information about required and supported headers and how to URL encode query parameters. I will try to explain what worked for me. The documentation has recently been updated and now contains more details compared to when I first explored it.
For this specific part of the API, my observation was that getting the query parameters wrong, often resulted in the query returning results, but not the expected results. Usually the result set way way bigger than expected in those cases.
One important behavior that is very sensitive to the Accept header is how the information is returned and presented in the responses. There are two completely different pattern.
Only the URLs to the results are available in the response. To get any details about the result referenced by the URL, it is necessary to query that URL. This corresponds to the situation for OSLC queries without or an empty oslc.select statement.
Additional information is provided inline in the response. It is not necessary to query the result URI to be able to access the most relevant information. This corresponds to the situation for OSLC queries with an oslc.select=* statement.
When I looked at the API first, I missed information about the valid headers. As far as I can tell, the valid headers are now updated in the wiki page. The supported and working headers are mentioned below as well.
Headers and performance
Which header to use seems to be a quite unimportant difference, but it can have a huge impact on the communication performance. Lets create a Gedankenexperiment. Lets assume we perform a request to the server. We want to search in the response data to get the URI to a query with specific property values like a project area, query name and creator. Lets assume the following characteristics for the request:
Result set size is 130 items
Paging size is 50 items
To process the response with the properties inline it is necessary to run 3 requests at most. If the desired information is on page 1, only one request would be necessary. Worst case all related data needs to be sent and received.
To process the data without the properties inline it is necessary to load a page. Then it is necessary to run another request for each of the URLs in the result set page and process the received data. In worst case this requires 3 + 130 = 133 requests. Worst case all related data needs to be sent and received as well.
Why is that a problem? Worst case, if the desired data is in the last link processed, both methods have required to transfer the same amount of data. In many cases one could argue the 1st approach would even require more data to be transferred on average than in the 2nd approach.
However, in my experience the information transfer between two network nodes is significantly slower than the time that would be required in a server to get the desired information. Each message that needs to be sent causes a considerable amount of overhead and delay. It is usually cheaper to send fewer messages than many small ones that transfer a similar amount of data, just because of the overhead required for each message. In addition all the subsequent requests for the details cause activity on the server which is likely to cause a lot more overhead compared to collecting all the information for the 3 initial request(s).
As an real world example, when I started to look into this, I did not know which headers where available. I used the headers I had often used e.g. ‘application/rdf+xml’. In addition, the query that I created had an issue. Instead of only returning the queries for a specific user in a specific project area, it returned all queries for the whole server. The responses only contained the query URLs. To get the name and creator of the query each URL had to be requested. It was also not obvious why the result set was so large and I had no code to recognize that results were related to project areas other than the expected. The server I ran against is on another continent and I was in my home office. I stopped the experiment after an hour or two.
At the end I was able to create solution that performs well and reduces overhead to a limit. But it was no means a simple process. I reached out to someone for hints. As a customer I would not have had the opportunity. This is why I try to finally share this information.
Stored Query API URL
I was not able to find a way to discover the URI to get the work item queries. The Wiki page mentions to find the simpleQuery tag in the project areas service provider, but I seem to be unable to find it, so I need to construct it based on the wiki page. From the Resource Oriented API page I can deduce two possible forms for the URL. Assuming PublicURI being the public URI of the CCM server e.g. ‘https://elm.example.com:9443/ccm’ the URL for the Stored Query Collection is either
PublicURI + '/oslc/queries'
or
PublicURI + '/oslc/queries.xml'
Both seem to work. Choose one you like and that works for you.
Query Stored Queries
The request below gets all the stored queries for a repository.
Get all stored queries for the repository
Note that the only Accept headers documented to be valid at the moment are:
Accept text/xml
Accept text/json
It is necessary to be authenticated to the ccm server to be able to perform the operation.
The image below shows a part of the response to the query above.
The response to the query for all stored queries
The first section shows the query for the next page in the attribute oslc_cm:next and the total result count in oslc_cm:toatlCount.
The rest of the information is one element rtc_cm:Query for each query descriptor. The element contains the query URI as rdf:resource, the identifier for the query, the Query name/title and description and the project area the query belongs to. The most important information is the rtc_cm:results element with the URL to execute the query. As an example the URL below:
Additional information is the date of the last modification and the user that created the query.
Note that the result is either XML or JSON. The tools for RDF that were used in some of the previous posts using the Python rdflib do not work in this context. Instead the Python code shown in the blog uses xml.dom.minidom to access the information in case of XML. The JSON code examples shown in previous posts using the json library can be used as a reference. This post will mostly use the Accept header text/xml. The code depends on the following libraries.
The main Libraries used to process the stored queries API.
Some example code for processing the data in Python will be shown below.
Narrow Down Stored Queries
It is usually not desirable to query for all stored queries for all project areas. A real production server can have hundreds of project areas, team areas and users that can have predefined or shared or personal queries defined. The result could be thousands to ten thousands of queries. To collect and transfer all that data is a challenge and will drain server resources as well.
It is possible to filter for all the properties that make up a query, identifier, name, creator, owning project area. The code below computes the query parameters from the parameters passed and creates a query section for the query URL.
Create the query parameters to narrow down the query results.
As an example the query that is created could look like below. The condition can narrow down to the project area, the user and the title, dependent on how much information is provided. If enough information is given, this would usually only return one hit. Note that this is a string terminated by the singe quote and the double quote characters inside are important. The query narrows down to one project area, the query name ‘All’ and the creating user.
'rtc_cm:projectArea="_8e5qfFpmEeukW7cqqDjAuA" and dc:title="All" and dc:creator="https://elm.example.com:9443/jts/users/ralph"'
How to discover the project area UUID has been explained in previous posts e.g. about discovery. The code that was used here is the same used in the other posts.
The code blow shows how the query URL is composed.
Python code to compose the query parameters and to create the query URL
The parameters provided are the same as above, the project area, the query name and the query creator. The creator can be provided in different ways. It is possible to provide a user URI like
'https://elm.example.com:9443/jts/users/ralph'
It is also possible to provide the variable string below.
'{currentUser}'
The query mechanism replaces this variable with the URI of the user that runs the request. For example, the query below would return the query named All created by the current user.
'rtc_cm:projectArea="_8e5qfFpmEeukW7cqqDjAuA" and dc:title="All" and dc:creator="{currentUser}"'
The last three lines in the image above compose the query URL. First the base query URL is composed. This is the part of the query that returns every stored query. Then the query parameter section is composed by adding ‘?oslc_cm.query=’ and then adding the URL encoded query parameters. The resulting query URL looks like below.
The code below executes the query to search for stored queries.
The first line runs the query that was just created using the function findQueryResources().
Execute the query to find stored queries
This function is shown in the image below. It uses the Accept header ‘text/xml’. While there is a valid query URL for a page, it executes that query.
The code that executes the query for the stored queries and collects the results
It calls qeryQueryInfoXML() to process the page result data. This code is shown below. The function builds up two arrays, one containing the stored query URL and one the associated query name. It also gets the query URL for the next page, if there is any, and returns that.
Get the information about the queries from the response
All query pages are iterated and the results added to the respective arrays.
Evaluate the result and
At the end of executing findQueryResources, there is a list of query names and an associated list of query URLs. Dependent on the query parameters given, it could return many or no result. The code here as shown below focuses on using the query name, but it would be easy enough to extract more information per stored query to use different criteria to look into the result set. The code tries to find the first stored query returned with the given name.
Find the query to run and execute it
If a stored query has been found, that query is finally executed in the function execute_query_xml(). The code for this function is shown below. Again, this uses the Accept header ‘test/xml’ and the results are processed as XML.
Process each result page of the stored query
The code iterates the query pages and is similar to the code already shown above. The code passes each query result page to the function processQueryResultInlineXML(). The code is shown below. It also looks very similar to the code we have already seen. The difference is that the code below now works on work item resource information and not on query information.
Processing one page of the stored query with work item data inline.
The code analyzes the oslc_cm:Collection and gets the total result count and the next page (if there is one). Then it analyzes the inline XML data for all the work items. For each work item it gets some of the available information and prints that. It returns the work item URIs, the totals and the next page etc.
Executing Stored Query Using JSON
The code here shows a JSON based implementation of the functions to execute the stored query after finding it. The function execute_query_json() does the same the function execute_query_xml() does and looks very similar. It is only using JSON as format to parse the data. The Accept header used below is ‘text/json’.
Process all query pages in JSON
The function getQueryResultDetailsInlineJson() is called to process each page. Like its XML twin it gets the total count and the next page (if available). Then it gets details about the embedded inline work item data and logs it. Like the XML based code, the function builds an array with the work item URIs for the page. It also returns additional information such as the link to the next page.
Process one query page with JSON work item data inline
The query descriptor URL provided in the search by the tag rtc_cm:Query, can also be used in a browser to get the query displayed. As an example see the information below.
By pasting the URL in the browser, the CSV download is triggered. It is also possible to use the URL above in tools like cURL.
Summary
This blog post has described the steps that are necessary to find existing work item queries and how to run such queries to get the data. I hope that the examples here in my blog help users out there with their work.
After looking into how to create and update work items the question becomes, how to find work items to begin with. OSLC provides a query mechanism to allow querying for items. This post intents to show how OSLC queries work including some examples that work for me. The techniques explained in the previous posts in this series are important. If necessary, go back to the previous posts to understand the details. As usual the focus in this blog is EWM/RTC, however, the OSLC Query mechanism works for all product supporting it. So what is explained here based on EWM will work with ETM, DNG etc.
Context of the blog post is the series
This is the series of planned posts I intent to publish over time. Most of the examples will be EWM based, but quite a lot of the content applies to more ELM applications. The examples where performed with versions 6.0.6.1 and 7.0.x.
I used at least the following links for exploring the OSLC Query mechanism. The latest version of the OSLC Query V3 document contains several examples which are very helpful. I still found it a challenge to get some of the queries working.
The examples in this blog are using the content type application/rdf+xml. Some examples work with the content type application/json, provided the function to parse the files are switched to using a JSON parser, some do not. The posts in this blog series are using RDF+XML and I decided to stay with it, to make it easier to follow.
Query Base
Before being able to execute a query, it is necessary to discover the query base. The query base is the URI that defines the root for the OSLC query. The first step is to get the service provider catalog from the rootservices document as described in the blog post about EWM OSLC Discovery. Get the rootservices document
GET https://elm.example.com:9443/ccm/rootservices

Accept application/rdf+xml; charset=utf-8
OSLC-Core-Version 2.0
Get the service provider catalog like below. Pass the OSLC-Core-Version and the Accept content type header. This step requires authentication to be done.
The catalog lists the services available for each project area. To narrow down to a project area perform a GET on the work item service for the desired project area, providing the headers mentioned above. As an example
GET https://elm.example.com:9443/ccm/oslc/contexts/_8e5qfFpmEeukW7cqqDjAuA/workitems/services
The resulting response body contains various services that are provided for the various work item types of he project area.
Various dialogs such as OSLC selection, creation dialogs and pickers
The OSLC creation factories for all the work item types
The OSLC resource shapes for all the work item types
The OSLC query capabilities
To be able to query for work items, it is necessary to analyze the query capabilities provided by the service provider. The query capabilities can be found by searching for the oslc:queryCapability nodes.
There are usually at least two query capabilities in the work item service provider for an EWM project area. One is the query capability for deliverables. A deliverable is also referred to as a release and is a work item attribute type. The query capabilities for deliverables can be found using the resourceType http://open-services.net/ns/cm#Deliverable.
The second query capability is for work items (in OSLC referred to as change requests). The image below shows the oslc query capabilities for work items. This can be identified by the resourceType http://open-services.net/ns/cm#ChangeRequest
Query capability for work items.
The oslc:queryBase is the URI for the work item OSLC query mechanism for the selected project area. It will be used in constructing the OSLC Query URI. The query base has the form:
The resource shape provides the information about the attributes provided by the TRS. The resource shape contains a oslc:valueShape for work items based on the work item type defect.
Value shape for work items
This provides the value shape that defines the common work item attributes, their types and the allowed values for these work item attribute value types. It is possible to GET the oslc:valueShape value shape (provide the OSLC related headers) like below:
GET https://elm.example.com:9443/ccm/oslc/context/_8e5qfFpmEeukW7cqqDjAuA/shapes/workitems/defect
This value shape provides with all the common attribute and link types. The work item of a specific type might still have additional custom attributes. The post EWM Work Item OSLC CM API explains how to get that information using the work item type specific resource shape associated with the creation factory.
The image below shows the code that gets the query capabilities out of the project area work item service provider document.
Extract the query capabilities from the service provider document
This code shows how the query base is extracted from the service provider catalog. To do this, the code identifies the change request resource type and gets the associated query base.
Get the query base for the work items
Having the query base it is now possible to execute OSLC queries. The code below executes the most simple form of OSLC query:
Querying the query base.
The code performs the GET method on the query base.
GET https://elm.example.com:9443/ccm/oslc/contexts/_8e5qfFpmEeukW7cqqDjAuA/workitems

Accept application/rdf+xml; charset=utf-8
OSLC-Core-Version 2.0
Please note the OSLC headers Accept and OSLC-Core-Version above. The same headers are used in all calls in this blog.
Paging
The request is redirected to support paging like shown below. The paging mechanism is used to split queries with large result sets into smaller, more manageable chunks.
Paging redirect
The response body contains the work item URI’s for the first page of work items. Note, because there is no query parameter, the query only returns the work item URI’s and not any other property data. To get more properties of the resulting work items e.g. to display the summary would, in this case, require to get the work item using the URI from the response.
Response body contains work item URI’s and information about paging.
In addition the response contains information about the total amount of results and the URL to get the next page, in case the number of results exceeds the maximum items returned by this page. The image above shows the oslc:responseInfo which contains oslc:nextPage with the URI to get the next query result page and the oslc:totalCount with the total count of query results.
The code below shows how the query is executed. In the while loop a GET request to the query URI is executed. The result of the call is analyzed and this provides the next page of the query, if paging is needed. If no next page is available, the query is finished.
Execute an OSLC Query
The code below processes the result for a result page and gets the resulting work items to display them. It prints the work item URI. It also tries to get and print the identifier (Id) and the title (summary) of each work item in the query. If the identifier or the summary is not available nothing is printed. The code then analyzes the paging information. It returns the next page URL if there is one. It also returns the total count of the result.
Try to get at the result details of the query page
URL Encoding
OSLC Query provides a mechanism to create simple queries to retrieve items. These queries are sent as a URL in a GET HTTP request. There are limitations on which characters can be sent in the URL. Some characters have specific meanings in the URL. To avoid creating and sending the wrong or illegal URLs, parts of the OSLC query parameters need to be URL encoded. See some explanations about the URL encoding here:
In the code below url encoding is done using the function urlEncodeString as shown below.
comm.urlEncodeString('URL Encode me')
The code URL encodes the data in a way that has worked for me. I am not totally sure I understand the URL encoding in all its details and there might be issues in the code below. If I got something incorrect, please leave a comment with a suggestion to correct it.
More complex OSLC Queries
The code below uses the following constants (mind the = at the end of each term) which are used to compose more complex OSLC Queries:
The statements represented by above constants and how they work are explained in the following sections.
The oslc.select Statement
OSLC queries support selecting the properties supposed to be returned in the query. The statement that is used for that is the oslc.select statement. The code below shows how the select statement is used. The first three lines are used to control running the queries and creating the file name for logging and can be ignored.
The interesting part is the selectString1. It defines the list of properties that should be returned for each query result. In the case below we want the type, the id, the title, the description, when it was last modified, who modified it, when it was created and who created it for each work item. This information is encoded in the selectString1 by creating a comma separated list of property identifiers. The select statement term is then created by concatenating the select statement ‘oslc.select=’ with the URL encoded version of the selectString1. This term is added to the query base as first query parameter using the separator ‘?’.
Select statement is provided to the OSLC query
When this query is run, the query result contains the properties for the work items that are returned in the query result. The image below shows the resulting data in the response.
The query result for a query using a select statement
The select statement can be nested to provide nested data. It is possible to use ‘*’ to select all available properties. The amount of data that is transferred can impact performance of the communication. The specification mentions that the servers SHOULD accept rdf:nil as single property. Both extremes are commented out in the cod above.
The oslc.properties Statement
The oslc.properties statement can be used to limit the set of properties or attributes of a work item that are considered in the OSLC request. The oslc.properties can be used in a GET request. In this case it can be used to specify which properties the requestor is interested in. The server does not have to collect and transmit all properties, but only the ones of interest.
The oslc.properties can be also used when updating a work item. This allows to perform partial updates. There is no example provided in this blog, but the syntax and encoding of oslc.properties and oslc.select are the same.
The oslc.where Statement
The oslc.where statement can be used to specify which work items to query. The first example below shows a query for the work item with the identifier 1. The select statement uses * to select all work item properties.
Get the work item with the ID 1 and return all properties.
The URL that is created can be seen below. The encoding makes it hard to understand. The important request headers are the OSLC-Core-Version and the Accept header.
The GET request with headers and URL encoding
The image below shows parts of the resulting RDF-XML for the work item with all the data for its properties.
The response with all properties
The In statement can be used to search for properties being in a range. The code below searches for the work items with identifiers being 1, 3, 9, 50. The query would run successful, if there are IDs that are not found.
Find the work items out of a list of ID’s
Please note as documented here, especially in the syntax section, the oslc.where statement only supports to compose complex conditions using the boolean operation ‘and‘. The operation ‘not’, ‘or’ or other complex nesting is not supported.
Before looking into more examples lets introduce the next statement.
Sorting – The oslc.orderBy Statement
The statement oslc.orderBy can be used to define the order for the result set. The example below finds all work items with the type defect and requests the result set to be ordered by severity (descending) and then by id (ascending). The order is defined with a prefix for the property. The prefix is + for ascending and – as descending order. Multiple order specification can be given in a comma separated list.
Search for all defects and sort by descending severity and ascending id
Unfortunately, the orderBy seems not to work for EWM 7.0.2 and the accept format application/rdf+xml. I have seen it working with application/json.
Full text Search – the oslc.searchTerms Statement
The statement oslc.searchTerms can be used for full text search. The query below finds all work items that can be fond by full text searching for the term ‘dividend‘ creates 20 hits with the JKE Banking Sample.
Full text search for ‘dividend’
Define a Namespace Prefix – oslc.prefix
The OSLC query mechanism allows to define new namespace prefixes that can be used in the oslc.where, oslc.orderBy, and oslc.select statement. My experimentation with this feature was quite problematic. What worked for me is the following:
To define a namespace create a variable with the namespace prefix, including the equals sign, and encode the URL. Then use only one namespace in the oslc.prefix definition Only define one prefix for one namespace in each oslc.prefix statement.
The code below defines several namespaces (mind the encoding part). Based on these namespaces I create a prefix term for each of the namespaces based on ‘oslc.prefix=’ and the namespace URI. To define multiple namespaces in a query concatenate the prefix terms with ‘&’. Some discussions on Jazz.net indicate it might be possible to use a comma separated list. I could not get this to work.
Defining prefixes
To use the prefixes in a query, just include the prefixes as query parameter.
Using prefixes in queries
The query URI can become very long when providing many prefixes.
The prefixes can make the query quite lengthy.
Search For Items With a Specific Enumeration Literal Value
The image below shows a query that selects only work items that have the severity set to critical. The enumeration literal to be provided for the selection is information that can be looked up by querying the resource shape and allowed values for each work item type associated to the creation factories. For common work item attributes the available attributes and allowed values can be found using the chain resourceShape to valueShape associated with the query base.
Queries for the severity literal representing the severity ‘Critical’
Search For Items Modified After a Certain Date
The image below shows a where term that selects all work items that are modified after a certain date.
Items modified after
Compound Where Terms
The OSLC Query mechanism supports compound where terms are built form simple terms. The only supported boolean operation is and. Or is not supported, neither is ‘not’. The code below shows a query that looks for work items of type ‘defect’ and severity ‘critical’.
Items of type ‘defect’ and severity ‘Critical’
Summary
This concludes my short blog about the OLSC Query mechanism. My intention, in addition to understand it better myself, was to provide some working examples and how to create the queries. I have tried this in the past and got some where, but it was quite challenging. The documentation I had available in the past was often lacking some small but important information. The documentation for OSLC CM 3.0 has improved a lot, but apparently there are still issues you can run into.
So as always I hope I was able to provide simple but relevant examples that help users of this technology to achieve their goals and save some time.
After looking into EWM Discovery, how can one create or update a work item using the techniques explained so far? This post will look into the steps that are required to create and update a work item. The techniques explained in the previous posts in this series are important. If necessary, go back to the previous posts to understand the details.
This blog was originally separated into two sections, creating a work item and then updating the work item. The first part mentioned programming and Python, the second used RESTClient to demonstrate the concepts. This was just due to the code I have written so far and due to complexity of the operations. The blog post was recently updated with Python code snippets for work item update and additional content.
Update: The blog post has also been rearranged and updated to separate getting a work item and updating a work item.
Update: The blog post has been rearranged and updated to show the usage of the oslc.properties query parameter for partial get and update.
Update: The blog post has been rearranged and updated to show how to resolve a work item and setting the resolution.
Update: The blog post has been updated with how to get the complete workflow information needed to navigate the workflow states and actions.
Context of the blog post is the series
This is the series of planned posts I intent to publish over time. Most of the examples will be EWM based, but quite a lot of the content applies to more ELM applications. The examples where performed with versions 6.0.6.1 and 7.0.x.
To create a work item using the OSLC API requires some information that is provided by the OSLC API and can be discovered. To create a work item first requires a URI/URL of a creation factory providing the capability to create the work item.
EWM supports customizable work item types with customizable attributes of customizable attribute types. Each work item type has its own creation factory URL that needs to be looked up to create a work item of that type.
Work item types have potentially different sets of attributes configured. Each attribute has a type from a number of available attribute types. EWM allows to create custom attribute types. Some of the attribute types are primitive and are easy to handle. As an example the summary of a work item is just a string and it is easy to provide data. Other attribute types are far more complex. Many attributes are enumeration types. Enumerations are a number of available literals with an ID and a display name for each literal. A work item usually has an owner or subscribers. These represent users that are available in the system referenced by a unique URI. Work items can be assigned to a project or team area, which are other attribute types available in a project areas process. Which process area a work item is assigned to is controlled by a Category that maps a user readable string to the process area represented by its URI.
Note, some data that shows up in the work item is not attribute based. As example the collection of reviews and approvals, the attachments and the comments are not attribute type based. Some attributes that show up are only presentations or are calculated and can not be changed. Some of the not attribute based data is provided as pseudo attribute e.g. to be able to export the data.
To create a work item it is necessary to find out which attributes of which types a work item can have and which values the attribute of such a type can have. Attribute types can be single value such as enumerations or strings or they can have multiple values such as enumeration lists or string lists. All this information is required when creating a work item.
The information which work item attributes with what types a work item type can have, can be discovered in OSLC APIs as part of discovering the creation factory. The information is accessible via a resource shape. How the discovery process works in general is described in EWM Discovery.
Reminder, for all requests use the mandatory OSLC header:
OSLC-Core-Version 2.0
To receive RDF encoded data use the Accept header and for sending RDF use the content Type header as shown below:
Accept application/rdf+xml; charset=utf-8
Content Type application/rdf+xml; charset=utf-8
The image below shows the RDF form of a part of the service provider catalog for a project area. Using the namespace
xmlns:oslc="http://open-services.net/ns/core#"
the oslc:CreationFactory entry contains the resourceType(s) and the resourceShape. The first resourceType http://open-services.net/ns/cm#ChangeRequest is used for OSLC integrations.The second resourceType provides the link to the work item type definition. The entry oslc:creation contains the creation factory URI.
RDF form of the creation factory for defect and task
To receive JSON encoded data use the Accept header and for sending JSON use the content Type header as shown below.
Accept application/json; charset=utf-8
Content Type application/json; charset=utf-8
The image below shows the JSON format of the creation factory entry for the work item type defect. The data is provided analogue to the RDF format and can also be used to access the data for the creation factories.
JSON form of the creation factory for defect
Discover Resource Type and Shape
Following the resourceType URI provides the details of the work item type. The image below shows the details for the defect. Getting the resourceType
GET https://elm.example.com:9443/ccm/oslc/types/_8e5qfFpmEeukW7cqqDjAuA/defect
with the headers introduced above provides more details. The display name is Defect and the work item type ID is defect. The data also contains the URI for the EWM project area that defines the work item type. The image below shows the result of such a GET request.
Type definition for defect
The Python code block below processes the RDF data and extracts the important data. The important take away are the predicates to select the information to be iterated.
Extract the creation factory information
The code operates on some simplifications. The code gets the work item type ID by filtering out the entry that starts with the public URI root. The code assumes that the end segment is equal to the work item type ID. This just saves the call to the resourceType URI which would contain the information. The code gets the creation factory URI and the resource shape URI.
To be able to create a work item, GET the resource shape using its URI and the headers described above. As an example:
GET https://elm.example.com:9443/ccm/oslc/context/_8e5qfFpmEeukW7cqqDjAuA/shapes/workitems/defect
The resource shape contains a number of attribute type definitions for the attributes (and link types) the work item type can have. The information contains the name (id) of the type, the title (display name) of the attribute type, the allowed values, the default value, if the attribute is read only etc. The image below shows one example for the attribute Priority with ID priority, the default attribute literal and the link to the allowed values. The attribute is defined for values in an enumeration. The allowed values URI describes the available values defined in the enumeration.
Allowed Values
To get the allowed values for the attribute Priority perform a GET using the shape URI. As always provide the OSLC headers.
GET https://elm.example.com:9443/ccm/oslc/context/_8e5qfFpmEeukW7cqqDjAuA/shapes/workitems/defect/property/internalPriority/allowedValues
The result of the request is shown below.
Allowed values for the work item attribute Priority with ID internalPriority
Note that the allowed values, the priority enumeration literals, do not provide any information about the display name or any other details. To get the display name it is necessary to GET (OSLC headers!) each of the priority literal resource URIs and analyze the results.
To create a work item, the next steps would be to get allowed values for all required attributes and to create a request body containing this information.
Required Attributes
At the time of writing, OSLC does not provide a mechanism to get the list of attributes that are required to create a work item due to restrictions in the process. If the target system requires special attributes to be set e.g. in certain states, or expects special values, the work item creation or save will fail. To successfully create or update work items, it is necessary to know such limitations ore provide a configuration capability to adjust for such information.
Request Body
For the JKE Banking Example that is shipped with EWM, the process requires the following information to create a defect:
Summary
Category
To make the example a bit nicer we also want to also set the description of the work item. The summary and the description attributes are easy. This is just a string value. The category is the mapping to a process area. This is not a trivial attribute and it is necessary to get an allowed value. A valid approach is to get all allowed values into an array and to pick one value. If it is desired to find the correct allowed value based on a display value or some other characteristics, iterate all allowed value URIs and get the details.
The code below is the code that creates the payload for the request body needed to create the work item. It looks more complicated than it is, probably because of the RDF library. The code creates an empty graph, a node for the work item and then adds the predicate object configuration that represents the desired information e.g. the text for the summary and the description.
Create the payload and the work item
The payloadString serialized in createRDFWorkItem from the graph simply looks like the RDF XML below. It only contains the information about the summary, description and the category
Creating the Work Item
To create the work item, POST to the work item types creation factory URI like shown below:
POST https://elm.example.com:9443/ccm/oslc/contexts/_8e5qfFpmEeukW7cqqDjAuA/workitems/defect
Provide the required headers to declare OSLC, and the headers to control the content encoding that were already explained. The Content-Type defines the format of the request body. The request body is the payloadString created above.
The response status should be a 201. The response headers should contain the location header with the URI of the work item. The URI of the work item is the unique URI of the work item and can be used in subsequent operations to identify the work item. E.g. in GET, or PUT operations to retrieve or modify the work item. The URI is also used in the process of linking work items. The URI can be used in a redirect to open the work item editor in a web UI.
The response headers contain a new important header called ETag. The ETag value describes the state of the work item. Every time the work item is changed it gets a new ETag. When trying to update a work item it is necessary to send the ETag value from the previous GET in a special If-Match header. The server can use this value to evaluate the state of the work item the update is supposed to be applied to based on the current ETag. If the ETag in the request is not the current ETag of the work item state, the request is based on stale data. New changes where done to the work item. The server detects the mismatch and alerts the client that the change can not be executed. The client needs to refresh the work item information, GET the latest state, modify it accordingly and retry to update the work item based on this information.
The response body sent back by the server, contains the data for the new work item. The information is usually much more than the information that went into the creation of the work item. The server creates several special attributes such as the creation date, the creator and similar information. In addition attributes with default values are automatically set and will be returned.
Response body for the POST to the creation factory.
All subsequent operations on the work item should be based on this state, or a never version state that was retrieved by a GET on the work item URI.
The code below shows the creation of the work item and gets the work item URI from the results location header and the etag from the results ETag header.
The work item creation and the response analysis for RDF.
The same process can be used with the JSON format. The image below shows an example for a work item creation using the JSON encoding with the same attributes used with RDF above.
JSON payload to create a work item
JSON requires to use the headers shown below instead. The header Content-Type only needs to be set when a request body is sent.
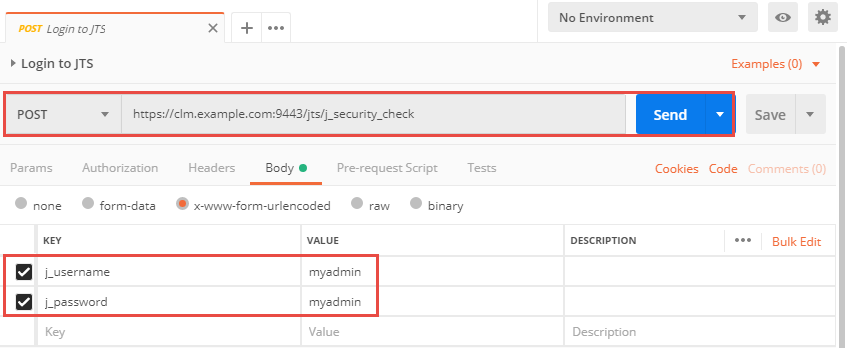
The following sequence is done with the RESTClient extension installed in Firefox. RESTClient is a Firefox extension that runs in the browser. This allows you to log in to the server with the web UI in Firefox and then use the RESTClient without worrying about the authentication because RESTClient reuses the authentication done in the UI. Another Option would be Postman, but that requires to log into the CCM server as explained here. Install RESTClient and Firefox to do these steps yourself.
To get a work item we need the public URI of the work item. The public URI was returned in the Location header when creating the work item. It can also be located e.g. using an OSLC Query. The public URI has this form:
where the number at the end is the work item unique ID for the repository. Note that the URI of the work item is not the URL for the work item editor you get when you copy the address URL from the browser. That URL contains information like the project area name and is not stable.
Open the Web UI of EWM. Open a work item e.g. the one created before. Get the work item URI by copying it out of the Web UI like shown below. You can also use the work item URI from the automation to create the work item.
Use copy link location on the icon to get the work item URI
To get the current state of the work item it is necessary to perform a HTTP GET operation on the public URI. Open a RESTClient and prepare to get a work item. As an example select GET as method and paste the work item URI into the URL address.
GET https://elm.example.com:9443/ccm/resource/itemName/com.ibm.team.workitem.WorkItem/242
Use the OSLC, Accept and Content Type headers as explained above.
Prepare the GET request
Push the Send button to execute the request.
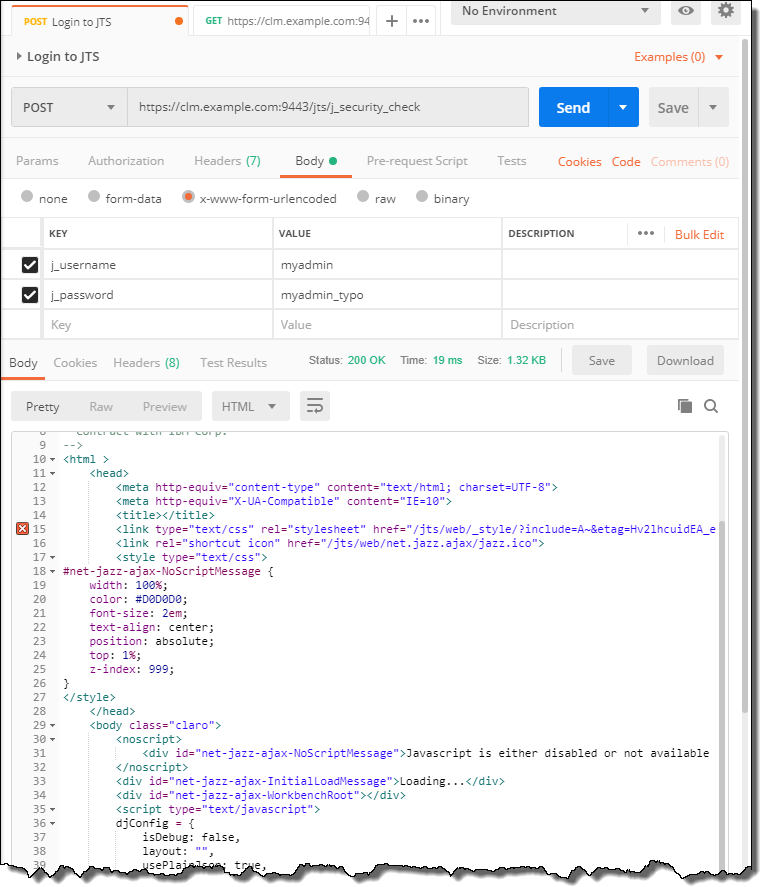
The request should succeed with a status 200. Here the Request and the response headers in RESTClient in Firefox.
The successful GET request to read the work item 242
Browse the response Headers tab first. Note the ETag header. This is important for a later update.
Property Selection
Update: It is possible to use the oslc.properties query parameter to select which properties (attributes) are of interest in this OSLC request. Note that the oslc.properties require URL encoding to allow to send them in the request URL. The code shown below shows which part of the URI needs to be URL encoded. It is the the comma separated section of property definitions behind the
oslc.propertis=
The oslc.properties can be used in a GET request. In this case it can be used to specify which properties the requestor is interested in. The server does not have to collect and transmit all properties, but only the ones of interest. This saves computing resources and bandwidth.
The image below shows the result of a GET request on a work item URI, providing a oslc.properties selection. Note the response body only returns a limited amount of properties compared to the full GET above.
OSLC properties selection in a GET request.
The image below shows how the requested properties are selected using Python code.
Selection of the properties the request is interested in.
Update a Work Item
To update a work item it is necessary to get the current state of the work item. For this it is necessary to perform a HTTP GET operation on the public URI as shown above. Go back to the result of the previous section or open a RESTClient and prepare to get a work item. For the latter make sure to select GET as method have the work item URI into the URL address.
Make sure to use the OSLC, Accept and Content Type headers as explained above.
Perform the GET request
Push the Send button to execute the request.
The request should succeed with a status 200.
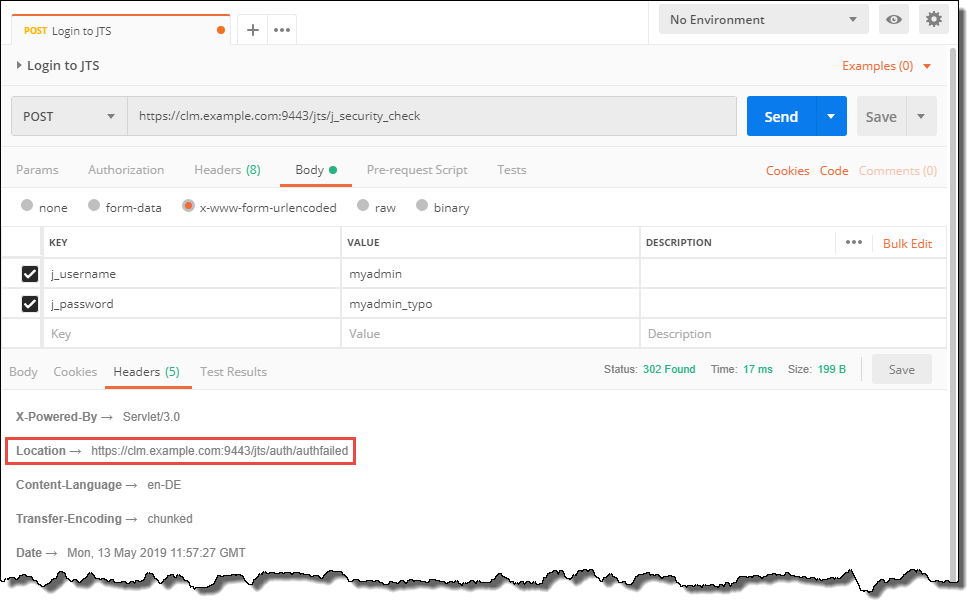
The ETAG in the successful GET request to read the work item 242
Browse the response Headers tab first to prepare for updating the work item. Copy the ETag header into a text editor, we need the value of the header later.
Switch over to the Response tab. Search the content for :title to locate the XML containing the work item summary attribute. Mark the response body and copy its content.
The work item summary attribute
Open a new RESTClient window. Paste the response body from the previous GET request into the request body of the new request. Copy the work item URI into the address URL. Change the method to PUT.
Search for the :title in the new request body. Modify the text enclosed in the tag e.g. to An updated summary like below.
Now add another header If-Match with the ETag value from the GET method.
If-Match "c6eebbc9-257c-335a-9726-287f39732012"
See the image below how the request looks like. Perform the send.
The update should succeed with a 200 status and contain a new ETag.
Successful update with a new ETAG.
Open the work item in a work item editor. You can do this by pasting the work item URI into the browser address field. If the work item editor is already open the editor should show the work item was changed. Refresh the editor if this is the case. The summary attribute was successfully updated:
The updated work item summary in the Web UI
Performing a subsequent GET in the initial RESTClient window provides the same information and the new ETag. The ETag will change if the work item is changed again.
Update: change a work item in Python code
The code below retrieves the work item based on its URI.
Getting a work item and the ETag for updating it.
After getting the work item and the etag, the response body is parsed into a graph that has the required namespaces bound to it. The response has the work item URI as subject in the response, this is retrieved and validated. The work item data is analyzed and some data is pulled out by querying the graph for objects with a specific predicate (e.g. DCTERMS.identifier) and the data is printed.
The code below shows the modification of the summary of the work item.
Updating the work item with If-Match header
The new summary is computed based on a timestamp. Then the value of the subject node is set using the code below.
# Set a RDF entry for a node, predicate and object.
    def setRDFAttribute(self, graph, node, rdfPredicate, rdfObject):
        graph.set((node, rdfPredicate, rdfObject))
The update header is created, including the If-Match header with the work items ETag from the get operation. The RDF graph is serialized to be sent. Then the PUT operation is performed. The change will have a new ETag, so that is received.
The response body is parsed into an RDF graph again and the information for some of the attributes is again analyzed and printed. The image below shows the console output that is created.
Successful update of a work item with the original and new ETag
Property Selection
Update: It is possible to use the oslc.properties query parameter to select which properties (attributes) are of interest in this OSLC request.
The oslc.properties can also be used in create and update requests. This can be used for partial updates. Please carefully read this section about updating work items and also check the examples that are provided. Especially for creating and removing links and custom attributes.
For using the oslc.properties query parameter, to limit the amount of properties to a subset, please check the sections oslc.select and oslc.properties in the post EWM OSLC Query API. Syntax and encoding for these query parameters are the same. You have to provide the oslc.properties as a query parameter URL encoded like shown below.
PUT https://elm.example.com:9443/ccm/resource/itemName/com.ibm.team.workitem.WorkItem/242?oslc.properties=rdf%3Atype%2Cdcterms%3Aidentifier%2Cdcterms%3Atitle%2Cdcterms%3Adescription%2Cdcterms%3Amodified%2Crtc_cm%3AmodifiedBy%2Cdcterms%3Acreated%2Cdcterms%3Acreator
As a summary, the usage of the oslc.properties query parameter allows to
Limit the properties returned in a GET request to the selected properties. Instead of sending all properties, the server can just respond with the sub set of properties.
Limit the properties that are considered to be received to the selected properties in PUT and POST requests. This can be used to just have to send a limited amount of attributes, and not all, to achieve a partial update. This can also used to remove properties by including a property in the oslc.properties but not sending data for it.
The link above mentions to use the PATCH method for partial updates a couple of times. I briefly tried to use PATCH to partially update a work item, but I got an “Error 501: Not Implemented”, so I assume PATCH is not available.
Work Item Workflow State change
One important work item attribute is the workflow state also abbreviated with state of the work item (not to be confused with the ETag). When checking the Resource Oriented Work Item API V2 it mentions that the state is read only. It mentions the capability to use an action to perform a state change, but there is no documentation provided that shows how that works. Digging deeper into the Jazz.net forum there are answers that hint on how it could work, but every one of the answers I found was lacking some detail. Here what I was able to come up with to make it work for me.
The work item workflow is defining the states of the workflow and actions that are valid to get from one state to another. States and actions have unique ID’s.
Analyzing the resource shape of the work item type, the state attribute with ID internalState can be located. The attribute has allowed values that can be discovered. The allowed values are the states of the workflow. As an example for one state there is a URI like below:
We are not interested in the state, we need the ID of the action to perform the workflow action. I have not found any simple way to discover the URI to get the workflow actions. There is however a pattern how to access the required information for workflows and actions and other information required to manipulate the workflow state of a work item.
Looking at the path of the URI for the workflow state reveals that the path section after the section workflows is the project area ID. The next path section is states and the section after that describes the workflow ID. The last section is the workflow state ID.
If we remove the workflow state ID section, and perform an GET on the resulting URI e.g.
GET https://elm.example.com:9443/ccm/oslc/workflows/_8e5qfFpmEeukW7cqqDjAuA/states/com.ibm.team.workitem.defectWorkflow
the resulting response is a list of the workflow states available for the workflow.
Please note, that I experienced issues with the headers to be used here, dependent on the headers used different information was returned in some cases. I would suggest to test using the OSLC headers. If there is a lack of information try to only use the header Accept application/xml (or application/json). The result could contain more information. Please note that in this case the format is not RDF.
If we replace the section states in the URI by actions we get an URI that allows to GET all the workflow actions.
GET https://elm.example.com:9443/ccm/oslc/workflows/_8e5qfFpmEeukW7cqqDjAuA/actions/com.ibm.team.workitem.defectWorkflow

Accept application/xml
Please note, to get the complete workflow information, use only the header Accept application/xml (or application/json). Do not use the Accept application/rdf+xml and do not use the OSLC-Core-Version or any other header. Run the call as shown above.
This way you receive the full workflow table. This contains the information of the workflow action including the resulting state. Given this information it is then possible to extract all workflow information necessary to navigate the workflow. I found this hint in this answer.
To get the information in JSON use only the header application/json.
The image below shows how the complete workflow information looks like, if you get it in the correct way.
The complete workflow information, including the result state of an action.
Once a desired workflow action ID is selected, it is possible to perform a workflow action. This can be achieved by adding a query parameter ?_action=<actionID>, to the work item URI, where <actionID> is replaced by the ID found as workflow action. The result is shown in the image below. Please note the familiar OSLC and content headers as well as the ETag for the last state of the work item are needed as well.
Updating the work item performing a workflow action with an empty resource representation.
It is also necessary to send the representation of the work item, otherwise the PUT call will fail. To get an ETag, it is necessary to do a GET, so all the information is already available. By default OSLC expects the complete representation and deletes data that is no longer available in the request.
I have tried to send an “empty” work item representation as hinted in one of the forum questions and the one shown above in the image and below as code worked for me. Note that there is no guarantee that this works with all versions and forever. An attempt to do a partial update using PATCH resulted in an not implemented response. In general see some hints on partial representations in Resource Oriented Work Item API V2.
Important Update about partial update: Please see the Updating Work Items section in the Resource Oriented Work Item API with OSLC_CM 1.0 wiki page and scan through the documentation, especially for partial update. Note the usage of the query parameter oslc_cm.properties. By providing a list of properties that is to be updated it is possible to send only part of the representation containing said properties. The oslc_cm.properties uses the same syntax used by the oslc_cm.select statement. See the post EWM OSLC Query API and check the section about oslc.select for how to create, compose and encode the parameter.
To get the minimal RDF shown here, I cut out all content and stripped it down to the bare minimum. RDF libraries should be able to serialize empty graphs as well and it should be easy enough to find a minimal empty body for JSON.
The URL below successfully updated the work item state without the need to pass additional attributes. The minimal request body above was used with the URL below and the work item state update was successfully performed.
PUT https://elm.example.com:9443/ccm/resource/itemName/com.ibm.team.workitem.WorkItem/241?_action=https://elm.example.com:9443/ccm/oslc/workflows/_8e5qfFpmEeukW7cqqDjAuA/actions/com.ibm.team.workitem.defectWorkflow/com.ibm.team.workitem.defectWorkflow.action.startWorking&oslc.properties=
With headers:
OSLC-Core-Version 2.0
Accept Type application/rdf+xml; charset=utf-8
Content Type application/rdf+xml; charset=utf-8
If-Match "fcd3b360-d152-367d-956e-d1f9f428ced4"
Note that the oslc.properties statement did not work with rdf.nil. But it was possible to omit a value as shown above to clarify that no property value would be included. IT would be possible to specify additional values in oslc.properties that would be sent in the request body. One example is the resolution – see below how that looks like.
Please note, that it is necessary to satisfy all required attributes when performing a workflow action. The new state might require additional values that you might have to provide, in which case you want to definitely use the full information from the resource.
Please also note that I am not seeing errors if the workflow action can not be done or does not exist. The response is 200, regardless of this fact.
Resolve Work Item With Resolution
One example for attributes that might become required with respect to a state change is the resolution attribute
rtc_cm:resolution
that might be required in certain states when resolving/closing the work item. Following the pattern we discovered the resolutions can be found using the workflow URI and replacing the section states by resolutions. The resulting URI provides the available resolutions.
Please note, that I experienced issues with the headers to be used here, dependent on the headers used different information was returned in cases such as the actions above. I would suggest to test using the OSLC headers. If there is a lack of information try to only use the header Accept application/xml (or application/json). The result could contain more information. Please note that in the latter case the format is not RDF.
Since I had built all the logic to get the action information using XML (minidom) and not RDF in python, I used only Accept application/xml as header to get the resolution information and reused the code written to analyze the actions.
GET https://elm.example.com:9443/ccm/oslc/workflows/_8e5qfFpmEeukW7cqqDjAuA/resolutions/com.ibm.team.workitem.defectWorkflow

Accept application/xml
With the call above it is possible to GET all resolution information like ID’s and names. The image below shows an example. Mind the request header used.
Get the resolution information.
It is then possible to add or set the attribute value like below.
See the response from a GET response to an work item URI, containing the value below as the example.
Setting the resolution results in this additional attribute.
The example below shows all that is needed to close the work item and set the resolution updated in the same request. In addition to the workflow action as above use the the oslc.properties and define an additional property, the resolution attribute, to be provided.
PUT https://elm.example.com:9443/ccm/resource/itemName/com.ibm.team.workitem.WorkItem/241?_action=https://elm.example.com:9443/ccm/oslc/workflows/_8e5qfFpmEeukW7cqqDjAuA/actions/com.ibm.team.workitem.defectWorkflow/com.ibm.team.workitem.defectWorkflow.action.resolve&oslc.properties=rtc_cm%3Aresolution
The request URL contains the workflow action and the request body contains the data for the additional attribute to be set as follows:
The request headers, including the If-Match header, have been shown already and show up in the image below which shows all the important data in RESTClient:
Resolving the work item with setting the resolution attribute.
This is a complete example of a state change while changing the resolution attribute in addition. This can be expanded on to set more properties using oslc.properties.
I found numerous questions around this in the Jazz forum, but there was still some considerable amount of work to be done, to get the state change working.
The page Resource Oriented Work Item API V2 also describes other interesting concepts like query mechanisms and representations. Some of them will be presented in subsequent upcoming posts. Something I have not yet explored are the draft work items. Intriguing. Maybe I find time to look at it.
Summary
I am fully aware that I am quite late to the party, but despite trying, I was unable to find examples for the whole process that were consistent and simple enough, covered most of the ground or worked for me. There was quite some research that needed to be done to get all the concepts covered. All the information in the blog series I am currently writing has been collected to help customers as well as IBM internal resources with the ELM APIs.
So, as always I hope that the content of this blog (series) is of interest to users out there and helps to save some time achieving their goals.
Discovery is the name for the method to locate the entry points for the OSLC API in EWM and other ELM tools. The mechanism is the same for all applications but there are differences in the details. This post aims to help understanding the discovery process with a focus on EWM and work items. Ultimately we want to be able to create a new work item and need to get all that is required to do that.
Context of the blog post is the series
This is the series of planned posts I intent to publish over time. Most of the examples will be EWM based, but quite a lot of the content applies to more ELM applications. The examples where performed with versions 6.0.6.1 and 7.0.x.
The main entry point into EWM and other Jazz applications is the rootservices document. The document is an XML document that is based on RDF. The document can be accessed using a HTTP GET on the rootservices in the context root of the ccm and other applications. For example:
GET https://elm.example.com:9443/ccm/rootservices
The document is not password protected and does not require special headers to be accessed. It is only available as RDF XML document, there is no other way or format to get it. It is possible to use the URI for the rootservices document directly in the browser to display it.
The rootservices document contains information about all the resources and services provided by the Jazz Server.
Service Provider Catalog
To create a work item we need to find the Work Item Service Provider Catalog. We are interested in the rdf:resource entry of the element oslc_cm:cmServiceProviders.
There are certainly many ways to achieve this. The best way to achieve this is to use RDF. RDF support exists in various languages. I am not the best person for the job to explain RDF. My summary would be that RDF defines subject, predicate, object relationships in a Graph based on XML. Once the graph is created, it can be queried. For example, if one has the subject and the predicate it is possible to locate the objects.
The trick is to understand what the subject, predicate and object could be. I have always struggled to figure that out on my own, just looking at the RDF XML document. I have found two possible solutions, that work for me.
Serialize the graph as N-Triples and look into these
Even better, serialize the graph as Turtle format and look into that
Here is a part of the rootservices document, that was parsed as RDF XML serialized into Turtle.
Turtle serialized rootservices document showing the subject
In this document, line 19 shows the subject. Please also note line 17 that shows a prefix definition we are interested in. The next part of the document of interest is shown below.
Turtle serialized rootservices document with predicate and object we are after
The lines 104 to the end of the file show additional subjects and their predicates and objects.
In Python, it is possible to use the library rdflib to work on RDF XML. A core communication support library that I have developed for this define the URIs and namespaces for the used domains. Also see the blog post Using the EWM REST and OSLC APIs for more information about this. The documentation for rdflib can be found here.
The image below shows an example for defining the namespace used above.
Defining a new namespace.
The image below shows the import statements used for rdflib in my communication library that has all the RDF support infrastructure.
Imports for RDF XML rdflib
The image shows the code that is used to serialize the rootservices document and the function to get the service provider catalog. The last argument is the predicate that locates the work item service provider catalog we are interested in. In this example the predicate is
The function below composes the subject and then gets the objects selected by the subject and the predicate.
Get the objects based on the subject and predicate
The function creates the RDF graph. This binds all the namespace definitions and aliases.
Then the rootservice document is parsed based on this RDF definition to create the graphs content. The code creates the URI for the rootservices document that represents the subject – it is basically the URI of the rootservices document. Finally the code gets all objects selected by the subject and predicate, and creates an array of these URIs.
The code segment shows how the work item service provider URI is then taken out of the result array. Please note that all these activities did not require a login, username, password or anything in addition to the rootservices document.
The image below shows how the RDF graph is created and the desired aliases and namespaces are bound to the graph.
Create the graph by binding the namespace aliases and URIs
Work Item Service
We just discovered the work item service provider catalog shown in the GET command below. The next step in the discovery chain is to look up the work item services for the project areas. This is done using the service provider catalog that was discovered above.
GET https://elm.example.com:9443/ccm/oslc/workitems/catalog
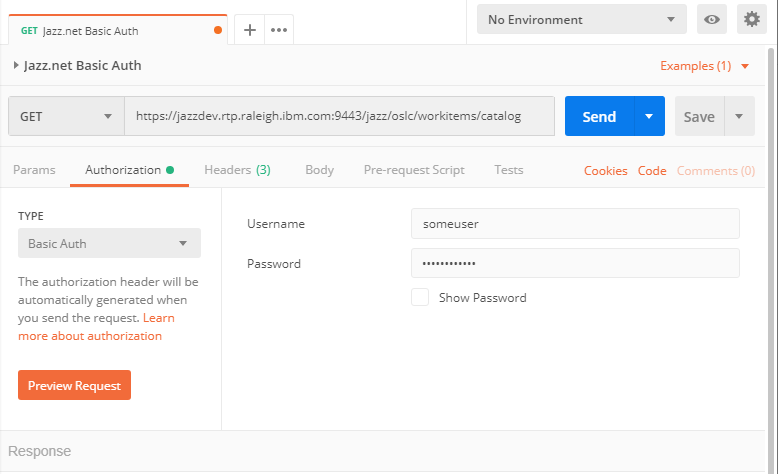
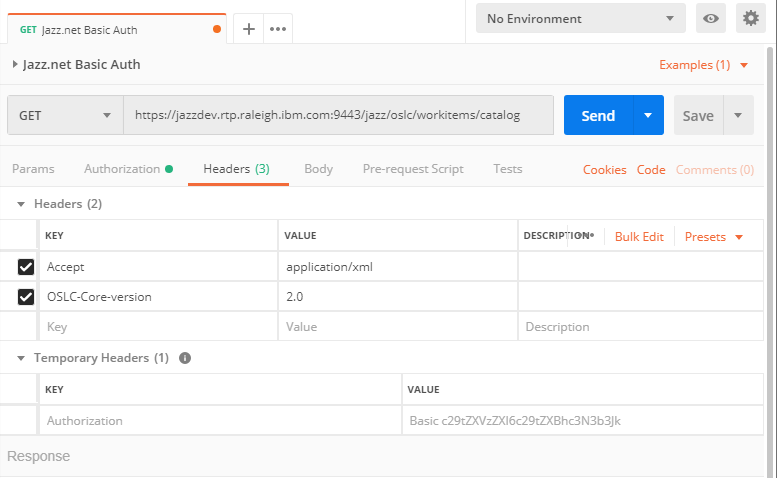
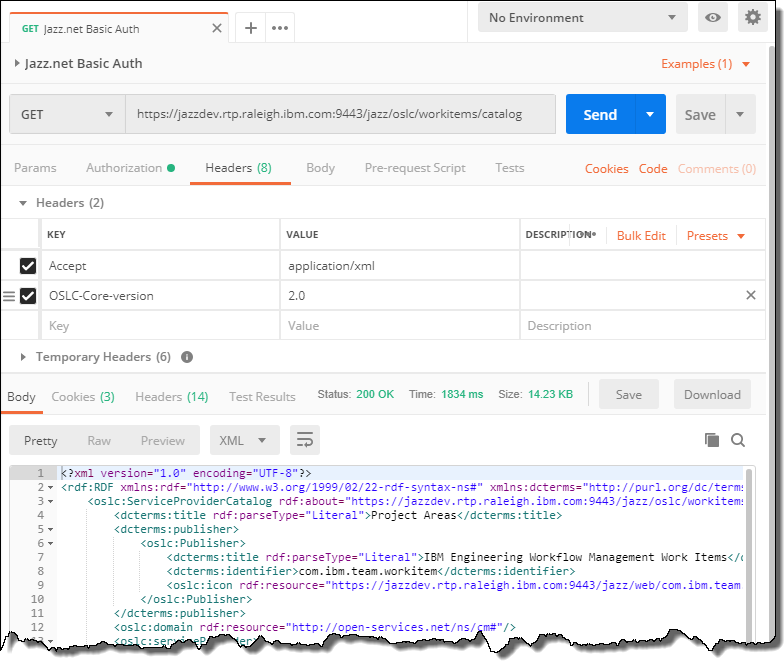
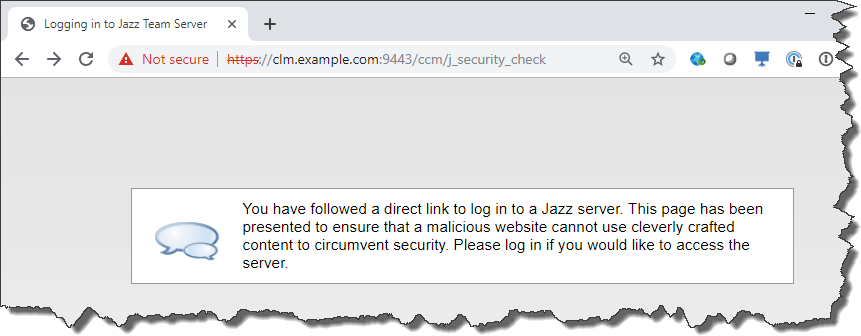
Note that this request is for a protected resource. The server will redirect to the authentication. The details are explained in the previous post ELM Authentication.
The resulting RDF XML document contains the information we are interested in. The image below shows the Turtle serialization of the service provider catalog. It shows a structure similar to below.
Turtle format of the service provider catalog
The section with the predicate oslc:ServiceProviderCatalog shows the project areas services documents. For some purposes this might be enough. It is possible to iterate all the service provider catalogs to get more information for each one performing a GET on the URI. However, the response we already got contains more information that can be used.
Service Provider details
By searching for the objects that have the predicate oslc:ServiceProvider instead, it is possible to access the URI for the service provider, as well as additional information such as the project areas name using the dcterms:title. This can help reducing the number of subsequent calls to get these details.
The code below shows how to get that information from the serialized document. It builds arrays of project area names and URIs which is later used. E.g. find the index for a project area name and then get the related URI. There are likely better ways to store the information in Python.
Retrieve the service providers
The first step is to look up the subject for the predicate oslc:ServiceProvider. The resulting URI is the service provider for the project area. For example
As explained above, the code uses the found subject to get the project area URI in the oslc_cm1:details and the project area name in the dcterms:title attribute.
Project Area OSLC Services
In EWM, work item services are project area specific. The reason is that each project area can have a different process and the process defines the work item types, attributes, workflows and all that. The next steps in the discovery process would be to get the project areas services.xml.
GET https://elm.example.com:9443/ccm/oslc/contexts/_8e5qfFpmEeukW7cqqDjAuA/workitems/services.xml
The resulting RDF XML document contains information about various OSLC related capabilities and services. By looking through the information, especially using the Turtle format, it is easy to identify.
The OSLC query capability
Various dialogs such as OSLC selection, creation dialogs and pickers
The OSLC creation factories for all the work item types
The OSLC resource shapes for all the work item types
Similar to the work item services above, it is possible to get the desired information. Here example code getting the creation factories and related resource shapes for all the work item types.
Getting the creation factories
The pattern repeats. To create a work item of a specific type, get the creation factory for that type. To get information about the attributes to create, in the work item, get the resource shape for the type. For the attributes in the resource shape get the type, allowed values and multiplicities.
Other Formats
The rootservices document is only available in RDF XML. Dependent on the tool, other formats might be supported for subsequent documents. For example using the header
Accept application/json; charset=utf-8
it is possible to try to get the JSON representation. This works for EWM in various places. No guarantee. The discovery mechanism in this case is similar to the XML example above, the only difference is that JSON is a format that is easier to read for humans in my opinion. Instead of creating a graph, it is necessary to use a JSON library to access the data.
The code below shows how to get the service providers when using JSON format instead of RDF XML.
Getting the service providers JSON
The discovery is analogue to what has been shown above with RDF. Even the structure of the code is similar, which is due to the fact that the data structure is similar. It is just in a different format that is easier to digest than RDF, at least for me.
Summary
I have struggled for a while with how to explain the discovery process. Especially how to get the data out of the RDF XML has been hard. Since I found the Turtle format, it makes a lot more sense to me. So, as always, I hope that this was of interest and helps the users and the Jazz community to make their life easier.
Authentication against a Jazz application is quite complex. When using the Plain Java Client Libraries, this is not a concern, as the ITeamRepository handles all that for you. It authenticates against the server and keeps the authentication valid over time. This is important, because application servers have timeouts that can void the the authentication of a session. A very common timeout that impacts the Jazz applications is the Liberty Profile default of 2 hours.
Running a client application against such a server requires detecting the need to authenticate and performing the authentication as well as to guarantee the current request is performed. Enterprise applications also require to work in complex setups supporting different ways to authenticate. Some examples are authentication based on Liberty Profile file based user management, LDAP based delegated authentication and user management, Jazz Authentication Server (JAS) based authentication, Kerberos and more. Implementing a client that uses the REST and OSLC APIs directly requires to develop a mechanism that handles this automatically.
Warning, this is complex!
I have tried to simplify this topic as good as possible, within my limited knowledge and experience, however this blog turned out to be very lengthy and complex. I also had to redo my screenshots multiple times to correct for changes during writing the post. Again, this ended up not being the casual blog post. You have been warned.
Approaching authentication
I have worked with the EWM Plain Java Client Libraries in the past. They provide a standard login mechanism to use and that keeps you logged in. I worked with Eclipse Lyo and used the mechanism provided with it, similar to plain Java API. I started just using an HTTP Client and I implemented a simple Login mechanism that was able to perform a Form based authentication. There was no code that would keep me logged in. When I started experimenting with Python, I just implemented a similar login mechanism that uses Form based authentication as explained in this post. In the first steps of the script, the authentication was executed, under the assumption that it was valid for the rest of the script.
That was sufficient for my experiments with my local test server. However it does not work with systems that have JAS enabled. This created questions, such as which authentication method was available and how to detect that, that required deeper knowledge about how the authentication was supposed to work. This approach also does not work for scripts that have to run longer durations. In many environments, the authentication expires after some timeout.
I started reading the Native Client Authentication article from the Team Wiki to understand how it was supposed to work. I got confused. I talked to some of my peers and hoped for someone having looked into this already. No luck. I cite the answer of a very skilled colleague that I hold in high regard: “Ah, this Native Client Authentication article is the most cryptic article I have ever come across.. at times it appears like everything has been told and at almost the same time, it appears like it is telling us nothing” and “I read the article now the 1001th time, and I still don’t understand”. Exactly.
I could not leave this as the answer and started coding while trying to follow the article. It makes no sense to me, to try to rewrite the article in this blog. Also just words will not bring any clarity. It looks as if language is not clear enough to describe what needs to be done.
The only way I am able to explain what goes on is showing code samples. I did not want these blogs to be about code, but it seems to be unavoidable to get clarity and to explain what goes on using the resulting code in my library class ELMCommLib. At this time I will use images to show the code. I will likely make the code available as open source later. Once done, I will link the download location to the blogs, as usual. The code is the result of a quite lengthy development and test process. It only implements parts of what the Team Wiki article explains. I have only so many test systems available and I can only test what these systems do. So here the disclaimer…
Disclaimer
Please note that so far I have only tested against a standard system supporting Form based authentication and a system supporting JAS. I used a trick to test the fallback to Basic authentication. My general disclaimer to the right of the page applies too. I’m not responsible for any damage done when following this article.
Context of the blog post is the series
This is the series of planned posts I intent to publish over time. Most of the examples will be EWM based, but quite a lot of the content applies to more ELM applications. The examples where performed with versions 6.0.6.1 and 7.0.x.
I started with creating a function internalJazzRequestWithAuthentication() that can be used for all HTTP requests by passing the method and all parameters needed. This function deals with the whole authentication requirements and makes sure the authentication dance is performed when needed. I provide more convenient functions that wrap this function and are easier to use.
Function internalJazzRequestWithAuthentication()
This function has become long and complicated, so I have to show it in smaller pieces below.
The function delegates the request to the function internalJazzRequest() which is performing the correct call using the requests library. The function looks like this.
Function internalJazzRequest()
The function returns the result for the request. The result is now evaluated in the first part of the authentication code of internalJazzRequestWithAuthentication().
The function internalJazzRequestWithAuthentication() checks the status code of the response to be able to determine if anything related to authentication needs to be done.
The first HTTP status code it evaluates is 200. Usually 200 means the call went OK and the result is the desired result. However, the result headers can contain information that the access to the resource would require authentication and the call actually did not return what was expected.
The function internalHandleFormChallenge() is used to handle this case. It checks the result headers to figure out if Form based authentication is required. The code to detect the Form authentication request is easy enough to understand. The code checks for the presence of a special custom header X-com-ibm-team-repository-web-auth-msg. If the header is present and contains the value authrequired a Form based authentication is required.
If Form based authentication is needed, the code performs the login and retries the initial call. Note that currently the code uses the URI that is provided when creating the communication library for authentication. This needs to be changed at some point. The code has to get the public URI root from the result. This is important for applications like DNG that delegate authentication to JTS.
Function internalHandleFormChallenge() handles Form based login challenges.
The function also handles the case that the initial request was done for an insecure URI. This is handled as a fail and a false is returned.
If no authentication was required, the current result is returned back.
If form based authentication is required, the function internalLoginForm() is used to perform the form based authentication. It is essentially the legacy code remaining from an initial login mechanism that I used for automation examples. There is a façade function loginForm in the code that keeps this code compatible to old scripts. The form based authentication sends the credentials to the URI publicURI/j_security_check and checks if the authentication worked by looking at the response location header.
Function internalLoginForm() performs the form authentication.
Back in the function internalHandleFormChallenge() the code tests if the login was successful. If so, the initial request for the resource is re-executed in the function internalRetry() and the result is returned. The retry code will be explained later.
There are several other return codes, typically for different methods like POST, PUT etc. that can require form based authentication in internalJazzRequestWithAuthentication(). One example is return status code 302 which is handled exactly like the code 200.
The wiki page Native Client Authentication mentions the return status codes 303 and 307. None of the test systems I worked against ever responded in any of those codes. At the time of writing they are detected in a check and the call will fail for these codes. Once I start sending unauthenticated PUT, POST, DELETE or PATCH requests, I might see these response codes. The handling would be the same. One of the next steps for me will be to setup tests that force the other situations.
The last possible response is 401. This is the most complex case. It handles all other cases for authentication, especially Jazz Authorization Server (JAS), OICD and some other authentication options. See the initial part of the handling for 401 in internalJazzRequestWithAuthentication() below.
401 Challenge, detection of the authentication method.
As explained in the wiki page it is necessary to check for the header WWW-Authenticate. If this header is present, it needs to be evaluated. This could be a Basic authentication challenge or a Bearer challenge for Jazz Authentication Server/OIDC/OAuth. The situation where the Bearer or the Basic challenge is missing is handled at the very end.
If the Basic challenge and the Bearer challenge is detected, the headers X-JSA-AUTHORIZATION-REDIRECT and X-JSA-AUTHORIZATION-URL are evaluated to determine the authentication strategy. For the test system I have available, I needed to follow the JAS authentication.
The first step to do JAS authenticate with Basic and Bearer challenge is to get the redirection URL from the header X-JSA-AUTHORIZATION-REDIRECT. Based on this the code constructs the first redirection URL stored in xjsaauthredirect with the additional parameter '&prompt=none'.
The code performs a GET on the no-prompt redirect URL. The result of this call determines the next steps. When the GET does not return 200, the authentication is still valid and the code runs a retry for the original request, the result of which is returned. This is shown here.
Retry code if no authentication is required.
If the GET returns status code 200 authentication is required. The code below shows the code to handle the authentication. Note, that there is some code that gets information that remain unused at this time.
To reauthenticate the code performs a GET on the redirection URI in xjsaauthredirect, this time without the additional no-prompt parameter. The request can result in a status code 401. This is indicating Kerberos or some other authentication method. I have not implemented this code path at the moment. I lack a test system that behaves this way.
The JAS/OAuth authentication dance
The request can result in a status code 200. In this case we are on the OAuth path. The code performs a request on the redirect URI in xjsaauthredirect, this time providing an additional authentication header conforming to the Basic authentication header. The header is computed in the call to HTTPBasicAuth(). If this succeeds with a status code 200, the client is authenticated and the code retries the initial request. This is not strictly necessary for all requests to do that, but for now, I wanted to do it anyway. The result is returned back to the outer code. Note that the Authentication header is only sent this one time. In contrast when using Basic authentication like below, the Authentication header is sent with all the subsequent calls.
In the case that the server only returned the Basic authentication header, the code below initializes the normal Basic authentication mechanism. The code is written in an way that now always sends the Basic authentication header with all requests in this case.
The case that Kerberos was detected is also handled here at the end. Lacking a test system the code returns unsupported and False for now. When the code was unable to identify the authentication method, e.g. the server was not a Jazz server, the code fails as well.
Handling of Kerberos and Basic authentication
This is what I was able to come up for handling authentication. There is no guarantee, that it is completely correct. I am lacking test systems that behave in different ways, so testing is very limited.
Please note, that the authentication is only valid for the session that is used and based on several cookies that are managed by the session. Also note, as already mentioned, the session can be invalidated by the server at any time and the authentication would have to (automatically) be done again.
Retry code
I ended up creating a function to handle the retry for the initial call that led to the authentication challenges. At the moment the code for GET is tested and works. The code currently basically reruns the initial request and checks if that was successful. Then it returns True and the result or False.
Then internalRetry() function performs a retry for the initial call.
While writing this code, it appears that the retry code might have to be changed later. When the first call requiring authentication is something other than GET the code might fail. As an example, I am not sure at the moment how a POST e.g. for creating a work item would be handled in detail. The key here is that POST of a work item may only be run once. This is going to be an interesting journey and there is much to be learned about redirects and retries. Once all cases are tested, I will try to re-upload the changes.
Example for authentication flows – Form authentication
As already mentioned, I am able to track the communication in my framework. The following sequence of messages is related to a GET request against a system that uses Form authentication. Please ignore the files with extension .nt, they are not relevant for the authentication.
Form authentication message flow.
The first call is to get the rootservices document. The rootservices document is not protected, so no authentication happens.
The next call is to get the service provider catalog which is discovered in the rootservices document. The service provider or workitems catalog is a protected resource, this means the request requires authentication. The request below shows that the call was redirected from the work items catalog to the web page showing the login prompt. The page code in my logs usually shows some mysterious message that “Javascript is either disabled or not available in your Browser”. This is based on the fact that there is no browser that sent the request and all JavaScript code in the HTML page fails.
The response header also contains the header X-com-ibm-team-repository-web-auth-msg authrequired indicating authentication is required.
Request returns with authentication challenge
The code detects that authentication is required. And executes the form based authentication, providing the username and password unencrypted. The latter is the reason why it is absolutely necessary to use HTTPS and not HTTP as protocol. HTTP sends the credential information unencrypted. The response of the login call contains the redirection location to the previous call.
Form based authentication is performed
At the moment, the code shown here does not use the redirect, it uses the original resource URI to retry the call. This is the retry the code performs. Please note that the destination URL and the Request URL are now the same. The response body contains the protected resource service provider catalog. This catalog contains the information about the visible available project areas.
Retry to get the service provider
All subsequent calls in this session are performed without any authentication challenge. The next call to get the work item service for the desired project area is omitted.
Example for authentication flows – JAS authentication
Finally lets have similar look at the sequence of events when running against a system with JAS Authentication. Note, I have replaced the original host name with a generic one, should there be any unclear references, in case I did not spot them. The following flow is the result of the same version of software running against a different URL that has JAS authentication configured.
JAS Authentication message flow.
The first call is to get the rootservices document again. The rootservices document is not protected, so no authentication happens.
The next call is to get the service provider catalog which is discovered in the rootservices document. The service provider/work item catalog is a protected resource, this means the request requires authentication. The request below shows that the call to the service provider catalog fails with a status 401. The response header also contains the header WWW-Authenticate with the form containing the Basic and Bearer challenge. The headers X-JSA-AUTHORIZATION-URL and X-JSA-AUTHORIZATION-REDIRECT are also present. This provides with the authentication and redirect URL for the authentication.
JAS authentication challenge with Basic and Bearer authentication header.
The next step is the GET request against the redirect URL with the additional parameter &prompt=none. This request collects additional information after some redirects. I don’t claim I understand the details here. Key is that the call can either determine that there is actually a valid authentication already, or a new authentication is required.
Request if logion is required
Here the previous call results in status code 200. This means that JAS authentication is required. So we GET the previous target URL, but without an extra parameter &prompt=none.
Note that the request gets redirected to the login URL that we have seen in the response to the initial call in the header. X-JSA-AUTHORIZATION-URL. The response header seems to indicate that Form based authentication is a valid fallback: X-com-ibm-team-integration-jazzop-auth-msg form-login. I am not sure and have not tried. I followed the wiki page Native Client Authentication implemented the JAS authentication. The response body here is the HTML code of the login page. If the client was a browser, it would be possible to show it to the user.
Determine the authentication mechanism
The previous request ended with a status 200 which means JAS/OAuth2 is the way to go. This is done in the next step. The request is executed again and an additional Basic authentication header is created and sent with the request. Note that the Authentication header is not shown below. If it was I would have had to redact it, because the data is only encoded, not encrypted. This is also the reason why Jazz Applications are by default all using HTTPs only. Do not send your credentials over HTTP.
Also note that the request gets successfully redirected back to the service catalog URI. The response body actually contains the service provider/work items catalog.
Authenticate to the system and continue
Because it is just a GET request, It would be possible to just return it as a result. At the moment I run a last request to retry the initial get. I will leave that request out in this example.
Summary
As always, I hope that this blog helps users out there that work with the Jazz products and their APIs. This was a very complex topic and I hope I was able to shed some light based on the experience I have gained over time. There are several cases missing, which I was unable to test lacking access to test systems and also test code that I have not yet developed. I will try to keep the post updated as always. Once I have finished this series, I will also try to publish the code for re-use.
If you have made your own experience with this topic and want to share, please do so in the comments.
I have collected a lot of experience with the Java APIs for RTC/EWM over the years. Until 2020 I did not use the RTC/EWM REST and OSLC APIs at all. Luckily I got involved in several engagements where I had the opportunity to explore these APIs and learn how to use them.
I found the documentation for these APIs I was able to find underwhelming. The available documentation was often lacking complete working examples. There was usually some critical part missing or there where no examples at all, just the API specification. The latter seemed to be systematic to focus on the specification and not the specifics. However the lack of samples was confusing and left too much room for interpretation. I ended using search engines a lot. I had to experiment a lot to get things moving.
Obviously I learned a lot. I would like to spare others the hassle. So, as usual I want to share the experiences and lessons learned with the community. My intention is to provide with some relevant and working examples that are easy enough to perform on your own. I hope this can save people some time when trying to use these APIS as well.
This post will be the first in a series of posts and provide links to the other posts for easy navigation. In addition this post will discuss which development environment and tools were utilized to explore and use the APIs. I will share some of the code I have developed over the time to ease the exploration.
The planned blog posts for the series
This is the series of planned posts I intent to publish over time. Most of the examples will be EWM based, but quite a lot of the content applies to more ELM applications. The examples where performed with versions 6.0.6.1 and 7.0.x.
Since back then, the ELM API Landing Page has been added to provide a more comprehensive overview about the available ELM APIs. If you are interested in ELM related APIs go over that page and find out what APIs are available. This page also points to other resources such as the OSLC standards and available workshops.
Finally the Interesting links page is a collection of, well, interesting links I found over the years.
Development environment choices
The first information I can share is how I explored and used the APIs and explain a little bit about the development environment options available and which development environments I used to explore the APIs.
I like developing with Java a lot. The EWM/RTC Java APIs are very rich and it is relatively easy to develop code for EWM/RTC, provided the development environment was set up by performing at least the complete Lab 1 of the Rational Team Concert Extensions Workshop. Eclipse, the RTC SDK and the Plain Java Client Libraries allow development of extensions and automation based on the EWM Java SDK and API. The same environment can also be used to develop code against the REST and OSLC APIs.
It is also possible to use Java or any other language supporting HTTP, to develop code for the EWM/RTC REST and OSLC APIs, just using libraries and available frameworks.
I have already used the Java based Eclipse Lyo framework to develop a client automation for Doors Next Generation (DNG) and I used the Eclipse Lyo Designer code generation framework to develop integration servers. My experience was that Lyo is a nice framework that helps a lot, if you know what you are doing. If I was not, I found it challenging, especially debugging and understanding what was going on in the HTTP requests.
I have looked into and used Postman and the Firefox addon RESTClient to experiment with REST and OSLC APIs. It is very useful for experimentation and I use it in parallel to the other development environments. A typical use case is to login and experiment with one call to figure out how it works. If the call sequence and the amount of data becomes too big, it is not really efficient any more, and I would use a different approach.
I started using Python and Jupyter Notebook in 2020 when I had the need for some automation for importing, manipulating, consolidating and querying a lot of CSV data for a customer. I was very impressed with the quality of the available libraries and the turn around times that were achievable. When I was asked to help one of our customer teams with information about the RTC/EWM APIs for the development of a prototype for a customer specific mobile client, I decided to use Python instead of Java. As mentioned above I also used RESTClient or Postman for experimentation with one or two API requests.
There are various Python development environments around. I do not think it matters which one you use. I used Spyder which comes with Anaconda. There is also PyCharm and kite. I am not opinionated. I just notice that the development environments are far away from the quality of Eclipse and the built in compiler and debugger. There are always tradeoffs, I guess.
Python – Libraries and Code Samples
The focus of the blog posts is more the APIs, how they work and how they can be used and not so much Python and how to use it. However, I figured that I want to share some code I developed over time, enabling easier data collection and debugging. So I will provide examples where I see fit.
The most important aspects of HTTP based APIs is to understand which method is used with which URI, which headers are used, which formats are sent and accepted and which request body (if any) is sent. The response data is also key, especially the status, response headers such as Location and obviously the response body. A mechanism that can log all this information is key in understanding the APIs and faster turn around times.
Python has a lot of libraries for various purposes. The Libraries that I used are shown below, loosely grouped by what they are used for. First the libraries used operating system and system specific purposes such as logging, files and execution.
import os
import sys
from datetime import datetime, timezone
from pathlib import Path
Then the requests library which is used for session handling and HTTP communication in my code.
import requests
from requests.auth import HTTPBasicAuth
from requests.packages.urllib3.exceptions import InsecureRequestWarning
This code below is necessary to suppress issues with certificates. This is a typical situation for me as I usually develop against some local test system.
# Disable warnings for self signed or invalid SSL certificates
# to be able to talk to test systems
requests.packages.urllib3.disable_warnings(InsecureRequestWarning)

# Start a session
session = requests.Session()
The Libraries I used for RDF XML and JSON parsing and representation.
I ended up creating a base library for the Communication with the ELM system that allowed better reuse. I will not share all the code at the moment, but I will share some basic learning and code that I found being key for me to be able to do my work. The library is referred to as:
from elmcommlib import ELMCommLib as elmcomm
The library is initialized with a session, the public URI and a name for the log folder to be created.
publicURI = 'https://elm.example.com:9443/ccm'
paName='JKE Banking (Change Management)'
user='ralph'
password='ralph'

# Disable warnings for self signed or invalid SSL certificates
# to be able to talk to test systems
requests.packages.urllib3.disable_warnings(InsecureRequestWarning)

# Start a session
session = requests.Session()
comm=elmcomm(session, publicURI,'logCreateWiRDF')
The library also provides a mechanism to create and set log file folders using createLogFolder("FolderName") . In case the folder already exists it can alternatively set with setLogFolder("FolderName").
The log folder is used by the method writeResult() shown below, which dumps the complete communication in a text file, when a file name is provided. The file name should be constructed and numbered to better understand the flow of the sequences. Below shows such a sequence with file name numbering as an example.
The communication logs are always created in the current log folder. This allows to split the logs for the API usage into smaller sequences by switching the current log folder.
Content of a log folder.
A debug print dPrint() allows to avoid chatty logging. You can keep the logging entry and force it to show if you want. Printing a timestamp using timeStamp() is sometimes useful, especially when looking at performance of calls.
    # Folder for log files
    def createlogFolder(self,folderName):
        defaultLogFolder= 'commlogs'
        if(folderName==None):
            folderName=defaultLogFolder
        if(folderName==''):
            folderName=defaultLogFolder
        script_dir = os.path.dirname(__file__) #<-- absolute dir the script is in
        logFolder=os.path.join(script_dir, folderName)
        Path(logFolder).mkdir(parents=True, exist_ok=True)
        return logFolder

    # Folder for log files
    def setlogFolder(self, folderName):
       self.logFolder=self.createlogFolder(folderName)


    # Log the HTTP communication for the request in a folder
    def writeResult(self, fileName, result, url=None):
        if(fileName!='fileName'):
            self.dPrint(f"Execute: '{fileName}'")
            logFileName=os.path.join(self.logFolder, fileName)
            with open(logFileName,'w') as f:
                if(url!=None):
                    f.write(f"Destination URL: {url}\n\n")
                reqMethod = result.request.method
                reqURL=result.request.url
                reqBody=result.request.body
                f.write(f"Request: {reqMethod} {reqURL}\n")
                f.write("\nRequest Headers:\n")
                for header in result.request.headers:
                    value=result.request.headers[header]
                    f.write(f"\t{header} {value}\n")
                f.write(f"\nBody:\n{reqBody}\n")
                f.write(f"\nResponse Status: {result.status_code}\n")
                f.write("\nResponse Headers:\n")
                for header in result.headers:
                    value=result.headers[header]
                    f.write(f"\t{header} {value}\n")
                cookies=result.cookies._cookies
                f.write(f"\nResponse Cookies:\n {cookies}\n")
                f.write(f"\nResult Body:\n{result.text}\n")


    # Debug print if debugging is on
    def dPrint(self, message=None, doPrint=True):
        # DebugPrint, switch off by sending doPrint=False
        if(message!=None):
            if(doPrint==True):
                print(message)
            else:
                pass


    # Print timestamp
    def timeStamp(self, message):
        now = datetime.now(timezone.utc)
        self.dPrint(f"{now}: {message}")
The image below shows how a log file for a message created using the method writeResult() looks like. Note that the log contains all the important pieces of the request, response pair. I used tooling in the editor Notepad++ to “pretty print” format the XML section in the response body. This makes it much easier to understand.
Logged http request – response
Help with RDF XML
The REST and OSLC APIs provide different serializations for the content that they accept and provide. One older one is XML based using the Resource Description Framework (RDF) specification. Newer standards such as JSON and more might be available. I have experience with RDF and JSON and I prefer JSON.
RDF is not for me. I always struggle to understand what and how I should be searching to get the data I want. Especially when the data is full blown with namespaces and what have you. This was one of the biggest struggles I had with Eclipse Lyo. The HTTP Client was hard to use for debugging, because the content was usually consumed when I tried to dump the response into a log file. So I could have a log entry for debugging and the call would not proceed or the call would work and I had no log data. Maybe I overlooked something.
In Python I was able to use the method writeResult() and continue processing the response data. I was able to use the function below to serialize RDF response bodies into a form that shows all the subject, predicate and object data and saves it into a file. That made it easier to work with RDF for me. I still prefer JSON format, if available. The OSLC discovery mechanism supported by RTC/EWM requires XML-RDF in the first steps, so you will have to deal with it.
    # Serializes a graph (based on RDF) in the nt format
    # This format shows all graph nodes as Subject->Predicate->Object
    # This allows to better understand what to search for
    def debugSerialize(self, graph, fileName='fileName'):
        # Serializes a graph into the NT format. This provides
        # a great source to look into RDF triples in the graph
        if(fileName!='fileName'):
            logFileName=os.path.join(self.logFolder, fileName)
            graph.serialize(logFileName, format="nt")
The serialization formats supported out of the box are “xml”, “n3”, “turtle”, “nt”, “pretty-xml”, “trix”, “trig” and “nquads”. For me NT and Turtle seem to be most useful, I built in capabilities to save the XML data as NT and Turtle format to help understanding how to be able to access the data later.
Update: The preferred option is to serialize the graph as Turtle format and look into that.
This is how the parsed RDF graph data from above looks in the NT format. Every row (mind the word wrap) is a triple of subject, predicate and object. This provides with hints how to search for data.
The RDF-XML in NT format, providing the triples in the model.
The capabilities above where absolute key for me to be able to explore and understand the EWM/RTC APIs and document them for my colleagues.
Operating on RDF requires the RDF definitions in Python. I used the ones below and defined them in my library.
This is the first of a series of posts, I hope to publish more soon. I will try to keep this post maintained and I am looking forward to the next posts. As always, I hope that my content, especially in this blog, helps someone in the ELM community out there. If it does, feedback would be awesome.
Recently the question how to authenticate to a ELM/CLM (aka Jazz) application came up in several occasions. I did not know the whole story either, so I had a look. Here is what I found.
Update history
2019/05/14 Added Basic Authentication
2021/01/22 Added Links
Important Links
The ELM API Landing Page note the entries for the OSLC Workshop and OSLC in general.
There are several scenarios that could be of interest. Some of the scenarios will be provided below. A general documentation about how the authentication of a client to a Jazz application works is provided here in the development wiki.
Common scenarios are as follows:
Using a REST client to explore the REST/OSLC APIs
Creating custom automation using REST/OSLC APIs
Scenario 1 is also used in the OSLC Workshop. However, as explained below, things have changed since the workshop was initially written and the latest changes are not addressed in the workshop.
REST clients
The main changes that could be recognized are in the browsers and the integration of REST clients. These changes heavily impact how easy or hard it is to login. The first REST client used in the OSLC workshop was the Firefox browser addon REST Client . Using this addon It is easy to login to the Jazz application. All that needs to be done is
Open a browser window
Provide the URL to the CLM application and open the URL
The application prompts for a login
Provide user name and password and perform the login
Open the REST Client Addon
The REST client addon uses the login performed in the steps above for subsequent calls to the server. This makes it easy, because it is transparent and there is no reason to worry about the details. The browser basically handled them.
Similar addons are available for the Chrome Browser. Examples are
The browser integrations above all allowed to use the browser to login and use the login information in subsequent calls. These browser addons or extensions used to be very popular, but security threats and changes in integration philosophies seem to make them more and more unavailable. Some of the addons mentioned above are discontinued and might not be available much longer.
The Postman as packaged app as explained at the end of this post is currently still available and allows to configure a Postman Interceptor, that intercepts the login information from the browser and uses it in later calls. So it works like the solutions 1-3 above and the REST clients available as Firefox addons or extensions.
Alternatives are standalone solutions like Postman as standalone App which seems to be the path forward for Postman. There are many other stand alone REST clients. The caveat is, that the simple option to just login to the Jazz application is no longer available as an option. So it is important to know the details,
When trying to write custom tooling that needs to access data on a CLM/ELM server, it is also necessary to understand the details.
Testing and special considerations
It is a good idea to have a test system. Ideally local on your own machine. You can follow Lab 1 of the Rational Team Concert Extensions Workshop to set up a small system with JTS and RTC. It is not necessary to install the plain Java client libraries, any of the SDKs or to run the WorkshopSetup application. It is possible to install the other applications as well sing the Web Installer or one of the many Installation Manager repositories.
Create the sample project in the lifecycle project administration section to have data to play with.
Postman Settings
This blog shows the examples using Postman as standalone App which is very useful and allows to save and organize calls as a benefit. Like any application there are usually settings that can be beneficial or get into the way. Here the settings of interest in the context of this blog.
Disable SSL Certificate Verification
Please be aware that the SSL certificates of a test system as described above will typically be considered invalid. It is very common that test systems have invalid SSL certificates. A common issue is that the certificate is self signed and often for a different or generic host name. In such cases SSL certificate validation throws an error. Browsers, REST clients and APIs often reject working with servers presenting invalid SSL certificates. It is usually necessary to create exceptions or to configure the systems to ignore the SSL validation error.
Make sure the REST client or API works with sites that have invalid SSL certificates, or provide valid SSL certificates.
Postman rejects communicating with servers using invalid SSL certificates and displays an error message. This can be changed by changing the settings, turning the setting ‘SSL certificate verification’ to off. Postman now allows communicating to servers using invalid SSL certificates.
Disable SSL certificate verification to be able to work with example projects
As an alternative, it is possible to provide valid certificates. It is also possible to use any other test system that might be available, especially when dedicated test systems with valid certificates are available. The screen shots in this blog refer to a test system that has been set up similar to the Extensions workshop, but with all applications installed and the sample lifecycle project being deployed.
Automatically Follow Redirects
By default Postman automatically follows redirects. This can be nice but it hides a lot of details. To better understand the details explained in the wiki page Authentication of a native client with a Jazz-based application, switch the setting automatically follow redirects to off.
Setting to switch automatically follow redirects off and on.
When following redirects automatically, postman also collects several cookies. To focus on the really important details, and understand which headers and cookies are really needed, the setting below is very helpful.
Minimal setting – disable automatic redirect and additional headers
Form based authentication
As explained in the wiki page Authentication of a native client with a Jazz-based application, there are multiple scenarios, how a client login would be performed. Unfortunately the number of scenarios are getting more over time as new standards are becoming available.
The easiest to use method that has worked for me so far has been the Form Based authentication. This works in a simple set up of CLM with any application server in a standard configuration without Jazz Authorization Server (OIDC) installed.
Perform a Form based authentication login to an application
To perform the Form based authentication to the application use the context root of the JTS or the application and append /j_security_check to the context root to create the login URI.
The image below shows the simplest way of performing the authentication using Postman.
Minimum information required to perform FORM based authentication
The POST to the secure resource URI provides the username and password using the form encoded key and value pairs for the j_username and j_password. password and username are both identical myadmin.
The code for this request is shown below.
POST /jts/j_security_check HTTP/1.1
 Host: clm.example.com:9443
 cache-control: no-cache
 j_username=myadmin&j_password=myadmin
Please note that there are no additional headers necessary. The request does not specify anything in the request for Parameters, Authorization, Headers, Pre-request Script or Tests.
Post response shows status 302 and headers show no authentication failure.
The response shows status 302. There is no header X-com-ibm-team-repository-web-auth-msg. There is no header Location with any value, let alone /auth/authfailed. This indicates the authentication was successful.
The Cookies keeps the LtpaToken to authenticate.
The Cookies keeps the LtpaToken.
If the setting for Automatically follows redirects is on, and other header options are also set to on, the request would be redirected and likely show a status 200. There would be a lot more headers and Cookies collected as well.
Once successfully authenticated, it is possible to send other requests passing the Cookies. For this OSLC request it is also necessary to pass an accept header and the OCLS-Core-version header.
Successful retrieval of the OSLC workitems catalog URI.
Please note that the Jazz Product APIs might need other special handling. In the above example the communication returns an additional Cookie JSESSIONID. In subsequent calls provide a header JSESSIONID with the value of the returned Cookie.
The easiest way to ‘log out’ is to delete the Cookies for the server.
Delete the Cookies for the domain to start again.
The request above can also be created by using a special content header Content-Type:application/x-www-form-urlencoded and a raw post body with a special encoding.
j_username=myadmin&j_password=myadmin
The images below show how this looks like in Postman.
The Following image shows an unsuccessful authentication due to a typo in the password. This is only one of the possible flows, but the other scenarios are handled the same way.
The Location header with value /auth/authfailed indicates a failed authentication attempt.
The response shows status 302. There is however a header Location with value /auth/authfailed. This indicates the authentication was not successful.
Authentication failed with redirect.
If the setting for Automatically follows redirects is on, the request would be redirected and likely show a status 200. The response body contains a page that the client could show to allow the user to enter the user ID and the password to authenticate. This web page uses JavaScript. Because the REST client Postman does not support JavaScript execution the page shows an error.
Where to Authenticate
My understanding so far has been that the CCM and the QM server have their own authentication. The RM server delegates authentication to the JTS. The Lyo implementation uses the public URI of the applications to create the authentication request. For the RM application it uses JTS instead.
The document Authentication of a native client with a Jazz-based application, seems to imply that authenticating to the JTS should do the trick for all applications. Using this has, so far, not caused any problems, so my suggestion would be to use the JTS URI to authenticate.
If you experience any issues, fall back trying to use the application specific URI.
Basic Authentication
Although Form based authentication has been the preference, Jazz also supports Basic authentication. However, when using Jazz Authorization Server/OIDC, Basic authentication is not supported. See this section (since 6.0.6).
As a summary, for Basic authentication, a special header Autorization that contains username and password encrypted in Base64 is sent with each request. The request below shows the header
Authorization: Basic c29tZXVzZXI6c29tZXBhc3N3b3Jk
Testing and special considerations
When using Basic Authentication in Postman it is useful to have the Automatically follow redirects setting to be on.
To configure Basic authentication in Postman, select the Authorization type Basic Auth and enter the username and the password. Postman generates the authentication header. When using the API or other tools that do not create the authentication header, it has to be created and added.
Configure Basic Authentication.
The call below gets the workitems catalog for a RTC server on Jazz.net. This requires sending a valid Accept header and the OCLS-Core-version header.
When sending the request, the final response should have a status 200.
Successful response.
Please be aware that basic auth does not have a session handling and you have to always send the authentication header.
Malicious website
I am currently working with a customer trying to authenticate to one of their CLM systems. This seems to work except with the CCM server. When they try to authenticate they get the following message.
You have followed a direct link to log in to a Jazz server. This page has been presented to ensure that a malicious website cannot use cleverly crafted content to circumvent security. Please log in if you would like to access the server.
We are looking into what could cause this issue. The web does not provide any good explanation. I found some questions in the Forum and other places and think I noticed a pattern. Several requests I have seen used a wrong URI to authenticate.
It is currently unclear what is happening and how to resolve the issue the customer is seeing. I will update the post, if we can figure out what is going wrong.
Summary
This blog post tries to shed some light on how to log into a CLM System to be able to use the REST and OSLC APIs. This should work for manual work as well as for automation tools. This blog uses Postman, but any REST client should work. The details, especially covering redirects and different authentication methods can be found inn this document Authentication of a native client with a Jazz-based application.
As always, I hope that this post helps users out there with using their Jazz tools.
We finally published Maintaining the Rational DOORS Next Generation type system in a configuration-management-enabled environment. Part 3: Automation tool deep dive on Jazz.net.This was a major effort and took a long time to do. This article provides a closer look at the source code, what it does and how it does it. It also provides some insight in how OSLC4J works and can be used. The information in the article, especially for setup and deployment of the automation prototype is very reusable for other scenarios and I hope to be able to reuse it in later articles and blog posts.
While working on the article, I continued to refine the Type System Manager. See the releases tab for the latest release. The latest releases support more automation It integrates finding editable configurations based on sub-strings in the description, create a source to target mapping and import/deliver type system changes based on this mapping. The new commands avoid the creation of a CSV file.
In addition to all this, the code on this branch already supports Registering Custom Resource Intensive Scenarios to CLM Applications. Each command uses its own scenario name composed from the command name plus the postfix “Scenario” to register the scenario execution.
Disclaimer and Download
Any code downloadable or accessible in this post is provided as is, without support, and used at your own risk.
The code was developed in Java using Eclipse and is based on the Eclipse Lyo Client.
If you have questions around the Type System Manager, ask them in the Jazz.net forum instead of commenting on the article or this blog post. Tag the question as a Rational DOORS Next Generation question and add the tag: dng-type-system-management to mark it for the reader.
Summary
As always I hope that the artifacts created for this blog and on Jazz.net will useful for the Jazz user community out there.
Recently I worked with OSLC/REST and discovered a nice REST client that I find really useful. I thought I would share it with you here.
If you have found tools that help you with this and want to share, please comment to the post. Please use English, describe the tool, what it does and why it is useful. If possible provide the URL in the comment as well. This will help me distinguishing the valuable information from occasional spam that slips through.
* Update * See Postman as another alternative. Links can be found below.
I have actually not done that much work with OSLC/REST in the past. I worked with the Java API’s most of the time. I have however done the Open Services for Lifecycle Collaboration Workshop in the past and also helped submitting it in classes.
The workshop suggests to use Firefox and one of the REST Client Addons available. I did exactly that and it was a pain in the, err.., neck. Why? The whole URL was maintained in one line and that, every time I changed the focus, snapped back to the position in the front. I found myself frantically scrolling back and forth trying to find the last edit location. In general the display did not give me a good way to understand what the request did and if there were issues with it. Not pretty. I tried out alternatives, but I couldn’t find anything satisfying.
I decided to try a different browser – despite the fact that I really like Firefox.
I looked into Chrome, which I recently started to use for JavaScript based Attribute Customization as described in this Wiki page and the Process Enactment Workshop (Lab 5). It suits me way better for JavaScript debugging, as I find it a lot easier to find the script, compared to Firefox Firebug.
The Nugget – Advanced REST Client
I discovered the Advanced REST client. And I it’s a nugget. A really big one actually, I think. You can simply download and install it in Chrome and have it in your Apps tile in the bookmarks bar.
This makes it easy to reach and does not take away a lot of real estate.
Now what are the things that distinguish this from other REST tools I have seen so far?
URL Management
The URL management is really nice as it basically allows you to work in two modes.
There is the traditional mode where you have the whole URL in the URL field. This is most efficient to use if one has a complete URL available and wants to copy/paste it.
The first real great difference however is the small triangle in front of the URL field. It allows you to automatically decompose the URL into its interesting parts with respect to REST and also to easily manage the query parameters.
Note, I found some URL’s where this does not work as expected for the decomposition. You can still use the feature, but folding/unfolding needs some manual work during unfolding. I hope this gets corrected soon.
This is very useful, as it allows to focus on the parts that are really interesting and removes the need to parse the URL visually. It is really easy to edit, add and remove query parameters to create the needed content.
There are also several ways to help with encoding and decoding the request data.
The same is available for the request headers.
It is possible to use the Raw mode to copy and paste complete headers and it is possible to switch to a Form view like above that works similar to the query parameter section.
Manage Projects And Save Requests
The second really useful feature is the ability to manage requests and to save them in projects. This allows to store requests that work or are under construction for later use.
While I was looking into OSLC, I had issues with my request several times and I found myself maintaining my URL’s in a text file while I was exploring. Being able to save the request makes it a lot easier and it is no longer necessary to switch between applications.
If something works, it can be kept and changed to work towards the final goal.
You can have multiple projects to manage the request, for example for different projects.
Other REST Tools
I found another REST tool that has similar capabilities.
Postman is available as application (online usage) and as Packaged App. It provides similar capabilities, except I miss the encoding/decoding option. The advantage of Postman is that it keeps a request history. This is easier to use compared to saving the change every time.
Summary
The Advanced REST client together with Chrome made my life a lot easier and I can only recommend to use it. If you do, give it a big thumbs up and donate to help supporting it.
As always I hope this is useful to the Rational Team Concert and CLM users out there.