After publishing the first version of the RTC WorkItem Command Line I realized several things that users might want to do that were not supported. So I updated the version to 2.0 and added these capabilities. I also found an issue with setting string lists, which is also now fixed.
This post, like the previous, provides a simple Work Item Command Line Client and explains the usage. It comes with code, so you can also enhance it if you need more features.
Latest Version
See A RTC WorkItem Command Line Version 3.0 for the latest version.
What’s new?
This version of the RTC WorkItem Command Line is complete as far as I am concerned.
- It still supports work item creation and update.
- It now supports all attribute types and the link types that I think can be supported. The missing Item types are now supported.
- It now supports several modes to modify the work item properties such as set the value, add to the available value or remove data.
- It supports a RMI server mode to enhance performance if multiple calls are needed
- It supports the RMI client mode to delegate requests to the RMI server portion.
Related posts
WorkItemCommandLine Summary
The WorkItemCommandLine – in short WCL – works on Windows and Unix clients. It requires a JDK and the Plain Java Client Libraries to be installed. Please note, I had issues running the Plain Java Client Libraries with just a JRE. You can try to use a JRE, if you like.
It currently allows to
- Create work items
- Update work items
- Show the attributes ID’s available for a work item type in a project area
The WCL allows to set and update all available attribute types (I am aware of) in RTC 4.x up to 5.0.2.
- String based attributes
- Number based attributes
- Enumeration and Enumeration List based attributes
- Tag based attributes
- Typed and untyped Item type attributes
- Typed and untyped ItemList type attributes
- ……
This works for built in attributes as well as for custom attributes.
In addition to these attribute types various not attribute based work item values can be modified:
- Subscription
- Comments
- Approvals
- Links to work items
- CLM links to work items
- CLM links to Requirements Management and Test artifacts and to SCM change sets
- Links from build results
- Attachments can be uploaded
- Trigger a workflow action
This should be sufficient for most of the automation needs, especially during builds.
The WCL supports the following operations modes on work item attributes:
- set – set the value of the attribute, overwriting or deleting existing information
- add – add values or data to the attribute
- remove – delete values or data from the attribute
- default – dependent on the type of the attribute set the value or add values
The WCL supports RMI where the WCL runs as a RMI server and WCL can delegate calls to that server to have them processed. This only requires starting the team platform once and saves several seconds in subsequent calls.
License
The post contains published code, so our lawyers reminded me to state that the code in this post is derived from examples from Jazz.net as well as the RTC SDK. The usage of code from that example source code is governed by this license. Therefore this code is governed by this license. I found a section relevant to source code at the and of the license.
Please also remember, as stated in the disclaimer, that this code comes with the usual lack of promise or guarantee.
On the other hand, you have the code and are able to add your own code to it. It would be nice to know what you did and how, if you do so.
Just Starting With Extending RTC?
If you just get started with extending Rational Team Concert, or create API based automation, start with the post Learning To Fly: Getting Started with the RTC Java API’s and follow the linked resources.
You should be able to use the following code in this environment and get your own automation or extension working.
Download
You can download the latest version here:
Setup
Download the packaged executable application. The file is compressed and will be named like wcl-Vx-YYYYMMDD.zip. The x represents the version number and is followed by the date it was created.
If you have installed an RTC API development environment following the RTC Extensions workshop and this post, you have all else that is needed and can use the installs folder of your extension development install, for example C:\RTC401Dev\installs.
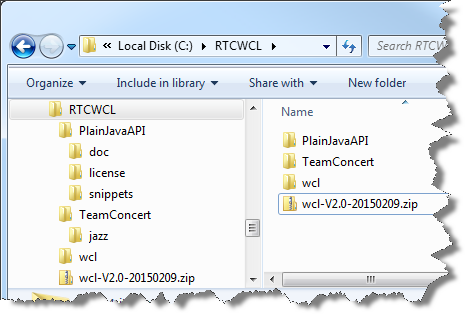
Extract the file e.g. using 7Zip to a folder, for example C:\RTCWCL (or C:\RTC401Dev\installs).
The destination folder should now contain a folder wcl.
If you don’t have an extension development environment set up, download and install the Plain Java Client Libraries for your version of RTC. Open the All Downloads tab of the RTC version you are interested in. For example https://jazz.net/downloads/rational-team-concert/releases/4.0.1?p=allDownloads and scroll down to the Plain .zip Files section.
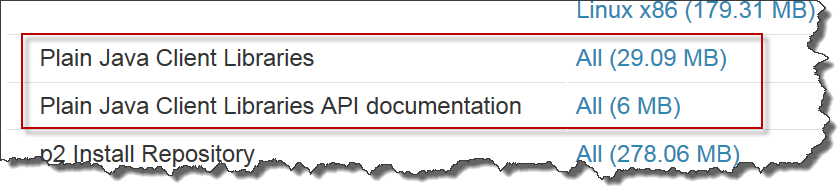 Download the Plain Java Client Libraries file.
Use 7Zip and unzip the Plain Java client Libraries download file (for example named RTC-Client-plainJavaLib-4.0.1.zip). Use 7Zips Extract Files command and provide the extraction Path C:\RTCWCL\PlainJavaAPI .
If you don’t have an extension development environment set up, download and install a Java JDK. If you have the Rational Team Concert client installed a compatible JDK is available in the install location e.g. TeamConcert\jazz\client\eclipse\jdk. The easiest way is to download the zip version of the Rational Team concert Client and extracting it to C:\RTCWCL\TeamConcert.
The folder should now look similar to this image.

Adjusting the Scripts to the Environment
If you downloaded a different JDK or have the RTC Eclipse client installed in a different location, follow the next steps to adjust the WCL to the different paths.
Open the folder created when extracting the WCL for example C:\RTCWCL\wcl. The folder contains the script files
- wcl.bat – for Windows clients
- wcl.sh – for client with Unix/*ux operating systems such as Linux
- rmi_no.policy – a RMI policy file
- README.txt – the online help printed in a file
Open the files relevant for your operating system. They should look similar to this:

The scripts assume an install structure where the JDK and the Plain Java Client Libraries are installed like in the image before. If your setup uses different paths, adjust then according to your setup. The scripts for usage with RMI only add a statement to the rmi_no.policy file.
On Unix operating systems chmod the shell scripts so that they are executable and the RMI policy is readable.
You should now be able to run the WorkItemCommandLine.
In order to allow RMI to work, WCL requires a policy file. Modify the file rmi_no.policy to your requirements and make sure it is in the same wcl folder on the server and the client. Make sure the policy file it is readable for the user that runs WCL.
Test the Environment
Open a shell or cmd window. change the directory to where you extracted WCL for example C:\RTCWCL\wcl. Type wcl and run the WorkItemCommandLine. The command should be executed and print help content like below.
 If this does not happen, make sure the paths are set correctly and the JDK is compatible.
Please note, because the version 2.0 supports so much more, the help is very long and the windows shell can cut it off. To avoid this, you can
- Redirect the output into a file for example by typing wcl>wcl_help.txt
- Change the console setting to increase the size and buffer using mode con: lines=1100 cols=150
The README.txt is provided as help for convenience.
The Syntax of WCL
WCL uses the following syntax:
wcl – {/} {[:]=}
Where , at this time, can be
- create
- update
- printtypeattributes
The commands have their own requirements for base parameters such as repository URL, users, password and the like.
Switches
WCL provides several switches that influence the behavior. Some switches are command specific, others are general. Available values for are:
- ignoreErrors allows to successfully perform the create and update command if minor errors happen. Errors covered are for example if an optional attribute or its value was not found. If the flag is provided, WCL will continue to perform the next operations and print the error. If the flag is not provided any error will cause the operation to fail.
- enableDeleteAttachment enables deletion of attachments using the set or the remove mode.
- enableDeleteApprovals enables deletion of approvals using the set or the remove mode.
- rmiServer is used to start the RMI server, see the RMI section below.
- rmiClient is used to run the Workitem Command Line against a RMI server instead of processing the command itself. See the RMI section below
Parameters
Values for are usually the ID of a work item attribute. The WCL defines various pseudo attribute names, typically prefixed with an @ e.g. to create links and upload files as attachment. The reason for the prefix is that RTC does not allow to start attribute ID’s with special characters and this makes it impossible to define custom attributes with conflicting names.
The parameter sections = must not have spaces in the or in the or before or after the =. The value of , or the whole term can be enclosed in quotation marks “.
Parameter and value example:
projectArea=”JKE Banking (Change Management)”
Each parameter can only be used once in the command line. In some cases like attachment uploads a special section needs to be added in the parameter to allow for multiple specifications in one call.
Multiple parameter example, ‘_2’ is used to make the second parameter unique:
@attachFile:add="./Test.txt:Some Description:text/plain:UTF-8" @attachFile_2:add="./Test.txt:Some Description:text/plain:UTF-8"
The WCL also has an alias mechanism built in, that allows to map different external names for attributes to the internal representation. Currently the names of the AttributeCustomization described here are built in. This allows, for example, to use FOUND_IN=”Sprint 2 Development” instead of foundIn=”Sprint 2 Development”. You can add your own aliases if needed.
Values
The s are specified by a string. Parameter values are usually the display value of elements (enumerations) or composed of display values of the path to this item (category, iterations, process areas). For example setting an enumeration attribute would use the display name “High”, instead of the literal ID. This makes it easier to use. In some cases e.g. for links, subscriber lists and other user lists, it is necessary to specify the ID of the element instead of the display name.
Value examples
- For enumeration based attributes use the display value for the enumeration literal:
internalPriority=High
- For HTML and string based attributes use a string. HTML types like summary, description, comment and HTML support the syntax below:
description=”Plain text
bold text
italic text
External RSJazz Link
User link to @ralph
Work Item link to Defect 3
“
- For Wiki and multi line text attributes use
or \n for line breaks and check the syntax in the wiki editor. The full description for the Wiki Syntax can be found here. Example for a Wiki entry:
custom.wiki=”
=Heading1Plain text\n==Heading 2\n\nNormal Text **bold text**
**bold text**
//Italics//”
- For work item type, owner and some other attributes use the object ID:
workItemType=task
owner=tanuj
- Use the display name for simple attributes or the path composed out of the display names for hierarchical attributes;
category=JKE/BRN
foundIn=”Sprint 2 Development”
target=”Main Development/Release 1.0/Sprint 3″
custom.process.area=”JKE Banking (Change Management)/Release Engineering”
- Dates have to be specified in the Java SimpleDateFormat notation:
dueDate=”2015/02/01 12:30:00 GMT+01:00″
- Duration values are specified in milliseconds:
duration=1800000 correctedEstimate=3600000 timeSpent=60000Since version 3.2 the value can also be specified in hours and minutes
timeSpent=“3 hours 3 minutes” or timeSpent=“3 hours” or timeSpent=“3 minutes”
Lists
Work item attribute values of List with a specified item type such as userList. Use the separator ‘,‘ like in “value1,value2,…,valueN” to separate values.
Example user list: custom.user.list:add=”deb,al,bob,tanuj”
Work item attributes with an general attribute value type such as Item or itemList require encoding to locate the items. The format is: custom.item.list=value
Where value has the form: {,}
Each having the form : with no spaces allowed in the value list.
Available values for and examples for Item and itemList attribute values:
- ProjectArea – specified by its name.
Example: “ProjectArea:JKE Banking (Change Management)”
- TeamArea – specified by its name path from the project area to the team area.
Example: “TeamArea:JKE Banking (Change Management)/Release Engineering”
- ProcessArea – specified by the name path from the project area to the process area.
Example: “ProcessArea:JKE Banking (Change Management)/Business Recovery Matters”
- Category – specified by the category path.
Example: “Category:JKE/BRM”
- User – specified by the users user id.
Example: “User:tanuj”
- Iteration – specified by the iterations name path (including the development line name).
Example: “Iteration:Main Development/Release 1.0/Sprint 3”
- WorkItem – specified by the work items id.
Example: “WorkItem:20”
- SCMComponent – specified by the Jazz SCM components display name.
Example: “SCMComponent:Build”
Modes
Modes allow different types of changes to attributes such as add values, append text or remove and set other data. The mode is specified using this syntax:
[:]=
Supported values for are default (no mode specified), add, set and remove.
If no mode is specified, the default mode for the parameter is used.
- Example for default mode: summary=”This is a summary.”.
- Example for add mode: summary:add=” Add this to the summary.”.
- Example for set mode: summary:set=”Overwite the existing summary with this text.”.
- Example for remove mode: custom.enumeration.list:remove=$,Unassigned.
Which modes are supported and their behavior depends on the attributes type.
- Single value attributes typically support default and set mode, but not add and remove mode.
- Default mode for single value attributes is set the value.
- Multiple value attributes, such as lists and links, typically support default, add, set and remove mode.
- Default mode for multiple value attributes is add, which adds the value(s).
- Set mode for multiple value attributes removes the old values and then adds the new value(s).
- Remove mode for multiple value attributes removes the specified values that can be found.
- String values such as HTML, Summary, Wiki type attributes support default (same behavior as set mode), set and add mode.
The Print Type Attributes Command to get the Attribute ID’s and Types
To set work item attributes, WCL needs the ID of the attribute. You can look up the ID of an attribute in the process configuration. The command printtypeattributes prints the attribute ID’s for the built-in and for the custom attributes of a work item type in a project area. The command requires, in addition to the repository URL, the user and password, at least the project area and the work item type to look up. Syntax and required parameters:
wcl -printtypeattributes repository=RepositoryURI user=userID password=password projectArea=ProjectAreaName workItemType=WorkItemTypeID {parameter[:mode]=value}
Example
wcl -printtypeattributes repository="https://clm.example.com:9443/ccm" user=ralph password=ralph projectArea="JKE Banking (Change Management)" workItemType=task
Please note, for the built in attributes this returns an internal ID that might not show up if you look into the process configuration. You can use the ID’s you find there too, the API should translate them correctly.
The Create Command
The command create can be used to create a new work item and set its attributes.
The command requires, in addition to the repository URL, the user and password, at least the project area and the work item type to create. Please note, if the process specifies additional required attributes, these need to be provided as well, otherwise the creation and save operation will fail. Syntax and required parameters:
wcl -create repository=RepositoryURI user=userID password=password projectArea=ProjectAreaName workItemType=WorkItemTypeID {parameter[:mode]=value}
Here an example for creating a work item.
wcl -create /ignoreErrors repository="https://clm.example.com:9443/ccm" user=ralph password=ralph projectArea="JKE Banking (Change Management)" workItemType=task summary="New Item" category=JKE owner=ralph
The command will report back the ID of the newly created work item if the operation was successful.
The Update Command
The command update can be used to update a work items attributes.
The command requires, in addition to the repository URL, the user and password, at least the ID of the work item to update. Syntax and required parameters:
wcl -update repository=RepositoryURI user=userID password=password id=workItemID {parameter[:mode]=value}
Please note, if the process specifies additional required attributes, these need to be provided as well, otherwise the save operation will fail. This can be relevant if the state of a work item is changed.
Here is an example where a work item gets heavily updated:
wcl -update /ignoreErrors repository="https://clm.example.com:9443/ccm" user=ralph password=ralph id=111 SUMMARY="New summary" FOUND_IN="Sprint 2 Development" owner=ralph target="Main Development/Release 1.0/Sprint 3" internalSeverity=Major foundIn="Sprint 2 Development" internalPriority=High attachFile="./Test.txt:Some Description:text/plain:UTF-8" internalApprovals="approval:Please Approve:ralph,deb" internalSubscriptions=al,ralph,deb internalState="In Progress" internalTags="test1,test2" custom.duration=1800000 custom.boolean=true custom.contributor=al custom.contributor.list=al,deb,tanuj custom.decimal=1500200 custom.integer=234 custom.long=567 custom.tag=tag1,tag2 custom.timestamp="2014/12/31 12:30:00 GMT+01:00" custom.wiki="My Wiki" custom.projectarea.list="JKE Banking (Change Management)" custom.project.area="JKE Banking (Change Management)" custom.teamarea.list="JKE Banking (Change Management)/Business Recovery Matters,JKE Banking (Change Management)/Release Engineering" custom.team.area="JKE Banking (Change Management)/Release Engineering" custom.process.area="JKE Banking (Change Management)/Release Engineering" custom.processarea.list="JKE Banking (Change Management)/Business Recovery Matters,JKE Banking (Change Management)/Release Engineering" custom.workitem=3 custom.workitem.list=9,20,7
The command will report back the ID of the updated work item if the operation was successful.
Special Attributes and not Attribute Based Work Item Modifications
Some attribute types need special treatment or require more complex values to be specified. Some have other limitations and considerations. These are explained below.
For Item List attributes the items need to be provided as a list of items with the separator “,”. As an example a work item attribute of type TeamAreaList would be set like this:
custom.teamarea.list="JKE Banking (Change Management)/Business Recovery Matters,JKE Banking (Change Management)/Release Engineering"
Please note, that this implies that the separator ‘,’ can not be part of any of the display names of the elements.
Special Properties Handling
Some special properties are protected from changing.
- Work Item ID: can not be changed
- Project Area: parameter “projectArea” can only be specified when creating the work item. It can not be set to a different value later.
There might be other limitations imposed by the process e.g. against changing the creator of a work item.
Comments
The parameter “internalComments” can be used to add a comment. This pseudo attribute only supports the default and add mode. Removing comments is not supported in the WCL. Comments support the HTML syntax mentioned above allowing to create web links, user and work item links. Example:
internalComments=””Plain Text
Bold Text
Italic Text
External RSJazz Link
@ralph
Defect 3
”
User, User Lists
For attributes that require users or user lists the value of the property needs to specify the user or the list of users with the ID. Examples:
internalSubscriptions=al,ralph,deb custom.contributor.list=al,deb,tanuj
Subscriptions
The parameter internalSubscriptions can be used to subscribe a list of users to a work item using their user ID’s. The syntax is:
internalSubscriptions[:mode]={,}
This attribute supports the modes default (same as) add, set and remove mode.
- Example set specific users (removing all others):
internalSubscriptions:set=al,tammy
- Example add users:
internalSubscriptions:add=deb,tanuj,bob
- Example remove users:
internalSubscriptions:remove=sally,bob
Example:
wcl -update repository="https://clm.example.com:9443/ccm" user=ralph password=ralph id=111 internalSubscriptions:add=al,ralph,deb
Tags
The parameter internalTags can be used to add a list of tags. This attribute supports the modes default (same as) add, set and remove. The syntax is:
internalTags[:] ={,}
Example to set the tag list of the work item to two tags test1 and test2, removing all other tags:
wcl -update /ignoreErrors repository="https://clm.example.com:9443/ccm" user=ralph password=ralph id=111 internalTags:set="test1,test2" custom.tags="MyTag"
Approvals
The parameter internalApprovals can be used to add approvals and approvers. Approvals only support the modes default (same as) add, set and remove. Set and remove only affects approvals of the same approval type. For example, mode set for approval type review will only remove existing reviews. The syntax is:
internalApprovals[][:mode]=”:{: {,userIDn}}”
The name of the approval to be created is required. The Approver ID list is optional and it is possible to add one or more approver userID’s. Example without approvers
internalApprovals:add=”verification:Please Verify”
The section can be left out if only one approval is specified. If multiple approvals are specified, it needs to be a unique string. In the example below “_1” and “_2” make the parameters uniquely distinguishable:
internalApprovals_1:add="approval:Please approve:ralph,deb" internalApprovals_2:add="verification:Please verify:tanuj"
Available values for are
- approval – to create an approval record
- review – to create a review record
- verification – to create a verification record
Examples:
wcl -update /ignoreErrors repository="https://clm.example.com:9443/ccm" user=ralph password=ralph id=111  internalApprovals="approval:Please approve:ralph,deb"
wcl -update /ignoreErrors repository="https://clm.example.com:9443/ccm" user=ralph password=ralph id=111  internalApprovals="review:Please review:deb"
wcl -update /ignoreErrors repository="https://clm.example.com:9443/ccm" user=ralph password=ralph id=111  internalApprovals="verification:Please verify:tanuj"
wcl -update /ignoreErrors repository="https://clm.example.com:9443/ccm" user=ralph password=ralph id=111  internalApprovals="verification:We need a verification"
The implementation of the modes set and remove is as follows. Removal of approvals by either set or remove mode must be explicitly enabled using the switch enableDeleteApprovals, otherwise the command will fail if one of these modes is used with a internalApproval parameter.
The mode set removes all existing approvals of the specified and then adds a new approval of this type as specified.
The mode remove searches for all approvals of the specified and deletes those found with a matching the Approval Name.
Workflow and State Change
The WCL allows to set the state of the work item in different ways. Please note, the state is reached after the save operation, if it can be set.
A pseudo parameter @workflowAction can be used to set a workflow action to change the work item state when saving. This attribute supports only the modes default and set.
When using this pseudo parameter WCL looks up the current state of the work item, tries to find a workflow action with the given display name. If one exists, it sets the save operation to trigger this action when the work item gets saved.
wcl -update /ignoreErrors repository="https://clm.example.com:9443/ccm" user=ralph password=ralph id=115 @workflowAction="Reopen"
Another example: @workflowAction=”Stop working” . Please note, the workflow change is governed by the RTC process engine. If RTC prevents the state change, the operation will fail on save. It is impossible to detect this prior to the save.
The parameter internalState representing the attribute to read the state can be used to set the state. The parameter only implements the modes default and set, which act equal. The syntax is:
internalState=[:]StateName
Where is the value forceState.
Without the forceFlag provided WCL acts similar to using the pseudo parameter @workflowAction. It looks up the current state, and checks if any workflow action from the current state exists, that leads to the specified target state. If there is one, it sets the workflow action to be performed during the save operation. If there is no workflow action the state change is not performed.
Example with a target state:
wcl -update /ignoreErrors repository="https://clm.example.com:9443/ccm" user=ralph password=ralph id=111 internalState="In Progress"
If the flag forceState: is added before the target state, WCL uses a deprecated API to forcefully set the state. Please note, that this does not trigger a workflow action and does also not trigger operational behavior. It should be used with caution. If the target state exists in the workflow of the work item type, the state is set, regardless if it is reachable directly or using multiple workflow actions or even if it is not reachable by the workflow at all.
Example with a target state forcefully set:
wcl -update /ignoreErrors repository="https://clm.example.com:9443/ccm" user=ralph password=ralph id=111 internalState="forceState:New"
State Resolution
The resolution of a work item can be set using the attribute internalResulution. The parameter only implements the modes default and set, which act equal. The parameter value provided is the display value of the resolution.
Example:
wcl -update /ignoreErrors repository="https://clm.example.com:9443/ccm" user=ralph password=ralph id=111 internalResolution=Invalid
Attachments
The WCL provides a capability to manipulate work item attachments. The pseudo parameter @attachFile can be used to upload and remove attachments. This attribute supports the modes default (same as) add, set and remove. The syntax format is:
@attachFile[]=”SomeFilePath:Some Description::”
Where:
has one of the following values:
- text/plain
- application/unknown
- application/xml
has one of the following values:
- UTF-8
- UTF-16LE
- UTF-16BE
- us-ascii.
As above, must be unique for multiple attachments in one command. If only one attachment is uploaded, the can be left empty.
The file must be accessible and in the correct encoding for the operation to perform correctly.
As above for approvals the mode set is implemented to remove all attachments first and then add the new attachment. The mode remove is implemented to search for an attachment with the same file path and description and remove it if it is available.
Some examples:
-update /ignoreErrors  repository="https://clm.example.com:9443/ccm" user=ralph password=ralph id=150 @attachFile="./Test.txt:Some Description:text/plain:UTF-8" @attachFile_2:add="./Test.txt:Some Description:text/plain:UTF-8"
-update /ignoreErrors /enableDeleteAttachment repository="https://clm.example.com:9443/ccm" user=ralph password=ralph id=150 @attachFile:remove="./Test.txt:Some Description:text/plain:UTF-8"
-update /ignoreErrors /enableDeleteAttachment repository="https://clm.example.com:9443/ccm" user=ralph password=ralph id=150 @attachFile:set="./Test.txt:Some Description:text/plain:UTF-8"
Duration Types
In duration types provide the value in milliseconds. For example
custom.duration=1800000
Timestamps
Timestamps need to be provided as string in the SimpleDateFormat using the format pattern “yyyy/MM/dd hh:mm:ss z”. For example:
custom.timestamp="2014/12/31 12:30:00 GMT+01:00"
Links
The pseudo parameter @link_ can be used to link the current work item to other objects. The syntax is
@link_={|}
Where specifies the type of link to be created, for example reportAgainstBuild and the values on the right side specifies one target object or a list of target objects to be linked to the current work item using the link type. The separator used here is the pipe symbol ‘|‘. The reason is, that the links can be URI’s and the naming conventions are problematic. It is hard to find a character that is likely not to appear in that string. Not everyone sticks to the specification and the pipe symbol seemed to be appropriate.
The parameter supports the modes default (same as) add, set and remove. Similar to other implementations above the mode set removes all links of the specified before creating the new links. The mode remove tries to find an existing link of the with the same target and removes this link, if it exists.
There are different ways the links get created, dependent on what link type and what target elements are specified.
wcl -update /ignoreErrors repository="https://clm.example.com:9443/ccm" user=ralph password=ralph id=111 @link_parent=1 @link_blocks=2|3 @link_reportAgainstBuild=P20141208-1713|@_IjluoH-oEeSHhcw_WFU6CQ|P20141208-1713
wcl -update /ignoreErrors repository="https://clm.example.com:9443/ccm" user=ralph password=ralph id=150 @link_tracks_workitem="https://clm.example.com:9443/ccm/resource/itemName/com.ibm.team.workitem.WorkItem/80|4|5" @link_affected_by_defect=123 @link_affects_plan_item=20|30 @link_related_change_management=4|7
wcl -update /ignoreErrors repository="https://clm.example.com:9443/ccm" user=ralph password=ralph id=150 @link_related_artifact="https://rsjazz.wordpress.com/"  @link_affects_requirement="https://clm.example.com:9443/rm/resources/_6c96bedb0e9a490494273eefc6e1f7c5" @link_tested_by_test_case="https://clm.example.com:9443/qm/oslc_qm/contexts/_6u2zcH-nEeSJhuhJc8_drg/resources/com.ibm.rqm.planning.VersionedTestCase/_N6HHYX-oEeSJhuhJc8_drg"
Work Item Links – links between this work item and another work item within the same repository
The following are supported from the current work item to a target work item. These links are local to the repository this work item belongs to. This means the value list is a list of work item numbers separated by pipe ‘|’ symbols.
- copied
- copied_from
- successor
- blocks
- resolves
- mention
- predecessor
- parent
- duplicate_of
- duplicate
- related
- depends_on
- child
- resolved_by
Please note, that if you try to create a link that can not be supported on the target end, save errors will show up. As an example if a target is set to be the child of this work item and that work item has already some other work item set as parent, the save will fail.
Format example:
@link_related=123|80
CLM Work Item Links – CLM links between this work item and another work item within the same or across repository boundaries
The following are supported from the current work item to a target work item. These links can be local to the repository this work item belongs to, or to work items in another repository. The parameter value is a list of one or more work items specified by their ID (if they are in the same repository) or by their Item URI separated by pipe ‘|’ symbols. To understand the URI format, look at an existing link in the RTC web UI and inspect the link target. Wrong target formats can lead to corrupt data.
- affects_plan_item
- tracks_workitem
- related_change_management
- affected_by_defect
Format example:
@link_tracks_workitem="https://clm.example.com:9443/ccm/resource/itemName/com.ibm.team.workitem.WorkItem/80|120|150"
CLM URI Links – CLM links between this work item and another item, described by a valid URI, in a different application or repository.
The following are supported from the current work item to a target item such as a requirement, test case or test result. These links are across repositories and applications. The parameter value is a list of one or more items, that support this link type, specified by their Item URI separated by pipe ‘|’ symbols. To understand the URI format, look at an existing link in the RTC web UI and inspect the link target. Wrong target formats can lead to corrupt data.
- related_test_plan
- affects_requirement
- tested_by_test_case
- blocks_test_execution
- implements_requirement
- affects_execution_result
- related_artifact
- related_test_case
- elaborated_by
- tracks_requirement
- scm_tracks_scm_changes
- related_execution_record
Format example:
@link_affects_requirement=https://clm.example.com:9443/rm/resources/_848a30e315524069854f55e1d35a402d|https://clm.example.com:9443/rm/resources/_6c96bedb0e9a490494273eefc6e1f7c5
Please note that the link “Associate Work Item” between a change set and the work item can only be created by the SCM component. The link created here is the looser CLM link. Create the work item change set link using the SCM command line.
Build result Links – Links from a work item to a build result in the same repository.
The following are supported from the current work item to a build result. These links are within a repository. The parameter value is a list of one or more build results. The Build result can be specified by its Build Result Label or by the Build Result ID separated by pipe ‘|’ symbols. The parameter value is a list of one or more Buildresults specified by their ID or their label. The WCL distinguishes between build result ID and Build Label, add @ as prefix to the Build Result Label.
- reportAgainstBuild
- includedInBuild
Please note that the link includedBuild should only be created by the SCM system from the snapshot, it is only available for completeness.
Format example: @link_reportAgainstBuild=@_IjluoH-oEeSHhcw_WFU6CQ|P20141208-1713
RMI Modes
The WCL can be run as a local Java application. This is fine if only one work item needs to be modified. However, since each call requires the RTC API TeamPlatform to be started and the process takes around 6 seconds, this does not scale for a lot of calls, it is possible to run the work item command line in a RMI server mode on the same or a different machine. This server waits for incoming requests and only needs to initialize the API once.
Called from another RMI client process, the server can process requests very fast and return the result. This can be achieved with two switches to set up the server and to delegate the call to the server.
The syntax for the switches is
/[=]
Where is one of the following values.
By default the RMI Name used to connect to the RMI server is “//localhost/RemoteWorkitemCommandLineServer” using a default port of 1099 for the RMI registry.
It is possible to define a different name and port by providing a value. The example below starts WCL as RMI server with name “//clm.example.com/WorkItemCommandLine” with a RMI registry listening to port 1199:
wcl /rmiServer=//clm.example.com:1199/WorkItemCommandLine
By providing the same naming in the rmiClient switch for the requested command, the connection can be established.
wcl -create /rmiClient=//clm.example.com:1199/WorkItemCommandLine /ignoreErrors repository="https://clm.example.com:9443/ccm" user=ralph password=ralph projectArea="JKE Banking (Change Management)" workItemType=task summary="New Item" category=JKE owner=ralph target="Main Development/Release 1.0/Sprint 3" internalSeverity=Major foundIn="Sprint 2 Development" internalPriority=High creator=myadmin
If the WCL is started as RMI server, the process will not terminate, but RMI will listen to requests and delegate them to that process. It is not necessary to provide a command or any other input values, when starting the WCL in RMI server mode as they will be ignored. RMI will make the process available and call it to service commands requested by other client instances that are started with the additional switch /rmiClient added to the command that is supposed to be performed.
Please note, that the server and the client require a policy file for the security manager. A policy file rmi_no.policy is shipped with the download. The policy file opens up everything.
So please rename and modify the file to your requirements
To enable security Java requires to call the class with the additional vm argument -Djava.security.policy=rmi_no.policy where the policy file name must exist and be readable on the server and on the client side.
Predefined Attribute ID Aliases
Aliases for attribute ID’s have been coded into the application. You can add your own aliases in the mapping table.
Available mappings:
RESOLUTION_DATE: resolutionDate
FOUND_IN: foundIn
PRIORITY: internalPriority
RESOLVER: resolver
SUMMARY: summary
ESTIMATE: duration
MODIFIED: modified
FILED_AGAINST: category
CREATOR: creator
RESOLUTION: internalResolution
MODIFIED_BY: modifiedBy
PLANNED_FOR: target
CREATION_DATE: creationDate
STATE: internalState
PROJECT_AREA: projectArea
OWNER: owner
TAGS: internalTags
DUE_DATE: dueDate
TYPE: workItemType
ID: id
TIME_SPENT: timeSpent
DESCRIPTION: description
SEVERITY: internalSeverity
CORRECTED_ESTIMATE: correctedEstimate
Summary
This WorkItem Command Line should allow for most of the automation needs when creating work items. In addition it is a nice resource for the RTC work Item API.
In later posts I will explain the code for users that are interested in adding their own implementation.
As always, I hope the post is an inspiration and helps someone out there to save some time. If you are just starting to explore extending RTC, please have a look at the hints in the other posts in this blog on how to get started.

 The import works as follows.
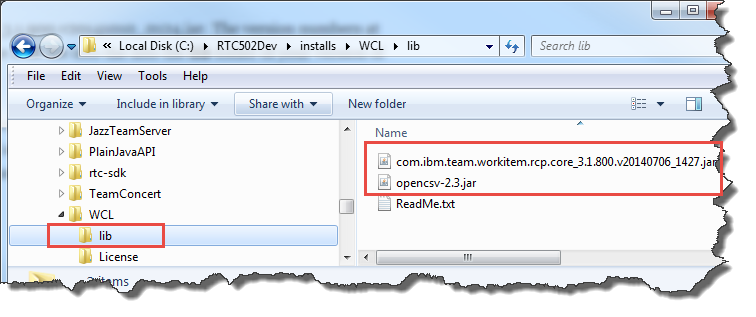 If you have imported the Eclipse project for WCL open Configure Build Path and create a user library named openCSV and add the Open CSV library opencsv-2.3.jar. Create a user library named rtcmapping and add the com.ibm.team.workitem.rcp.core library you just copied to it.
 Code Changes
 Summary